background image

Here are the descriptions of all setting items: 
 

Item 

Description 

Channel 

Select the channel number you wish to set. 

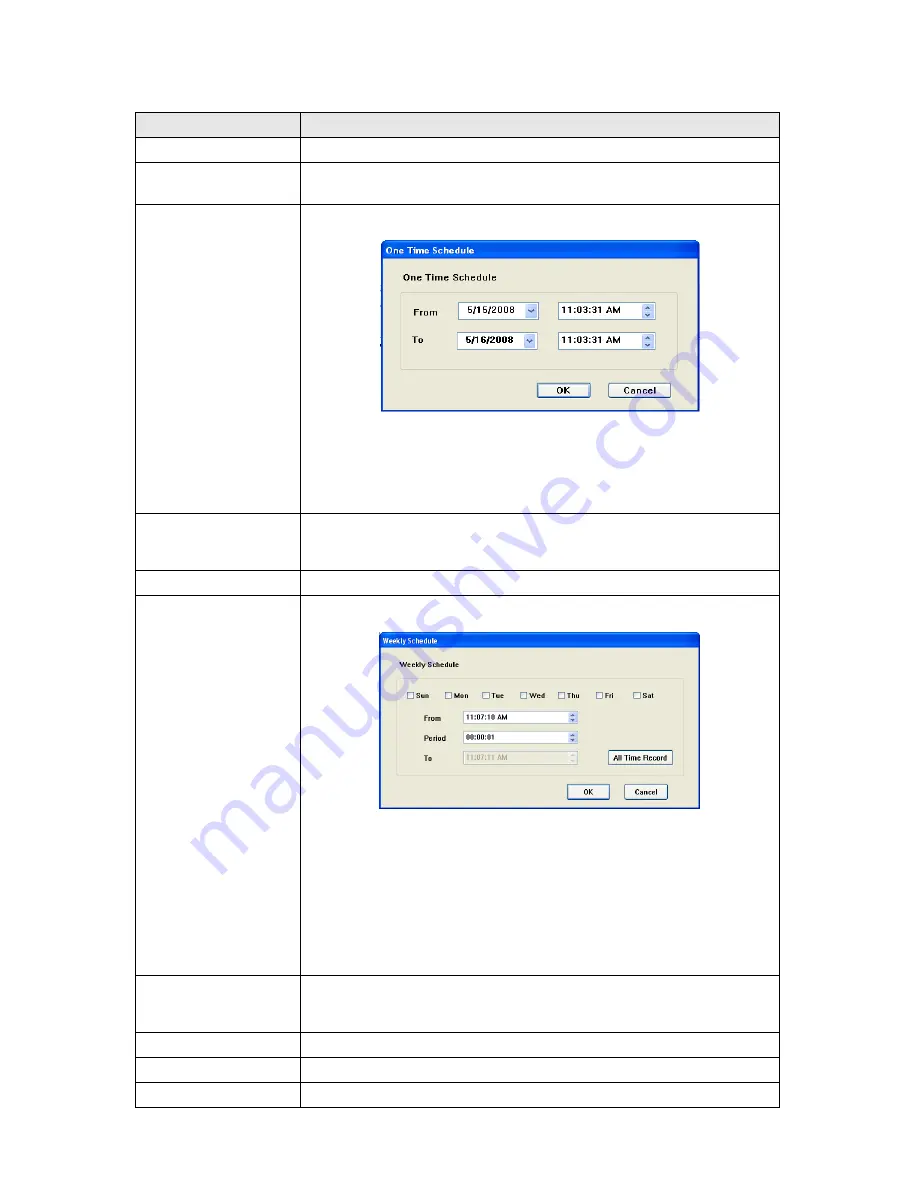
One Time Schedules 

You can specify the one-time schedule for selected camera; this schedule 
will be executed once only.   

New 

(One Time Schedules)

Click this button and a new window will appear: 


Please specify the time duration of this one-time schedule (the date and 
time of ‘From’ and ‘To’), then click ‘OK’ to save settings. 
 
Please note you must set a schedule that will be happened in the future, 
you can not set a schedule in the past. 

Edit 

You can modify a scheduled recording item. Select a schedule in ‘One Time 
Schedules’ list, and click ‘Edit’ button to edit the start and end time of this 
schedule. 

Delete 

Delete a selected schedule item. 

New 

(Weekly Schedules) 

Click this button and a new window will appear: 


You can define recording schedule that will be executed at the specified 
time of certain weekday(s) in a week. Please check all weekdays that 
applies, and set the start time in ‘From’ field. You can set the duration of 
video recording in ‘Period’ field (format is HH:MM:SS), and the end time will 
be calculated automatically and displayed in ‘To’ field. You can also click ‘All 
Time Record’ button to define a recording schedule that will be executed 
every weekday, from 12:00:00AM to 11:59:59PM. 
 
Click ‘OK’ to save changes. 

Edit 

You can modify a scheduled recording item. Select a schedule in ‘One Time 
Schedules’ list, and click ‘Edit’ button to edit the start and end time of this 
schedule. 

Delete 

Delete a selected schedule item. 

OK 

Save settings in this tab. 

Cancel 

Discard all settings in this tab. 


52

Интернет-магазин TELECAMERA.RU

Summary of Contents for IC-7000PTn

Page 1: ...Mechanical Pan Tilt IP Camera User Manual 1 TELECAMERA RU...

Page 2: ...S 27 2 3 4 UPnP 28 2 3 5 Login Free 29 2 4 1 Motion Detection 31 2 5 1 Camera Information 36 2 5 2 Date Time Setting 37 2 5 3 Utilities 37 2 5 4 Status 39 2 6 Account 43 2 7 SDHC 42 2 7 2 Space Alarm...

Page 3: ...3 9 Snapshot 66 3 10 Recording 66 3 11 Video Playback 67 Chapter IV Appendix 68 4 1 Specification 68 4 2 Troubleshooting 69 3 TELECAMERA RU...

Page 4: ...o supports wireless network that is you can link to this camera wirelessly You only have to provide this IP camera with 12V power by the power adapter that comes with the product package and you don t...

Page 5: ...yption WEP WPA Supports DHCP and PPPoE protocol you can also assign a fixed IP address to the camera also Supports Dynamic DNS used to allocate the IP camera s Internet address when the ISP you re usi...

Page 6: ...C7000PTn Power LED Audio LED LAN LED WLAN IC7000PT Power LED Audio LED ACT LED LAN z Power LED Indicates power status z Audio LED Indicates Audio status z LAN LED Indicates LAN activity z ACT LED Indi...

Page 7: ...z Power Connector Connects to A C power adapter z SD Card Slot Accepts SD SD HC memory card for image video storage z WPS Button click the bottom on IP Cam and click it on the AP you want to connect f...

Page 8: ...Side View Reset Button Reset Button Press the button with pen nib and hold for 5 seconds to reset the camera settings to factory default value 8 TELECAMERA RU...

Page 9: ...Bottom View Tripod Connector Tripod Connector Connects to tripod to secure the camera when the camera is not put on a horizontal surface 9 TELECAMERA RU...

Page 10: ...nection from AP and flash speed is once a second WLAN Flash Transferring data via wireless LAN Off Audio function is disabled Volume 0 On Audio function is enabled Audio Flash Two way audio is working...

Page 11: ...ng s missing Connect the Ethernet cable to your local area network and connect the other end to the LAN jack of this IP camera NOTE You can skip this step if you plan to use wireless LAN only 2 Plug t...

Page 12: ...k of this IP camera 4 Place the camera at a secure place and point the camera to the place you wish to monitor If you wish to hang the camera on the ceiling or wall please use the tripod connector loc...

Page 13: ...5 Launch Internet Explorer on your computer and following the instructions given in next section to set the IP camera 13 TELECAMERA RU...

Page 14: ...tings The first menu after you logged onto web management interface is Camera and this is the only menu you can see the real time image from camera You can always back to this menu by clicking Camera...

Page 15: ...thing moving at the place where camera points to you can select a lower image quality to get a higher image refresh rate Video Type Select the video encoding type Available options are MJPEG and MPEG4...

Page 16: ...ight of Snapshot button and you ll be prompted to select a new directory Recording Press this button to record the displaying image as a video file in AVI format and you can play the video file back b...

Page 17: ...pdown menu first 2 To move the camera click the position of labeled text not shown on image on the image to move the camera to the direction You may need to set the Pan Tilt speed to a slower setting...

Page 18: ...ven below Item Description Add Add a new set of grand tour see instructions below Edit Edit a selected grand tour The parameters for an existing grand tour will be recalled and you can modify them Sta...

Page 19: ...preset points from dropdown menu here then click Add to list to add this position to this grand tour When you click Add to list you ll be prompted to set these parameters View Time Define the time yo...

Page 20: ...rk menu of each camera and then you can log onto the web management interface of any camera and select one type of multi camera display You can select one type of multi camera display a One camera vie...

Page 21: ...will be displayed at the top of camera s view When IP and port information is displayed on the top of camera s view indicates the camera is configured You can also click the image to point the camera...

Page 22: ...en click Add new IPCam button to connect to this IP camera and display it s view in camera view If you don t want to add the camera now click Close button and the popup window will be closed When a ca...

Page 23: ...ctivate UPnP function You can access this menu by clicking LAN on the top of web management interface After you selected Network network setting menu will appear There are 5 sub menus available here P...

Page 24: ...ional AV Control Port Specify the port number of video transfer here If you have firewall on your network you need to allow computers on Internet to access this port number of the IP address of IP cam...

Page 25: ...ave any wireless access point but your computer has wireless network card Set to Infrastructure when you have wireless access point and you have computers with wired network connection Available Netwo...

Page 26: ...connect it Channel Select the radio channel you wish to use here When network type is Infrastructure the radio channel is auto selected according to the channel that wireless access point uses You can...

Page 27: ...apply a new account can be found on dyndns org s website The descriptions of every setting in this menu will be given below Item Description Enable DDNS Select Enable to activate Dynamic DNS function...

Page 28: ...descriptions of every setting in this menu will be given below Item Description Enable UPnP Select Enable to activate UPnP function of this IP camera select Disable to disable it Click Apply to save...

Page 29: ...o save settings then other users can access the image by this filename with jpg extension with the camera s IP address as prefix For example if your camera s IP address is 192 168 2 1 and the filename...

Page 30: ...d image and take a snapshot when motion is detected So you can use this camera to keep the safety of the belongings you have To use motion detection click the following link from the top of menu After...

Page 31: ...d Select JPEG and a still picture in JPEG format will be saved and select AVI to save a motion video clip Send snapshot file to FTP Select Enable to send the saved file to appointed FTP server when a...

Page 32: ...nor changes in the image and drag the slide to the left to decrease sensitivity camera will only detect major changes in the image Refresh In case the objects of the image captured by the camera moved...

Page 33: ...dress NOTE Some mail server would reject to deliver the Email from unknown sender it s recommended to input your own Email address here or any other actual one SMTP Authentication Some SMTP server req...

Page 34: ...irectory Please ask FTP server s administrator to know which folder you should use Certain user name may have restrictions and therefore can not place the file in the directory not owned by the user P...

Page 35: ...ng in this menu will be given below Item Description File Name Prefix Specify the filename prefix the texts which will be added before the file sequence number Destination Folder Specify the folder na...

Page 36: ...this IP Camera here This can be used to identify your camera on the network when you have more than one IP camera in the same network Default name begins with IC plus the last 6 characters of the MAC...

Page 37: ...use the time of the computer you re using Example 24 th August 2007 2007 08 24 and PM 9 24 30 21 24 30 If you select NTP Server the camera will get the date and time from NTP Server automatically Tim...

Page 38: ...DRESS OF THE CAMERA WILL RESET TO DEFAULT VALUE 192 168 1 61 Reset to Factory Defaults Clear all settings in the camera Please think again before you do this and then click this button to reset all se...

Page 39: ...2 5 4 Status This menu provides all information about this IP camera like firmware version system uptime date time and network information 39 TELECAMERA RU...

Page 40: ...ey will see the following message informing that they don t have permission to do that This camera supports up to 4 users After you selected Account you ll be prompted to input user account informatio...

Page 41: ...ge temporarily and set to Yes for this user when you want to give the privilege back Update Update the account s user name and password You can input the user name and password for this account again...

Page 42: ...tem Info a sub menu will appear There are 4 sub menus available here Please click the SD card setting you wish to set then refer to instructions given below 2 7 1 Status Here shows the remaining card...

Page 43: ...erver Input the SMTP server address you wish to use to send E mail Sender E Mail Address Input the sender E mail address of the space alarm E mail SMTP Authentication Select Enable if the SMTP server...

Page 44: ...lled you can use your IP camera to safeguard your property Please follow the following instructions to install the surveillance software 1 Double click the setup file located in xxx folder in supplied...

Page 45: ...con for you click all items you need here than click Next to continue 4 Here lists all options you chose in previous steps if everything s correct click Install to start installing procedure or click...

Page 46: ...this window it means the software installing procedure is complete Please click Finish to finish the procedure IP camera surveillance software will start after you click Finish button if you want to...

Page 47: ...ayed here Language Select a language from this dropdown menu to change display language Display layout Change camera image display layout Click a layout icon to change camera display layout There are...

Page 48: ...8 directions in PTZ control ring If the camera you connect support PTZ you can use PTZ control ring to change the direction that camera points to This function is only available for supported cameras...

Page 49: ...sh to connect Please click System configure button and a popup menu will appear Please select Configure Cameras to configure cameras Note If you re prompted by a windows security alert which asks you...

Page 50: ...Name Input the name of camera here Default value is the first 6 bytes of camera s MAC address you can change the name of camera so you can remember the camera s location of purpose easily Model Displa...

Page 51: ...verything s correct you ll see the camera s image in IP camera surveillance software s main menu 3 3 1 2 Schedule Recording In this tab you can setup scheduled video recording so you can record the vi...

Page 52: ...Delete Delete a selected schedule item New Weekly Schedules Click this button and a new window will appear You can define recording schedule that will be executed at the specified time of certain week...

Page 53: ...Description Channel Select the channel number you wish to set Mute Audio Check this box and the IP camera surveillance software will not play the audio captured by this camera Record Video Only Check...

Page 54: ...uration that camera will record when a motion has been detected from dropdown menu in seconds Invoke alarm when motion is triggered Send an alarm when a motion has been detected by the camera Send mai...

Page 55: ...directory in your hard disk Free Recording Space Displays remaining storage space Max Video File Size Defines the maximum file size of every video file When the size of file exceeds this value IP came...

Page 56: ...and you ll be prompted to input the email address Click OK to save changes Edit Select an email address from Recipient E Mail Address box and click Edit to edit the email address Delete Delete select...

Page 57: ...he SMTP account username of your SMTP server here In most cases it s the same with your POP3 username the one you used to receive email Please refer to the setting of your email software or ask your I...

Page 58: ...illance software To set password please use Security tab in General Options menu Here are the descriptions of all setting items Item Description Enable Requires password authentication when this softw...

Page 59: ...3 3 2 4 About This tab shows the version number of the IP camera surveillance software you re using 59 TELECAMERA RU...

Page 60: ...and camera arrangement you can click the icon that presents a specific kind of layout and the video displaying area will change accordingly Layout style 1 1 Camera only Displays the video of 1 camera...

Page 61: ...style 5 9 Cameras Displays the video of up to 9 cameras Layout style 6 10 Cameras Displays the video of up to 10 cameras Layout style 7 13 Cameras Displays the video of up to 13 cameras Layout style...

Page 62: ...s If you want to use all available spaces on your monitor to display surveillance image you can click Full Screen button to switch display mode to full screen mode To exit full screen mode press ESC k...

Page 63: ...figured cameras NOTE If a camera is configured but disconnected it will still be displayed in a scan sequence you ll see nothing and you ll see Disconnected text displayed at the upper left corner of...

Page 64: ...ertain object to see its detail Please select a camera in video displaying area by clicking on its image then click button to see more objects that fall in the scope of camera s view or click to enlar...

Page 65: ...see different places that fall in the scope of camera s view Please select a camera in video displaying area by clicking on its image and then click the directions you wish the camera to move to total...

Page 66: ...You can start video recording of selected camera manually by clicking Start Recording button When recording starts you ll see a message displayed in message displaying box like 1 1 10 00 00 Camera 2...

Page 67: ...deos file that falls in a specific period of time and Motion Search search all videos recorded by motion detection function and falls in a specific period of time Please define the start and end date...

Page 68: ...One RJ 45 port to connect to 10 100Mbps Ethernet Wireless IEEE 802 11b g Wireless Model Only LED Indicator LAN LED Green WLAN LED Amber Power LED Blue HTTP Utility Includes easy to use Viewer Recorde...

Page 69: ...if it s not 30 b Try a lower resolution c If you re connecting this camera from Internet it could be caused by a slow Internet connection and it s not a problem caused by camera However when the netw...

Page 70: ...ng is failed it will be logged and this may give you some clue on how to solve the problem e Change the threshold to a more sensitive setting I heard strange sound when I use pan tilt function a Pleas...

Reviews: