background image

13 


III-3.   

Myedimax.com 

You can use your network camera’s Myedimax.com cloud ID to monitor your 
camera remotely using a web browser from any Internet connection. The 
network camera’s 

green

 power LED 

must

 display 

on

 for this function to work. 


1.


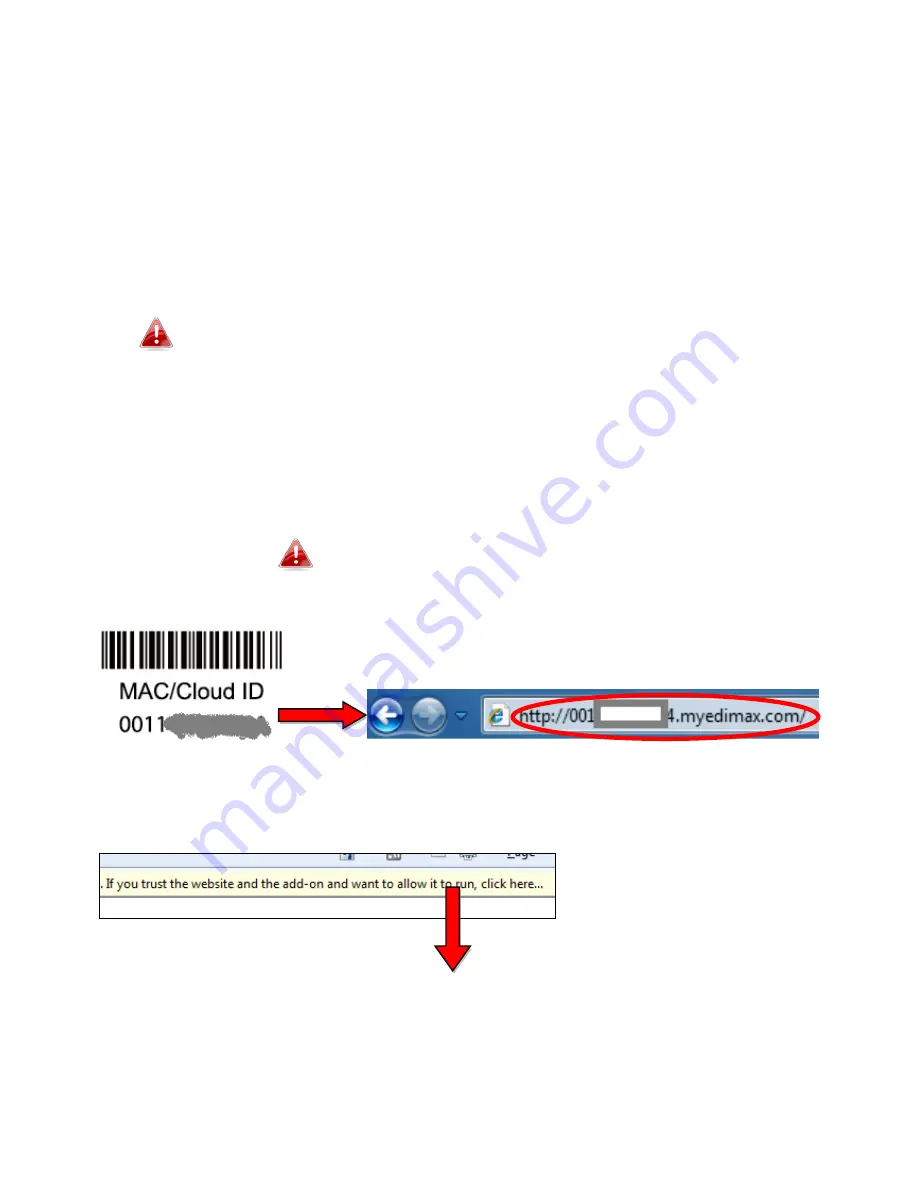
  Identify your network camera’s cloud ID. The cloud ID is displayed on the 
product label on the back of the network camera (see 

I-4.

). 


The cloud ID is a string of 12 characters consisting of numbers 0 – 
9 and letters A – F which is unique to your network camera. 


2.


Enter 

cloudID

.myedimax.com

 into the URL bar of a web browser. 


For example, if your cloud ID is 

001234567890

 then enter 

001234567890

.myedimax.com

 into your web browser. 


Internet Explorer is recommended. 


3.


 You may be prompted to allow a Java add-on to run. Please click the 
message where it says “click here” and then click “Run Add-on”. 


Summary of Contents for IC-3116W

Page 1: ...IC 3116W Quick Installation Guide English 05 2015 v2 0...

Page 2: ...3 I 2 Front Panel 3 I 3 Back Panel 4 I 4 LED Status 4 I 5 Product Label 5 I 6 Reset 5 II Hardware Installation 6 II 1 Mounting Kit 6 II 2 Camera 7 III Camera Setup 8 III 1 EdiView II App 8 III 2 WPS...

Page 3: ...3 I Product Information I 1 Package Contents IC 3116W QIG CD ROM Power Adapter Ethernet Cable Mounting Kit I 2 Front Panel Status LEDs Infrared LEDs Adjustable Lens Light Sensor...

Page 4: ...econd Network camera is starting up OR network camera is not connected to cloud server LAN Green On Network camera is connected to the local network Quick Flashing LAN activity transferring data Slow...

Page 5: ...4 Myedimax com I 6 Reset If you experience problems with your network camera you can reset the camera back to its factory default settings This resets all settings back to default 1 Press and hold the...

Page 6: ...nd requires some assembly 1 Assemble the included camera stand as shown below The camera stand can stand by itself or be mounted to a wall 2 Secure the network camera to the included camera stand usin...

Page 7: ...s power port and to a power supply as shown to the right 2 Wait a moment for the camera to power on The camera green power LED will flash slowly when it s ready Please refer to III Camera Setup to se...

Page 8: ...lly view the camera s live image from any Internet connection and web browser using the cloud ID see III 3 You can also follow III 2 WPS as an alternative method to connect your network camera to your...

Page 9: ...Android users ensure your Android device s Wi Fi is switched on and open the EdiView II app Select your network camera and click OK to continue 4 Android iOS users select your Wi Fi network from the l...

Page 10: ...etup complete screen click the Live icon to continue or wait for a few seconds to continue automatically 6 Setup is complete The camera s LED should display on and green You should see a live stream f...

Page 11: ...is recommended that you change your camera s password Go to More in the bottom right corner and select Settings You can configure your camera s settings and functions using the icons below the live i...

Page 12: ...k the instructions for your wireless router access point for how long you need to hold down its WPS button to activate WPS 2 Within two minutes press the WPS Reset button on the network camera for 2 5...

Page 13: ...he product label on the back of the network camera see I 4 The cloud ID is a string of 12 characters consisting of numbers 0 9 and letters A F which is unique to your network camera 2 Enter cloudID my...

Page 14: ...her security warnings prompts appear please select Run or Allow or similar depending on your browser 4 Enter your camera s password default password 1234 and click OK to see a live stream from your ne...

Page 15: ...t This equipment complies with FCC radiation exposure limits set forth for an uncontrolled environment This equipment should be installed and operated with minimum distance 20cm between the radiator y...

Page 16: ...n Richtlinien 1995 95 EC 2011 65 EC Espa ol El presente equipo cumple los requisitos esenciales de la Directiva 1995 95 EC 2011 65 EC Italiano Questo apparecchio conforme ai requisiti essenziali e all...

Page 17: ...ETSI EN 300 328 V1 8 1 2012 06 EMC EN 301 489 1 V1 9 2 2011 09 EN 301 489 17 V2 2 1 2012 09 EMF EN 62311 2008 Safety LVD IEC 60950 1 2005 2nd Edition Am1 2009 EN 60950 1 2006 A11 2009 A1 2010 A12 201...

Page 18: ...18...

Reviews: