Edimax ES-3116RE+ User Manual Download Page 7


4.


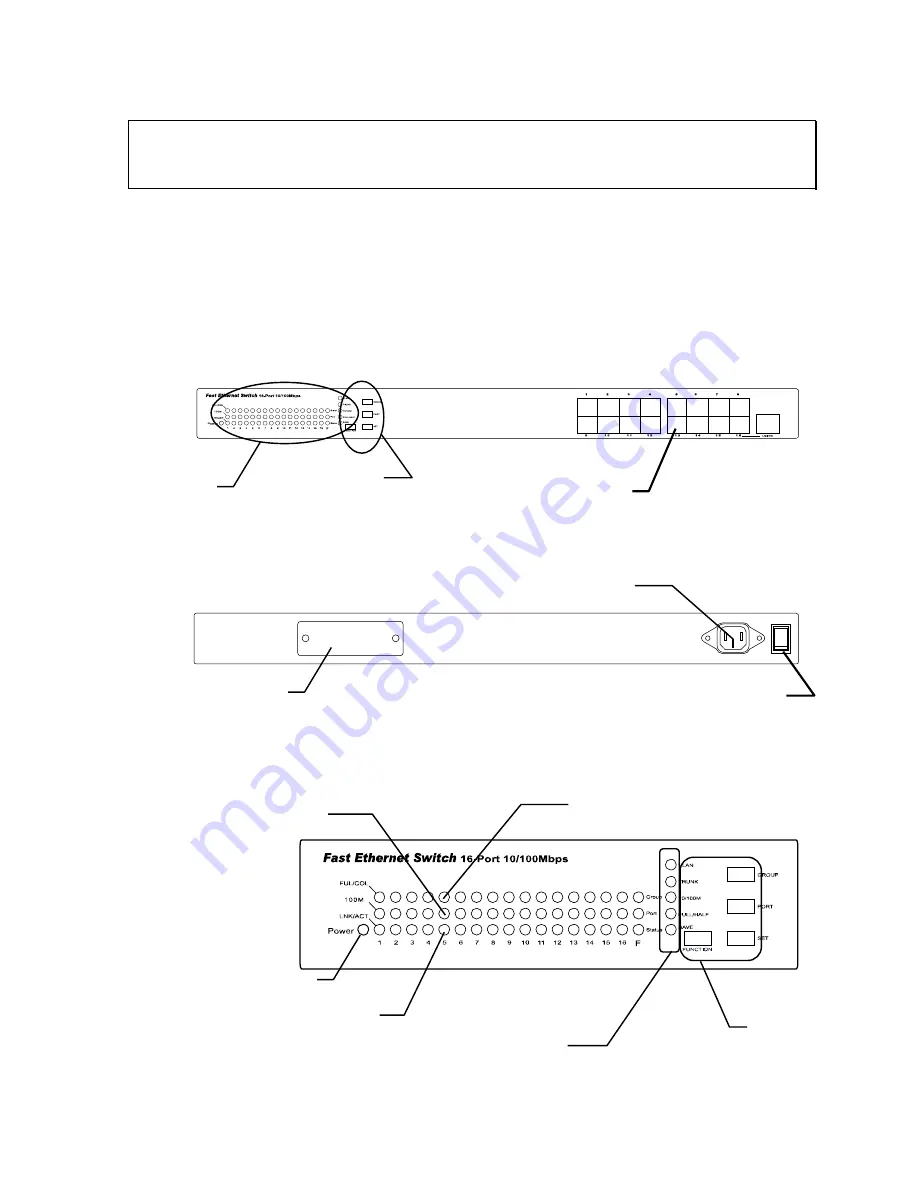
Physical Description 

(1) Panel 

„


Front View 


Control Button 

LED 


„


Rear View 


I

o

SW

AC 100-240V

POWER


Power Connector 

Power Switch

RJ-45 Connectors 

Expansion Slot 


„


LED/Button Panel 


Power LED 

Setup 

Buttons 

Setup Functions

Normal : Link / Activity 
Setup : Status 

Normal : 100Mbps 
Setup : Port

Normal : Full Duplex / Collision 
Setup : Group 


Summary of Contents for ES-3116RE+

Page 1: ...16 Port 10 100Mbps Smart Switch VLAN Trunking Fiber Option ES 3116RE User s Manual...

Page 2: ...rdance with the instructions may cause harmful interference to radio communications However there is no guarantee that interference will not occur in a particular installation If this equipment does c...

Page 3: ...rs With one set of status LEDs for each individual port the switch operation status can be easily monitored It s rackmount design that can be mounted on the industrial standard 19 inches rack in the e...

Page 4: ...link port which can connect to another hub switch using a normal UTP cable One 100Mbps Fiber SC ST module option Support Full Half Duplex Support IEEE 802 3x compliant full duplex flow control half du...

Page 5: ...cture Store and Forward MAC Address 8K Buffer 512Kbyte Flow Control Back pressure and IEEE 802 3x VLAN Port based VLAN up to 16 groups Trunking 2 groups N Way Auto Negotiation on all ports Full Duplex...

Page 6: ...3 Package Contents One Fast Ethernet Switch One Power Cord One User s manual Rackmount accessories...

Page 7: ...LED Rear View I o SW AC 100 240V POWER Power Connector Power Switch RJ 45 Connectors Expansion Slot LED Button Panel Power LED Setup Buttons Setup Functions Normal Link Activity Setup Status Normal 10...

Page 8: ...de Group Off This group is not in setting On This port is in setting mode Port Off This port is not in setting mode On This port is selected Setup Status Status Off This port is not selected On VLAN i...

Page 9: ...nect the other end of the network cable to the RJ 45 port on the network device Follow the same procedure to connect all the RJ 45 ports of the switch The UTP network cables must comply with EIA TIA 5...

Page 10: ...stations for reasons of security or convenience Each VLAN you configure behaves as an isolated broadcast domain just as if it were a separate switch There is no communication between ports on the sepa...

Page 11: ...er ports to the selected VLAN group Step 6 When you finish one VLAN group configuring press the Group button to scroll to the next VLAN group Repeat steps 3 to 4 and assign ports to the new group Step...

Page 12: ...ions describe how to configure port trunking Note 1 Trunking port work in 100M full duplex 2 The trunking ports must be configured to the same VLAN group Step 1 Press the Function button until the Tru...

Page 13: ...D is on the select port is set to auto sensing Step 4 Press the Function button until the SAVE LED is on Step 5 Press the Set button to save the setting Step 6 Press the Function button to return to n...

Page 14: ...LED is on and Half LED is on the select port is set to auto negotiation Step 4 Press the Function button until the SAVE LED is on Step 5 Press the Set button to save the setting Step 6 Press the Func...

Page 15: ...are used to connect to a hub s regular port make sure the crossover cable is used 3 Collision LED flashes constantly Make sure the cable is connected to the uplink port Check the network cable make s...

Reviews: