


9
IT
ALIANO
REMARKS ON INSTALLATION
REMARKS ON INSTALLATION
Note that:
Note that:
• installation must be carried out by authorised
• installation must be carried out by authorised
technical personnel;
technical personnel;
the appliance must be installed and operated in
the appliance must be installed and operated in
compliance with local and national law and European
compliance with local and national law and European
regulations. The Italian reference standard is UNI
regulations. The Italian reference standard is UNI
10683; in France one must follow the instructions in the
10683; in France one must follow the instructions in the
DTA (Document Technique d’Application Référence
DTA (Document Technique d’Application Référence
Avis Technique), www.cstb.fr
Avis Technique), www.cstb.fr
• if installed in a condominium, the appliance must
• if installed in a condominium, the appliance must
be approved by the administrator;
be approved by the administrator;
• if installed in public premises, check and follow
• if installed in public premises, check and follow
local regulations for this type of installation.
local regulations for this type of installation.
Here are a few general instructions, although these do
Here are a few general instructions, although these do
not obviate the need to comply with local regulations
not obviate the need to comply with local regulations
and do not affect the installer’s liability for the
and do not affect the installer’s liability for the
installation.
installation.
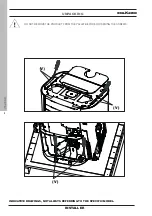
Remember that Rada Air Tight C is sealed, in other
Remember that Rada Air Tight C is sealed, in other
words, if it is installed correctly with the air inlet pipe
words, if it is installed correctly with the air inlet pipe
connected to the outside, it takes the majority of the
connected to the outside, it takes the majority of the
air from the outside. For different countries, check if
air from the outside. For different countries, check if
there are particular installation conditions allowed for
there are particular installation conditions allowed for
sealed stoves.
sealed stoves.
Checking the suitability of the installation
space
• The room must have a volume of at least 30 m
3
• The floor must be able to bear the weight of the
product and its accessories* (see the note in the
paragraph on the heat protection)
• Level the appliance
• Pursuant to Standard 10683 rev. 2012 point 6.3, in
Italy you can also install the appliance in bedrooms
or in rooms which already include a product that
takes air from it for combustion, provided that the
air inlet is connected to the outside
• Do not install the product in spaces where there is
a risk of fire or explosion
• In Italy, check the compatibility pursuant to UNI
10683 and UNI 7129 in the presence of gas fired
products.
INSTALLATION
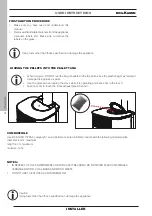
Protection from heat and safety clearances
The surfaces of the building adjacent to the product
must be protected against overheating.
The insulation to be used will depend on the type of
surface in question.
The appliance must be installed in accordance with
the following safety instructions:
- minimum clearance at the sides 5 cm and back of
10 cm from flammable materials
- no flammable materials may be kept closer to the
front of the appliance than 80 cm.
If connected to a wooden or otherwise flammable wall,
the flue must be appropriately insulated.
If installed on a flammable or combustible floor, or
which is not capable of bearing its load*, use steel or
glass plates under the stove to distribute the load.
Contact the retailer for this type of optional.
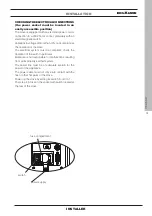
Positioning the product
The product is designed to operate in all climate
conditions. In special circumstances, such as strong
wind, the safety devices may intervene to switch the
appliance off.
Contact the authorised Edilkamin Technical Assistance
Centre.
INSTALLER
Summary of Contents for DANIA Air Tight C Plus
Page 61: ......
Page 62: ......
Page 63: ......
Page 64: ...cod 942171 GB 2 21 A w w w e d i l k a m i n c o m 942171 GB ...


