4
Arrows :
Next instruction is indicated by arrow.
How to display the Audio Screen
Press the [SCREEN] button to switch the screen display.
Route Assist Operation
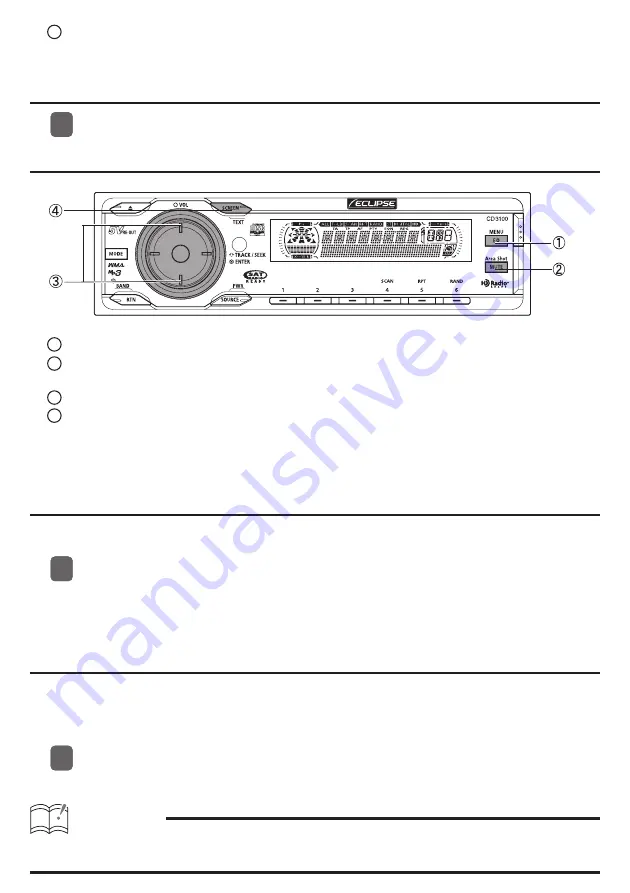
1
[EQ/MENU] button : Used when reading the Area Shot file(s).
2
[MUTE/Area Shot] button : Turns the Area Shot function ON/OFF (press and hold for more than
1 second).
3
[SELECT] (Upper / Lower) button : Jumps to next/previous Guidance Point instruction.
4
[SCREEN/TEXT] button : When pressed normally, switches between Audio and Area Shot
mode.
When pressed and held for more than 1 second, activates scrolling
text information.
Switching between Guidance Points
After passing each location described in the guidance, it is necessary to switch manually to the
next guidance. The previous screen can also be accessed manually and con
fi
rmed.
Press the [SELECT] (Upper/Lower) button to jump to the next/previous Guidance
instruction.
Upper: To jump to the next guidance instruction
Lower: To jump to the previous guidance instruction
Scrolling text information
Text information including intersection street names and turn directions can be scrolled across the
screen. A maximum of 9 characters can be displayed on a single screen. Excess characters are
scrolled on the display. When scrolling is complete, a place name such as intersection name is
displayed. To re-scroll, perform the following operation:
Press and hold the [SCREEN] button for more than one second.
Previously shown scrolling guidance information will be displayed.
ATTENTION
When the Scroll Pattern is set on “Repeat”, guidance information will scroll continuously.
(For details, see the radio Owner’s Manual)
11
11
11


