


Description and Operation
Page 2 - 4
EchoStar International Corporation
© 2
004
Ec
h
o
S
ta
r I
n
te
rn
at
io
na
l
Co
rp
or
a
tio
n
A
ll ri
gh
ts
re
serve
d
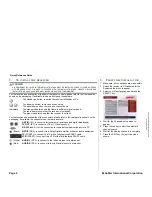
4.
T
HE
MAIN
MENU
STRUCTURE
The main menu has a tree structure where each sub-menu has one or
more option pages. Each sub-menu allows you to customise the settings
to match your installation and preferences. Note that the menu contains
dynamic pages which means that options are, or are not available
depending on the selections you make.
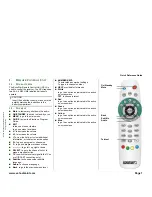
The
key gives access to the main menu, that gives you control over
the settings in the Installation menu, the User data menu and the
Information menu.
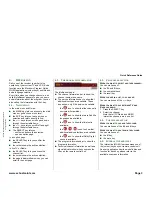
4.1.
C
HANNEL
ORGANIZER
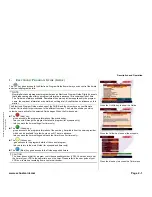
4.2.
T
IMER
■
Sort
To sort the channel list.
red:
by name,
green
: by number (channel number),
yellow
: by Type (FTA/scrambled),
blue
: by TP (transponder).
■
Delete
To delete a channel from the channel list.
■
Current hour
Shows the current time.
■
Current date
Shows the current date.
■
Timer number
Shows the timer number (1 to 8).
■
Status
To activate or de-activate a timer.
■
Action
To set a wake-up (Power On, sleep (Power Off)
or normal (Time interval) timer.
■
Repetition
To set the timer, once or repeat for every
occurrence.
■
Date
To set the start date for the timer.
■
Hour
To set the start time for the timer.
■
End time
To set the stop time for the timer.
■
Channel
To select the channel that you want to record
from.
■
colour keys
red
; to save the timer and advance to the next;
green
; to save the timer and leave the menu;
yellow
; to leave the timer menu without saving.
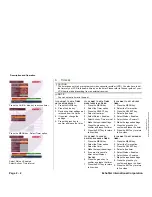
4.3.
I
NSTALLATION
- S
YSTEM
SETUP
L
ANGUAGE
C
ONNECTION
■
Menu
To set the language you want to use in the
menus.
■
Language 1
To set the language for programs with multi-
lingual audio.
For multi-lingual programs, if available, you can
choose your own language. The receiver will first
look for the 1st selected language, if not
available, for the 2nd. If the two selected
languages are not transmitted, audio is given in
the native language of that channel.
■
Language 2
NOTE
You can override the selection per channel with use of the alternative
audio and subtitle key on the RCU.
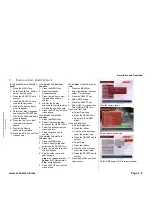
■
TV mode
To set the video format supported by your TV.
■
Video output
To set the video signal type, If you use a SCART
connection, select RGB for the best quality.
■
TV format
To set the image size for the TV.
If you have a TV with a 4:3 screen size and the
transmission is in 16:9 format, you can select
either 4:3 or 16:9.
4:3 shows the full screen completely where
some of the image sides is cut off, 16:9 will show
the full image with black top and bottom banners.
■
Audio output
Not used.
■
SPDIF output
To tell the receiver that it is connected to a
Dolby Digital amplifier or not. When you have
selected On, note that analogueaudio is not
given to the TV, so no audio is heard. If you want
to listen through the TV audio, select Off.