background image


Guangzhou EC-PACK Packaging Equipment Co., Ltd.


    EC-JET 1000Pro Continuous Inkjet Printer


101 

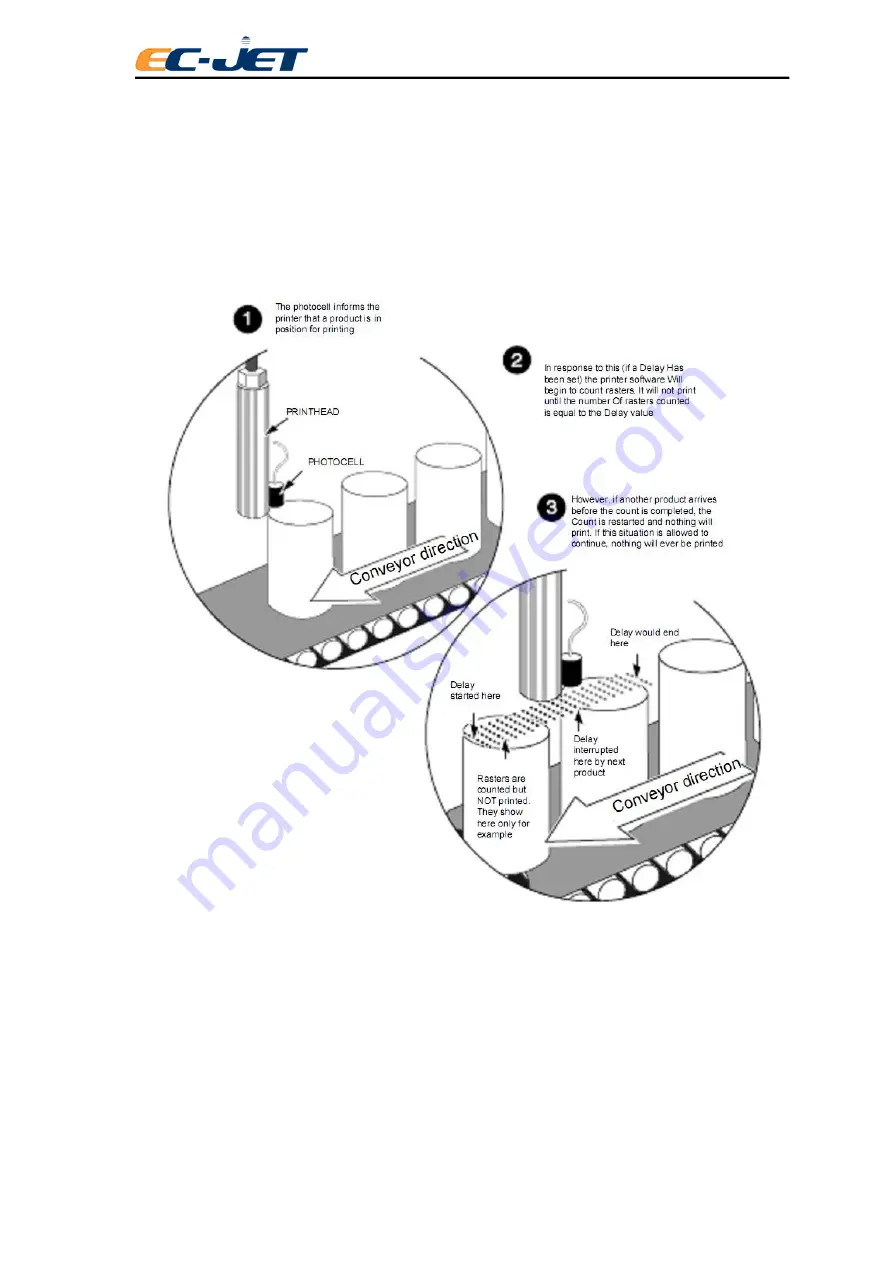
However, if  the  Print  Delay value  is set  to  an  inappropriate value,  it  is  possible  for the next  product  to 

arrive before the delay expires. This resets the delay to begin counting again, and since the conveyors 

travelling at the same speed, the next product will once again arrive before printing has occurred and the 

delay will be reset; and so on. If this is allowed to continue, printing will never occur. 


The following illustrates this problem: 


FC40 Part of Message Missing - over speed Error 

If the message to be printed is too long for the product or the conveyor is travelling faster than the system 

can print, the following warning message will be displayed in the status line of the display: 

“3.02 Over Speed (Print Go)” 

The following illustrates the problem: 

Summary of Contents for EC-JET 1000Pro

Page 1: ...re may be errors or omissions in this user manual EC JET shall not be liable for any loss or damage arising from the use of any information particulars or errors in this user manual or maintenance carried out by unauthorized personnel or any incorrect use of the product whatsoever At all times the printer must be operated with EC JET approved spares and consumables Maintenance not identified in th...

Page 2: ...cription 12 2 2 1 Operating Simplicity 12 2 2 2 Diagnostics 12 2 2 3 Print head Design 12 2 2 4 Printing Drops 12 2 2 5 Leaving Gaps 12 2 2 6 Detecting Products 13 2 2 7 Conveyor Speed 13 2 2 8 Ink Blockage Prevention 13 2 2 9 Blockages 13 2 2 10 Automatic Cleaning at Shutdown 13 2 2 11 Velocity of Drop 14 2 3 Principles of Operation 15 3 Controls and Indicators 16 3 1 Getting Started 16 3 2 Insta...

Page 3: ...rent Status of the Printer 30 4 3 1 System Status Line 30 4 3 2 Print Status Screen 30 4 4 Checking the Printer Status 30 4 5 Listing Error Messages 31 4 6 4 6 Password 32 4 6 1 Password Level 32 4 6 2 Password 33 5 Creating Editing and Deleting Message Fields 34 5 1 Introduction 34 5 1 1 The message used has a complete mix of all field types 34 5 1 2 Message Fields 35 5 2 Editing and Deleting Mes...

Page 4: ...2 3 Conduit Length 55 6 2 4 Head Height 56 6 2 5 Meter Counter 56 6 3 Changing System Set Up 56 6 3 1 Print Head Code 56 6 3 2 Ref Modulation 56 6 3 3 Ink Selection 57 6 3 4 Password 57 6 3 5 Change Password 57 6 3 6 Change Language 57 6 3 7 Remote Setup Menu 57 6 3 8 Diagnostic Menu 57 6 3 9 Solvent Add Time 58 7 Diagnostics 59 7 1 Start Jet 59 7 2 Stop Jet 60 7 3 Quick Start Jet 60 7 4 Start Pri...

Page 5: ...ntenance Mode 74 9 Warning and Fault Messages 77 9 1 Warning and Fault Messages 77 9 2 Summary of Warning Messages 77 9 2 1 System Failures 77 9 2 2 Print Failures 77 9 2 3 System Warnings 77 9 3 System failures 78 9 3 1 Print Failures 78 9 3 2 2 00 Print head Temperature 79 9 3 3 2 01 Deflector Voltage 79 9 3 4 2 02 Charge 80 9 3 5 2 03 Velocity Of Drop 80 9 3 6 2 04 300V Power Supply 80 9 3 7 2 ...

Page 6: ... 5 3 1 Problem Solving Printhead Mechanical Faults 94 10 5 4 Blockage Caused by Knocking and Strong Vibration 100 Appendix 1 Installation Setting Up 103 1 1 Unpacking the System 103 1 2 Where to Put the Printer 103 1 3 Accessories 103 1 4 Power Connection 104 1 5 Attaching the Printhead to the Production Line 104 1 5 1 Print Height 104 1 6 Setting up the Photocell 105 1 6 1 Photocell Connections 1...

Page 7: ...ory Capacity 115 2 5 Printhead 115 2 5 1 Types 115 2 5 2 Construction 115 2 5 3 Dimensions 116 2 5 4 Throw Distance recommended 116 2 6 Printing Performance Data 116 2 6 1 Raster Information 116 2 6 2 Character Height Range 116 2 7 Certificate Acquired 117 2 7 1 EMC 117 2 7 2 LVD 118 Appendix 3 Printable Line Speeds 119 Ideal Pitch 119 Double Pitch 119 Triple Pitch 119 Appendix 4 Dimension Layout ...

Page 8: ...H CONFORMS TO EUROPEAN AND INTERNATIONAL SAFETY STANDARDS MUST BE WORN WHEN CARRYING OUT INK OR SOLVENT RELATED ACTIVITIES CAUTION A CAUTION ALERTS THE USER TO ACTIVITIES THAT MAY CAUSE DAMAGE TO EQUIPMENT OR REDUCE ITS OPERATING EFFICIENCY BUT IS NOT DIRECTLY HAZARDOUS TO PERSONNEL NOTE A Note provides important additional information but is not safety related The hand icon may not always be show...

Page 9: ...the fully trained operators or service engineers qualified to open the front ink system door to add the ink or solvent Only fully trained EC JET approved service engineers qualified to open the screen door or the back access door 4 Always check that all covers are correctly fitted and all doors are closed before you use it If you are not sure ask your supervisor for guidance Covers act as safety b...

Page 10: ...e affected skin area thoroughly with proprietary cleaner Do NOT attempt to use solvents to remove ink from skin 1 5 3 Inhalation Evacuate the person into a fresh air environment If the person experiences any difficulty in breathing obtain immediate medical attention 1 5 4 Ingestion Do not induce vomiting obtain immediate medical attention and give the casualty half a litre of water to drink 1 6 In...

Page 11: ...r is normally fixed to a production line in such a way that printing takes place as the product passes the print head The presence of the product and printing can be synchronized using a product detecting sensor The printer consists of a cabinet and a print head The cabinet houses the electronics module the ink system a power supply and a message screen display The print head is attached to the re...

Page 12: ... comprehensive diagnostics package is built into the printer to enable problems to be identified and rectified quickly 2 2 3 Print head Design The print head is robustly designed for industrial environments It is hermetically sealed and is permanently attached to the printer itself by a 2 metres length of conduit 2 2 4 Printing Drops To form a printed pattern each drop must be directed to a differ...

Page 13: ...ect solvent for the ink being used i e the solvent used in the ink base MEK solvent for MEK based ink ETHANOL solvent for ETHANOL based ink etc The principle of continuous ink jet printing has proved to be the most effective means of printing with an ink which is required to dry instantly within a second on almost any surface 2 2 9 Blockages If ink is required to dry on the product it will also ha...

Page 14: ...placement of drops is more dependent on the speed of the drops as they travel through the deflector plates For this reason the velocity of drop VOD is constantly monitored and compared with the optimum VOD reference value printed on the print head conduit A feedback loop is used to increase or decrease ink pressure thus maintaining the correct speed of drops for accurate placement and therefore qu...

Page 15: ...ant at which it breaks off By varying the charge electrode voltages at the same rate as the drops are produced it is possible to charge every drop to a predetermined level The drop stream continues its flight and passes between two deflector plates which are maintained at a constant potential typically plus and minus 5 kilovolts In the presence of this field a drop is deflected towards one of the ...

Page 16: ...interlocks should all be in place and working correctly EC JET can accept no liability for damage to either machine or personnel in the event of the printer being installed moved or maintained by unauthorized and or untrained personnel If the printer is relocated or changes to the production line are made information on how to install and set up the printer can be found in Appendix 1 Installation ...

Page 17: ...MUST BE EARTHED THIS PRINTER MUST ONLY BE WIRED BY A QUALIFIED ELECTRICIAN EC JET CAN ACCEPT NO RESPONSIBILITY FOR ANY DAMAGE CAUSED TO EITHER MACHINE OR PERSONNEL DUE TO INCORRECT OR FAULTY WIRING 3 3 1 Switch on the printer Plug the printer into a suitable supply and switch the printer power switch at the rear right of the machine to on The following screen is displayed when power is switched on...

Page 18: ...he nozzle This prevents a potentially serious blockage of the nozzle caused by dried ink Simply press the stop key and the printer will initiate the shutdown sequence which takes approximately 3 minutes While the machine is shutting down the following message will appear in the status line of the screen When the printer has finished the shutdown sequence the following message will appear in the st...

Page 19: ...Message Display This part of the display area is used for displaying creating and editing messages to be printed Operation Menu Display This is used to display the operation message Appearance Line This is used to display valve of VOD pressure and phase Status Line The status line is present in all menu displays It is used to convey warning messages and print failure conditions to the operator Tim...

Page 20: ...hou EC PACK Packaging Equipment Co Ltd EC JET 1000Pro Continuous Inkjet Printer 20 3 4 1 Display Brief Introduction This button is to shift the functions and data shown in the OPERATION MENU As below pictures ...

Page 21: ...patterns to be printed 3 4 3 Text Control Keys This key is to lock the keyboard into upper case and type upper case Capital characters This key is to delete the character at the current cursor position without moving the cursor This key is to shift the typing mode to Number and Character This key is to shift the typing mode to English This key is to display and undisplay the QWERTY keyboard 3 4 4 ...

Page 22: ...Select the raster type you require by moving the cursor next to it and press for more raster type then pressing The EDIT MESSAGE screen will then be displayed Type in your message which will appear in the message area of the display then press key when you have finished The character set can be altered by pressing Each time key is pressed a different character is selected You can use the Field Typ...

Page 23: ...e the simple message EC JET PRINTER has been typed Press key to exit the EDIT MESSAGE screen and the CURRENT MESSAGE screen will be displayed Now Press key on the keyboard the following message will be displayed in the status line Starting Jet Please Wait When the system is ready to print the message will disappear and the function key assignments will change as shown below ...

Page 24: ... or key cursor will move one pixel each time This is useful when the spacing between characters needs to be adjusted to improve readability and or appearance Also this makes it possible to adjust the position along a vertical axis perhaps to centralize a 7 high field against a 16 high field 3 6 2 Moving to the Beginning of Message In the Editable condition press key twice and will be displayed the...

Page 25: ...ect the printing performance will be good If the printing is not so good see Troubleshooting and check all the setting Contact with your EC JET Distributor if there is any identified failure 3 8 Stopping switching off the printer Caution Never switch off until the printer tells you to do so when it displays Jet Stopped You may now switch off Otherwise it may lead to the print head failure System s...

Page 26: ... Setup Press the key in the CURRENT MESSAGE screen to enter the PASSWORD menu Type in the password and press the key It is recommended that you continue to use these passwords but you may wish to use the Change Password option of the SETUP menu to alter the passwords see Changing the System Setup 3 10 Screen Calibration After the machine start up click CURRENT MESSAGE on the top of the screen to e...

Page 27: ... the Change Language option of the SETUP menu a menu entitled CHANGE LANGUAGE will be selected This is to prompt you to choose which language you wish the system to use Menu Options Each option of a menu is preceded by wither a black or white bullet Aback bullet indicates the option can be selected A white bullet indicates the option is for display only and cannot be altered For example some optio...

Page 28: ...alue Or press key to go back to the previously selected menu The system will validate the change and reject it if it is out of range or the wrong type of date numeric data in an alphabetic field and vice versa In some instances a set range of options is offered for selection e g Sensor Permitted Out source or Triggered In these cases the left and right arrow keys are used to select the desired opt...

Page 29: ...ll support quick copy and paste if pressed twice 4 2 2 Editing a Message To edit a message press the arrows until the message for editing appears on the screen up down arrow to move a piece of message and left right arrow to move 5 pieces of messages Press key to edit the message see Creating a New Message and Editing a Message This key is to set the font This key is to toggle bold on or off This ...

Page 30: ...r when a condition is detected that affects printing If a Print Failure occurs a message is displayed on the System Status Line and if the jet is running a jet shutdown sequence is started System Warnings System Warnings inform the user of problems which may affect the operation of the printer but are not serious enough to turn off the printer However they should be acted upon at the earliest poss...

Page 31: ... solvent level check OK Solvent level is acceptable LOW Add one bottle of solvent see Routine Maintenance The ink and solvent levels should show OK If not they must be refilled with the correct ink or solvent CAUTION Only One bottle of APPROVED Ink or Solvent 500ml should be added when the level is reported Low If the level is still reported LOW after adding one bottle of ink or solvent it could b...

Page 32: ...option is turned to Off a User Level 1 then only User Level 1options will be displayed until a higher level password has been entered 4 6 1 Password Level Basic level This is the default level when the password isn t known The user can only perform simple operations such as start stop and check status User Level 1 The user has restricted access to the SETUP menu Allowed to change Level 1 password ...

Page 33: ...ing Change Password Change Language Remote Setup Menu Diagnostic Menu Solv Add Time USER LEVEL 1 PASSWORD USER LEVEL 2 PASSWORD 4 6 2 Password The PASSWORD menu will be active if the password function has been turned On in the SETUP menu Press key to enter the SETUP menu On Enable password Off Disable password Can be turned to Off so the user can enter and exit menus at will without having to use ...

Page 34: ...or The message cursor is completely different to the menu cursor described earlier Its position in a message is made visible by flashing the character it occupies between normal and inverse display The cursor size will relate to the last selected field This means that its size will remain fixed even as it moves through fields of different character heights As soon as a field is selected by pressin...

Page 35: ...the message deletion 5 1 2 Message Fields Date Fields These are created by pressing key from the Field Type menu of the EDIT MESSAGE screen The format can be defined and an offset in terms of days can be applied so that sell or use by dates can automatically be calculated by the printer It is mostly like creating the date field Press key in the Field Type menu and selected Create the Time Message ...

Page 36: ...then print out the message 5 2 Editing and Deleting Message Fields An example message comprises all types of field is used here to show how to create and modify message fields The message used has a complete mix lf all field types Time Timed message Sequential Number Date Logo and Remote In the following pages you will be shown how to use the message editing menus You may use the key to delete the...

Page 37: ...ds 5 2 4 Deleting Fields All fields whether Date Time Timed Message Sequential Number Logo and Remote are deleted in the same way Quite simply move the cursor to any character with the field to be deleted hold key down and press key the field will vanish from the display The and keys may then be used to position the cursor where needed 5 3 Creating Text Fields 5 3 1 Creating Date Fields These are ...

Page 38: ...ursor is located in a position not already occupied by a field so type in the words Sell by The cursor is located at the end of the text so press the space bar to create some space between the text and the date field that are about to create Now press from the EDIT MESSAGE screen and this will display the SELECT FIELD TYPE menu ...

Page 39: ...MAR1 3 mmm dd yy e g MAR 15 13 mmm dd yyyy e g MAR 15 2013 d e g Day of week 0 through 6 Sun to Sat d 1 7 e g Day of week 1 through 7 Mon to Sun dd e g Day of month 1 through 31 ww e g Week number 1 through 52 mm e g Month number 1 through 12 mmm e g Month e g JAN FEB etc y e g Last digit of year 0 through 9 yy e g Last two digit of year 00 through 99 yyyy e g Full year 2000 The most commonly used...

Page 40: ...s Minute Offset The date of printing is the current date plus the number of minutes passed Format Format see above in which date will be printed The date offset may be changed by pressing the key to move the menu cursor to the value typing in the new value and pressing the key to activate the change If the date offset and format shown is correct as on the menu above press the key until the EDIT ME...

Page 41: ... be satisfied by creating a text field which reads BATCH underneath the Sell By date of the display There is no need to change the Character Set but we do need to move the cursor so it is underneath the Sell By date To do this use key to move the cursor to the bottom of the message area and then key to move the cursor to where the batch number should begin The cursor is now located in a position n...

Page 42: ...ber it may consists of maximum20characters or number End number The last value of the sequential number it may consists of maximum 20 characters or number Interval Value by which to increment or decrement For example if this was set to 5 with a Start Number of 00 the counting sequence would be 0 5 10 15 and so on Range 1 through 127 Repeat Count Number of times the sequential number has been print...

Page 43: ...to a Start Number of 9999 and a Current Number of 9999 When satisfied that the sequential number has been set up correctly press key to return to the EDIT MESSAGE screen Notice the value is set to the start number of 9999 5 3 3 Creating Time Fields For the example here use key to move the cursor a few characters to the right There is no need to change the character set so just press the function k...

Page 44: ... of formats hh mm 24 hour clock hours and minutes hh mmpm 12 hour clock hours and minutes hhmm 24 hour clock hours and minutes hhmmpm 12 hour clock hours and minutes hh 24h 24 hour clock hours hh 12h 12 hour clock hours mm minutes s s seconds Use keys to locate the desired format in this case hh mm and press the key to select that format and return to the EDIT MESSAGE screen ...

Page 45: ...ed messages are allowed per Timed Message field each associated with a unique time at which the timed message will appear in the current printer message In this example a timed message is set to occur at 12 midnight zero hours to read Night Shift Press key from the EDIT MESSAGE screen to display the SELECT FIELD TYPE menu Locate the Timed Message option and press key to display the TIMED MESSAGE m...

Page 46: ...d print from 15 00 to 10 15 and so on To create the timed message use the menu cursor to locate and change the options as shown in the TIMED MESSAGE menu above Use a space or separator etc between the hours and minutes Press the esc key to return to the EDIT MESSAGE screen Minimum of Two Timed Messages One timed message is not enough Based on this example so far the system will wait until midnight...

Page 47: ...med Message we will have to delete the field we have just created and start again To do this make sure the cursor is somewhere in the timed message field we have just created press the del key the field will vanish from the display Now to create the timed message as we did before to occur at 12 midnight zero hours to read Night Shift Press key from the EDIT MESSAGE screen to display the SELECT FIE...

Page 48: ...ow key to locate the Next Message option and press key This will clear the Time and Message options ready to input the next Timed Message although our Night Shift message has disappeared from view it has been stored in the system Now create the Day Shift timed message by using the menu cursor to locate and change the options Now press key to return to the EDIT MESSAGE screen ...

Page 49: ...ware has been enabled to use the facility A remote field reserves an area in the message for data to be entered from a remote computer Several remote fields can be created in which case the data received from the remote computer will be used to fill the first remote field then the second and so on Position the cursor in an unoccupied part of the message area where the Remote field is to appear and...

Page 50: ... been configured with logos Logo should be kept at the certain folder EC JET EC230 BMP if it is in a USB Name of logo should be single color BMP bitmap with its name consists of English character or number and its pixel size not exceeds the message size Position the cursor in an unoccupied part of the message area where the logo is to appear and choose the Logo option from the SELECT FIELD TYPE me...

Page 51: ...ymbol will be inserted in the message at the current cursor position 5 4 Logo Editor EC JET printer equips with logo graphic editor can create and edit message easily When editing press key and shift to LOGOEDIT page Dot print Press key at the cursor position to print dot change the dot direction by different arrows Erase Press key to erase the dot on the left of the cursor ...

Page 52: ... requirements this is achieved by using the SETUP menu Password Reverse Print Horizontal Ref Modulation Print Height Bold Ratio Print Head Code Scale Height Aux In Ink Selection Print Width Photocell Alarm Set Up Print Delay Shaft Encoder Solv Add Time Print Interval Trigger Repeat Time Print Count Conduit Length Date Reverse Print Vertical Conduit Height Change Language ...

Page 53: ...ay This is the delay between prints Photocell Off Enable or the delay between the photocell triggering and print appearing on the product Photocell Triggered NOTES 1 Too small a delay may result in a 3 02 Over Speed Print Go or 3 04 Variable Data warnings 2 Minimum width and delay settings are interactive to allow sufficient time between printing for Phasing and VOD to occur 6 1 5 Print Interval O...

Page 54: ... left or rightarrow keys This can be set to any of the following values Triggered One trigger equals one print Enabled The printer will print continuously as long as the photocell remains triggered Remote Start printing when receiving the signal from the RS 232 port Off Printer ignores the photocell signal and will print continuously at a rate dictated by the Print Width and Print Delay settings 6...

Page 55: ... can be set separately according to the user s needs such as low ink low pressure Jet Running When the JET is running the external alarm will prompt the alarm Printing When printing is normal the external alarm will give an alarm No Printing When the printing prohibition alarm is triggered an external alarm will alarm Alarm Warning 6 2 Changing the Installation Setup 6 2 1 Set Time Printing must b...

Page 56: ...nter it is not necessary to place in front of the value The value may be entered simply as X Xm NOTE Care must be exercised with this option poor printer performance will result if incorrectly set This will automatically change the pressure reference from which the Solvent Add values calculated and shown on the MONITOR JET menu 6 2 5 Meter Counter After turning on the meter counter you can use the...

Page 57: ... ask you to enter the original password If the User Level 1 password is typed into this screen the CHANGE PASSWORD menu is displayed with the option to change only the User Level 1 password If a User Level 2 password had been typed into the PASSWORD screen the CHANGE PASSWORD menu would have provided the option of changing both levels of password 6 3 6 Change Language Printing must be stopped to c...

Page 58: ...selected will be the one which was selected the last time the DIAGNOSTICS menu was used The options available from the DIAGNOSTICS menu are described in another chapter of this manual 6 3 9 Solvent Add Time This shows the total time that the printer has added solvent since the printer has been switched on ...

Page 59: ...small and to prohibit the use of functions which are invalid for the current state of the printer only valid functions are displayed and are selectable at any given time This is in addition to menu variations due to the password level Password Diagnostics menu Jet stop Operation Jet printing Start Jet Stop Jet Quick Start Jet Start Print Stop Print Test Print Clear Nozzle Flush Nozzle Flush Shut D...

Page 60: ...tches the jet on at the reference running pressure and reference modulation The following message will be displayed while starting the jet Starting Jet Please Wait WARNING THIS COMMAND WILL START THE JET EVEN IF THE INK LEVEL IS LOW THE PUMP MAY BE DAMAGED IF IT IS RUN WITHOUT INK 7 4 Start Print Make the printer ready to print i e as per button but without returning to the CURRENT MESSAGE screen ...

Page 61: ...nt has stopped 7 8 Flush Shut Down The Flush Shutdown routine introduces solvent into the print head and nozzle during jet shutdown to remove any ink in preparation for a period of non use The option has three settings Off This is the disabled setting When set to Off the printer will not carry out the flush part of the flush shutdown routine when the jet is stopped On This is the enabled setting W...

Page 62: ...D has not been obtained for 15 minutes The warning will be redisplayed every 15 minutes while no VOD readings as obtained MOD The current modulation voltage Phase The system will load the phase automatically when it is On And unload when Off Solvent Add When Press Set Pressure exceeds this value solvent will be automatically added by the printer Ref VOD The reference VOD as input with the pinhead ...

Page 63: ... at 4000 and counts down by the number of hours the jet has been running When the value is less than 0 Service Time warning will be alarmed Service Recommended hours left until service required Starts at 4000 and counts down by the number of hours the jet has been running When the value is less than 0 Service Time warning will be alarmed 7 11 System Configuration Information It is useful to know a...

Page 64: ...enu displays a separate screen which shows which raster types your printer is using 7 12 Set Pressure Displays the current pressure set on the pressure DAC Your local distributor may ask you to use this option to 1 Diagnose and or check for any pressure loss 2 Purge the filter without resetting the filter time e g if changing ink only 3 Clean out print head by use of the venture vacuum 4 Use Quick...

Page 65: ... of the display is the current message 4 Press key to make edit the message 5 Press key to switch the edited message to the printing message 6 Return to the previous menu by pressing key and now the first line of the display is current message 7 14 3 Real time New Message 1 Change the REAL TIME SWITCH MESSAGE menu in the DIAGNOSIS menu and select ON 2 Return to the main menu 3 Under the printing c...

Page 66: ... a mild detergent CAUTION Do not use abrasive cleaning agents Do not use excessive pressure when wiping over the LCD screen excessive pressure can cause damage 8 1 2 Ink Spillages If ink is accidentally spilled onto the exterior of the printer the following procedures are recommended WARNING ALWAYS WEAR RUBBER GLOVES AND SAFETY GLASSES WHEN HANDLING SOLVENT DO NOT USE SOLVENTS IN CONFINED AREAS WI...

Page 67: ...hort delay between bursts to allow ink to dissolve The surplus solvent will run down the print head and can be collected in the container for disposal Allow the print head to dry completely by letting it stand for a few minutes Do not dry the print head with a cloth or towel as this may leave fibers that could interfere with the printed drops Particular care should be taken to ensure that the spac...

Page 68: ...C1000 Consumable verification 1 When the ink or solvent level is low the printer will display following interface Note if you do not follow up the instruction to verify the CSN of consumables printer will remind every 15 minutes 2 Open the ink system door and find the RFID assembly which is located at the right of the rear door 3 Hold the ink or solvent bottle keep label alignment of RFID putting ...

Page 69: ...ro Continuous Inkjet Printer 69 When shown the following interface printer read the correct CSN Click OK Note 1 If can t read the correct CSN then printer show the following interface Please check whether choose the correct consumable then continue to verify ...

Page 70: ...nter 70 Note 2 if do not verify the CSN and refill ink or solvent directly printer will show the following interface and flash every 15 minutes Note 3 On Status interface you can see the remaining time of the ink or solvent as shown in Figure 174 hours solvent and the 276 hours ink ...

Page 71: ...m gently until stop if necessary another hand hold the ink routine gently 2 Remove the ink or solvent bottle cap then cut the sealing foil along the edge more than half circle and fold inside 3 Pour the ink or solvent into the corresponding tank After the liquid in the bottle is finished take away the empty tank Note the solvent tank is white and the ink tank is black 4 Tighten the cap of ink or s...

Page 72: ...lter There are two air filters the inlet and outlet filter in the model 8 3 1 Cleaning and replacement of air inlet filter 1 The inlet air filter is located in the rear of the machine According to the environment periodically perform routine maintenance Suggest to clean every week to replace filter when is blocked by dust ...

Page 73: ...ir filter clean the filter by taping or blowing with compressed air 4 Re install the filter into outlet air cover 8 3 2 Cleaning Replacing the air outlet filter 1 Unscrew the thumb screw in the back of machine and open the ink system door 2 Unscrew ink tank limit thumb screw of the guide rail Some machine only have one guide rail 3 Open the front door ink system door hold ink system by hand and ge...

Page 74: ...rding to the reverse steps 8 4 Quick Maintenance Mode This new maintenance mode is for users requesting to maintain and repair the machine urgently but the EC JET authorized engineers can t come on users site Sending EC1000 machines to agents or resellers by courier for maintenance or repairing easy operation no need to empty the ink tank and solvent tank 1 Open the ink system door 2 Hold the ink ...

Page 75: ...as following picture screw the connector of routine 4 Follow the same instruction replace the solvent tank with SMART solvent bottle 5 Screw the ink tank and solvent tank cap then store in case avoiding high temperature and fire 6 Clean the SMART ink and solvent bottle and put in the ink system bracket setup the bracket screw the thumb and close the ink system door 7 Pack the machine send back to ...

Page 76: ... Co Ltd EC JET 1000Pro Continuous Inkjet Printer 76 8 EC JET Agents or resellers will send the machine back to customer Follow above opposite steps to change the SMART bottles into ink and solvent tank then you can use the printer normally ...

Page 77: ...creen e g 3 03 Ink Low 9 2 Summary of Warning Messages 9 2 1 System Failures These prevent normal printer operation 9 2 2 Print Failures These occur when the software detects a problem which affects printing 2 00 Print head temperature 2 01 Deflector voltage 2 02 Charge 2 03 VOD 2 04 300V power supply 2 05 Temperature Deflector 2 06 Ink tank empty 2 12 Pressure 2 16 Internal Spillage 2 17 Maintena...

Page 78: ...THAL VOLTAGE UNKNOWN HIGH VOLTAGES MAY BE PRESENT WITH SOME SYSTEM FAILURES DO NOT TAMPER WITH THE PRINTER OR PRINTHEAD WAIT UNTIL THE FAILURE SHUTDOWN IS COMPLETE These prevent normal printer operation Contact with EC JET distributor when necessary 9 3 1 Print Failures These occur when the software detects a problem which affects printing When a Print Failure occurs a message is displayed on the ...

Page 79: ...ntact your local distributor 9 3 2 2 00 Print head Temperature The print head temperature sensor indicates that a temperature around or in the print head has exceeded the safe operating limit This may mean that a fire has occurred within the head cover Possible causes Excessive local heat source Relocate the print head away from the heat source Fire in the print head Have your printer checked by y...

Page 80: ...city Of Drop This failure may occur when the jet is being started Possible causes Misaligned jet Carry out the nozzle clear procedure described in the Troubleshooting section of this manual see Troubleshooting Clearing the Print head Nozzle Print head code or modulation values set incorrectly Check the Print head and Modulation values printed on the print head serial number label found on the cond...

Page 81: ...tting has become loose on the main filter or damper To cure the fault the cause needs to be rectified and the ink tray completely cleaned and dried Contact your local EC JET distributor 9 4 System Warnings System Warnings inform the user of problems which may affect the operation of the printer but are not serious enough to require a shutdown When a System Warning occurs a message is displayed on ...

Page 82: ...t was running or before the printer had completed the shutdown routine Completion of the shutdown routine is important and must be allowed to finish The warning does not stop the printer from functioning It will be reported at every subsequent printer start up until a jet shutdown routine is fully completed Press the stop key and wait for the message Jet Stopped You May Now Switch Off 9 4 3 3 02 O...

Page 83: ...ndition is detected before the jet is started then the jet cannot be started until the solvent tank is replenished If the condition is detected while the jet is running the jet will continue to run regardless but no attempt will be made to add solvent 9 4 6 3 05 Print Go Remote Data A print go has occurred and printing data has not been received from the remote interface Make sure the transmission...

Page 84: ...w print head is fitted If it occurs at other times then the memory may be corrupt or the print head connector faulty Under normal circumstances this warning just confirms that the print head type has been changed The defaults for VOD modulation etc will be used until the user enters a new print head code in the SETUP menu If the wrong type of print head has been detected for any reason the modulat...

Page 85: ... 16 drops for Micro print head where pixel generation by the software is slower than the rate at which the hardware can print raster 9 4 15 3 15 Default Language There is little chance of fault of default language Otherwise contact your local EC JET distributor 9 4 16 3 16 Memory Failure Possible cause The battery backup has failed exhausted battery Recharge the battery by switching the printer on...

Page 86: ...investigating the simplest possibilities 10 1 Where to Start All problems with printer operation are distinguished from each other by the symptoms displayed These symptoms can be obvious faults with the print quality error messages on the display or any other signs by which it is apparent that the printer is not functioning correctly When the symptoms have been correctly identified the possible ca...

Page 87: ...a sample of the test pattern is printed Other faults may not permit a print to be made or may produce other symptoms such as fault messages To accommodate these differences this sub section is divided into two parts Identifying Faults by Print Sample and Identifying Faults by Symptom 10 3 Identifying Faults by Print Sample This part of the manual is intended to help distinguish between different t...

Page 88: ...ference to the top of the print means the part of the pattern closest to the negative deflector plate of the print head i e the least deflected drop Identifying Faults by Print Sample 10 4 Identifying Faults by Symptom When it is not possible to identify a fault by the visible effect on the print sample it becomes necessary to look for other symptoms For example it may not be possible to start the...

Page 89: ...ring printing 5 After the jet is stopped Note that these groupings only indicate the earliest point at which the symptom could be observed the symptom could also be observed later in the cycle of printer operation For example solvent contamination might be observed at any time but it is included in the first group because it is possible to check this symptom before switching on The text below each...

Page 90: ...ING PRINTING Poor print quality Refer to Identifying Faults by Print Sample page 75 Jet velocity reduces increased VOD reading Gutter Problems FC35 Messy print missing drops Gutter clipping FC05 Printhead cover catch FC06 No Print Print Delay value incorrectly set FC39 Part of message missing FC40 AFTER THE JET IS STOPPED Poor purge of nozzle at shutdown Gutter Problems FC35 10 5 Problem Solving T...

Page 91: ...se the loss of the drops from the top of the print pattern As printing continues the ink will build up on the gutter edge and the print loss will increase sometimes leading to deflector plate shorting and EHT failures The following diagram illustrates the problem This print sample shows gutter clipping resulting in loss of the top part of the print Cause and Cure Check the EHT settings see Changin...

Page 92: ...typical result of print head cover catch is a fine diffuse spray of drops Cause and Cure Check the settings and connections of EHT Check the print head cover slot for an obstruction which may be accumulation of ink If the print head cover is badly out of place on the print head the drops to be printed may miss the cover slot altogether Ensure that the conduit is not pulling the print head out of l...

Page 93: ...her a partial or a total pressure loss The debris can be pieces of foil seals from ink bottles or other extraneous material that has fallen into the reservoir Pre Pump Filter debris from the ink tank reservoir that has been drawn into the body of the filter can cause a total or more usually a partial pressure loss over tightening of the connectors onto the threaded stud of the filter body can caus...

Page 94: ...to rectify a jet alignment problem it is advisable to investigate which of these possible causes is most likely to have occurred and to take the appropriate steps to ensure it does not reoccur The first thing to do is to clear the nozzle which will most often cure the problem Clearing the nozzle should remove any deposits of ink or debris which could be causing an obstruction in the nozzle orifice...

Page 95: ...the PASSWORD menu will appear at this stage as shown above Type in XXXX for the password press the key and the SETUP menu will be displayed Scroll through the menu options using keys until the Diagnostics option is selected then press key to call up the DIAGNOSTICS menu Alternatively you can simply press key which will call up the DIAGNOSTICS menu directly ...

Page 96: ... clean 3 Invert the print head with some absorbent material wrapped around it where it connects to the conduit and hold it in a vertical position 4 Activate the Clear Nozzle routine by pressing the enter key 5 The status line will indicate that the printer is clearing the nozzle 6 Apply small amounts of solvent to the inverted nozzle face as illustrated below It should be observed that when a smal...

Page 97: ...oints above the reference pressure value If you suspect a gutter blockage do not attempt to clear it yourself contact EC JET or your local distributor FC36 Vibration Problems Poor print quality is the most common indicator of vibration problems This is because the print drops are relatively stable while in flight so vibration in either the product being marked or the print head it will result in t...

Page 98: ...test for print head vibration pass a piece of paper under the print head in the same way as described above but this time hold the print head with your other hand to dampen any vibration in it If print quality improves as a result then the print head is suffering from the effects of vibration ...

Page 99: ...or at 90 degrees to it i e across the conveyor width When the product tilts along the axis of the conveyor travel the width of some characters will be contracted and some expanded as the product tilts first one way then the other Similarly when the product tilts at 90 degrees to the axis of the conveyor travel the height of some characters will be contracted and some expanded as the product tilts ...

Page 100: ...e splashed on the VOD sensor and deflector plates and to build up deposits on the gutter 10 5 4 Blockage Caused by Knocking and Strong Vibration FC39 No Print Print Delay Problem Normally when the system detects a product passing the photocell it will activate a print go signal which causes the current message to be printed immediately The Print Delay option of the SETUP menu is used to delay prin...

Page 101: ... speed the next product will once again arrive before printing has occurred and the delay will be reset and so on If this is allowed to continue printing will never occur The following illustrates this problem FC40 Part of Message Missing over speed Error If the message to be printed is too long for the product or the conveyor is travelling faster than the system can print the following warning me...

Page 102: ...Guangzhou EC PACK Packaging Equipment Co Ltd EC JET 1000Pro Continuous Inkjet Printer 102 ...

Page 103: ...carefully remove the cardboard packaging and check for the following contents EC JET printer EC JET User Manual Final test print sample sheet Total Quality Plan packing card Key for cabinet A Guide to Quick Use 1 2 Where to Put the Printer The EC JET printer must be sited on a firm solid base preferably a EC JET cabinet or mounting table and with a clean power supply i e free from electrical inter...

Page 104: ... head bracket to ensure secure and vibration free operation 1 5 1 Print Height If the printhead is moved nearer to the surface to be printed height of the printed character will decrease if moved further away its height will increase However adjustment of the print height should be controlled through the SETUP menu NOTE Do not attempt to adjust the printed character height by changing the print he...

Page 105: ...product reaches the print head as close to the print head as possible and at a distance from the product which gives consistently reliable triggering when a product passes it A delay between the photocell being triggered and the print taking place can be set by a menu command to aid fine adjustment of print positioning on the product 1 6 1 Photocell Connections The photocell is connected to the sy...

Page 106: ... selection of encoder and gearing will determine the printed pitch and the maximum possible line speed for the application The printer allows some variation using the Print Width parameter but the initial selection of the encoder and gearing is critical EC JET offer a range of shaft encoders 2500 pulses per revolution 5000 pulses per revolution 10000 pulses per revolution Each is available with ei...

Page 107: ...er it Step 5 Check print samples for performance Step 1 Define the Required Raster Pitch for the Application For each raster type on each printhead type there is a drop pitch which gives the best quality print i e 1 1 aspect ratio at the default printer settings This value is known as the ideal pitch a table later in the section lists them For a particular application you may want to choose a diff...

Page 108: ...m the raster distance will be wider the line speed will increase Step 2 Select the Encoder Gearing and Pitch Factor A particular combination of encoder and encoder drive gearing or wheel will give a particular encoder pitch that is the distance the product will travel for each cycle of the encoder output signal The encoder pitch will be multiplied by the pitch factor a whole number to give the act...

Page 109: ...0375mm 10 0 375 3 10000ppr 188 2mm 0 0188mm 20 0 375 For this example the actual pitch using EC JET standard encoder wheel and the resulting two encoder are close to the desired pitch taking into account the higher pulse value the higher cost encoder we will start with 5000PPR encoder with EC JET standard encoder wheel diameter 60mm perimeter 188 2mm factor 10 this is covered in later sections Ste...

Page 110: ...e from table in Step 2 for encoder gearing Specified Frequency Limiting Signal Frequency see the following table The specified frequency varies with encoder type This gives the following maximum encoder speeds for standard EC JET encoders and wheels Encoder Maximum Encoder Speeds for EC JET Standard Wheel 188 2mm 2500ppr 0 075 1 5m s 5000ppr 0 0375 3m s 10000ppr 0 0188 1 5m s The maximum encoder s...

Page 111: ... character size and raster from the calculation prints must be taken at a variety of normal running speeds to confirm the settings This must include the maximum running speed Note If the customer has strict requirement on the message width necessary to calculate the drop pitch as requirement and design encoder wheel diameter rather than using EC JET standard encoder wheel and choose the right enco...

Page 112: ...ll give the correct value to enter Remember to check the maximum encoder speed Remember to enable the shaft encoder using the SETUP menu and adjust the Print Delay 2 If the message length measured on the original samples i e with the shaft encoder enabled and the original Print Width setting was shorter than that required then the print width must be increased The calculations will give the correc...

Page 113: ...or priming the Filters After a main ink filter change the filter must be completely filled with ink before the system is run For this purpose a Filter Purge option is available from the DIAGNOSTICS menu This procedure should only be performed by an authorized service engineer following filter replacement ...

Page 114: ...ess steel grade 304 Special surface 2 2 2 Dimensions External height 528 mm External width 264 mm External depth 325 mm 2 2 3 Weight Printer weight 18 1kg excluding ink solvent and packaging 2 2 4 Power Requirements Voltage 85 V 3 A to 132V 1 A a c A C 50 60 Hz Power rating 230 VA This equipment is a Class 1 earthed Electrical connections at the rear of the cabinet comply with the extra low voltag...

Page 115: ...e 6 2 bar 90 p s i maximum under fault conditions 2 3 4 Level Control Ink tank sense low Warning reported at approximately 400 ml Solvent tank sense low Warning reported at approximately 400 ml 2 3 5 Performance Solvent consumption 10 ml h at 20 Celsius ambient using EC1240 MEK black ink 2 4 Memory Capacity Message storage capacity Up to 4 areas 23 messages for each area Logo storage capacity Up t...

Page 116: ...s or up to three lines of 7 High characters or up to five lines of 5 High characters Rasters available Paired raster set printer model dependent of 7 Chinese 9 Chinese 12 Chinese 16 Chinese 24 Chinese and of English Number Symbol 5 Height Caps 7 Height Caps 9 Height Caps 12 Height Caps 16 Height Caps 16 HeightFull 24 HeightFull Logo Edit 2 6 2 Character Height Range Minimum character height 1 0 mm...

Page 117: ...Guangzhou EC PACK Packaging Equipment Co Ltd EC JET 1000Pro Continuous Inkjet Printer 117 2 7 Certificate Acquired 2 7 1 EMC ...

Page 118: ...Guangzhou EC PACK Packaging Equipment Co Ltd EC JET 1000Pro Continuous Inkjet Printer 118 2 7 2 LVD ...

Page 119: ...pitch i e double or treble pitch see Appendix 1 Installation and Setting Up NOTE Print quality will be impaired if printing takes place at anything other than ideal pitch Ideal Pitch Otherwise known as single pitch this is dependent on the raster i e printer type being used Printers with the faster raster has an increased pitch capacity because the overall character height is larger This helps to ...

Page 120: ...Guangzhou EC PACK Packaging Equipment Co Ltd EC JET 1000Pro Continuous Inkjet Printer 120 Appendix 4 Dimension Layout ...

Reviews: