background image


13

 / 

20


SD card space status 


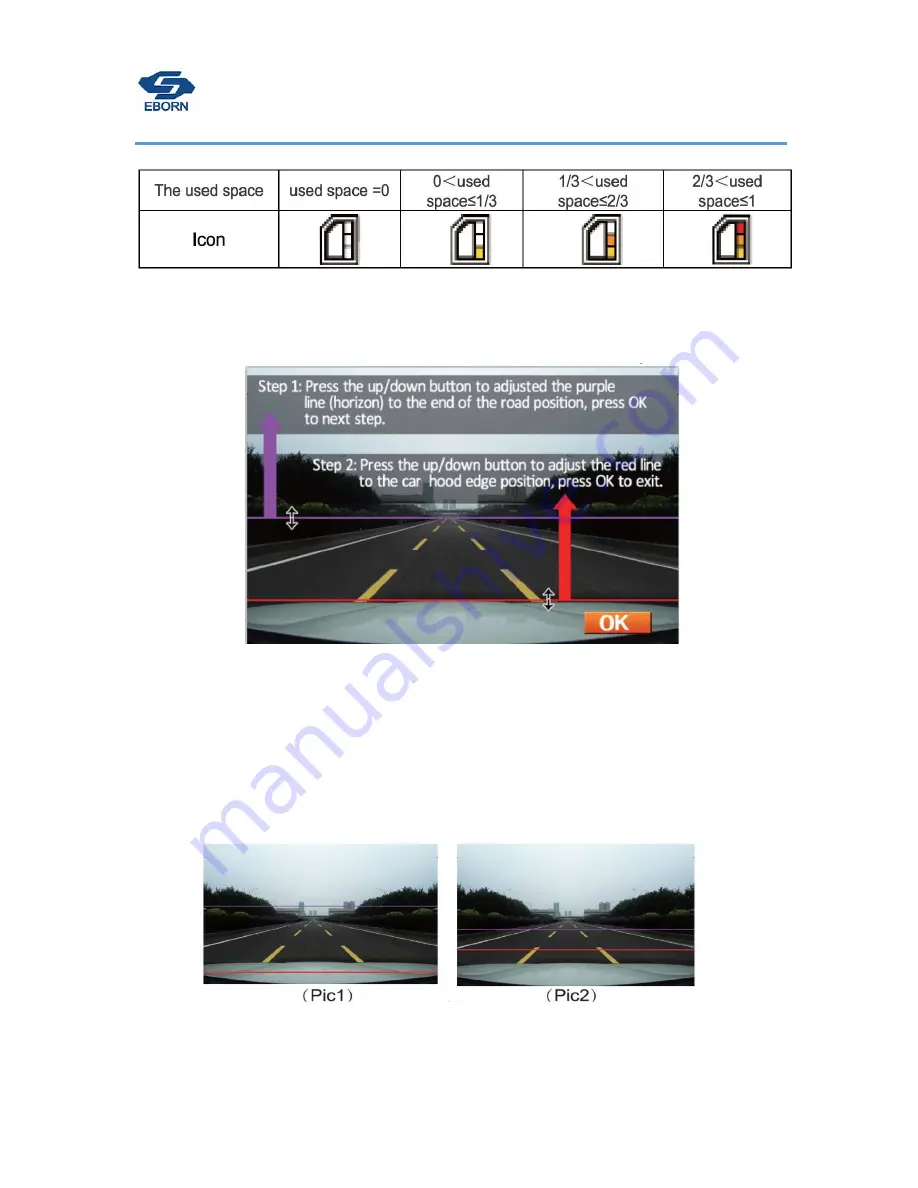
LDWS (Lane Departure Warning System) 

start “LDWS calibration” at menu: 


press OK button to start 

First step

: Press “Up” and “Down” button to adjust purple line to end of road(horizontal). 

Second step

: press “Up” and “Down” button to adjust red line to the edge of engine cover(liking picture),after 

adjusting,press OK to exit LDWS calibration. 


Remark: 

you need adjust the purple and red lines according to requirement, if the distance between purple line and red 

line is too big ( pic 1), it will make more failing alarm.And if the distance is too closer (pic 2), it will not work. 


Summary of Contents for EB-G01

Page 1: ...EBORN TECH HD GPS DVR G 01 Owner s Manual...

Page 2: ...is 20 to 65 4F to 149F Failure to comply may lead to malfunction and unit failure Do not leave the camera powered on while mounted on the windshield under direct sunlight in a parked car Note If the...

Page 3: ...Menu mode 6 Playback mode 9 Photo mode 10 Parking Monitor 11 WDR 12 Locked Video 12 LDWS 13 Video Resolution 14 Metering Setting 14 Frequency 14 Date Stamp 14 Time Zone 14 Low Light Warning 15 Fatigu...

Page 4: ...ys be recording and never run out of space Certain camera functions such as Motion Sensor and G sensor should remain OFF under normal operating conditions They are intended to be used ONLY when the ve...

Page 5: ...ct Greenwich Mean Time find setting menu Time Zone the GPS will locate in 1 3mins We have set up video steps on www eborn net cn EBORN G 01 Layout Structure 1 Power 2 MENU 3 UP button 4 Down button 5...

Page 6: ...4 20 Main Interface Instruction...

Page 7: ...5 20 Button functions...

Page 8: ...en first time use it will ask you format the memory card please choose YES and format it After formatting EBORN dash cam will start recording Button functions in recording mode Preview mode Press OK b...

Page 9: ...recording then press the menu button Button functions in menu mode Tips If you press the menu button during preview mode it will direct you to the recording menu and if you press it during photo mode...

Page 10: ...8 20...

Page 11: ...9 20 Playback mode Long press M button at preview mode it will direct you to playback mode you can see a video list...

Page 12: ...10 20 Choose a file to play you can use the button to delete or move to another file Photo mode Short Press M button at preview mode...

Page 13: ...nd is off when vehicle is off After you install the car hardwire successfully then car charger will always have power supply even engine is off please use parking mode as below steps 1 Stop recording...

Page 14: ...ns sensor any moving object it will start recording and stop recording after 20sec The screen will sleep in parking mode you can press any key to awake the screen if no continue operate in 5 seconds s...

Page 15: ...d horizontal Second step press Up and Down button to adjust red line to the edge of engine cover liking picture after adjusting press OK to exit LDWS calibration Remark you need adjust the purple and...

Page 16: ...60P 1280 x 720 30P Metering Mode Setting Metering Mode refers to the way in which camera determines the exposure Frequency Light Frequency anti flickering Auto 60Hz USA Standard 50Hz European Standard...

Page 17: ...ight the car in front of you has already gone but you don t move yet it will remind you 2 Safety driving distance warning when your car is too close with another one it will warn you Record Time Loop...

Page 18: ...rsion from setting menu Indicator Instruction When boot up it will comes blue light first it means successfully connect with power then it will countdown 3 seconds then blinking red means recording Co...

Page 19: ...your computer when the first time you set there is no need to set every time unless you change another computer If the G sensor picks up a high amount of lateral G in any direction the camera will aut...

Page 20: ...18 20 EBORN Electronic Technology Inc WWW EBORN NET CN...

Reviews: