background image

ROT

EN

13

www.eberg.eu

READ INSTRUCTIONS CAREFULLY: Read and follow all instructions. Please keep this instructions in a safe 

place for future reference. Do not allow anyone who has not read these instructions to assemble, switch 

on/off, adjust or operate the heating panel.

1. SAFETY NOTES

PLEASE READ AND SAVE THESE IMPORTANT SAFETY INSTRUCTIONS 

When using electrical appliances, basic precautions should always be followed to reduce the risk of 

fire, electric shock, and injury to persons, including the following: 

• 

Read all instructions before using this heater.

• 

Extreme caution:

 This appliance is not intended for use by persons (including children) with 

reduced physical, sensory or mental capabilities, or lack of experience and knowledge, unless they 

have been given supervision or instruction concerning use of the appliance by a person responsible 

for their safety.

• 

Children should be supervised to ensure that they do not play with the appliance. Children are not 

allowed to connect the device, operate, regulate, clean and maintain.

• 

The heating panel should not be used in small rooms occupied by people who are unable to leave 

the room on their own, unless they are under the constant supervision of a person for their safety.

• 

This heater is hot when in use. To avoid burns, do not let bare skin touch hot surfaces. Keep 

combustible materials, such as furniture, pillows, bedding, papers, clothes, and curtains at least 1 

meter from the front of the heater and keep them away from the sides and rear.

• 

Always unplug heater when not in use. Before disconnecting the power cord, turn off the power at 

the switch on the control panel.

• 

Do not operate the heater with a damaged cord or plug or after the heater malfunctions, has been 

dropped or damaged in any manner. Return it to authorized service facility for examination, electrical 

or mechanical adjustment, or repair.

• 

Indoor use only, wall or ceiling mounted and free standing. For safety reasons manufacturer do not 

recommend to use standing feet in model ROT 960E.

• 

This heater is not intended for use in bathrooms, laundry areas and similar indoor locations. Never 

locate heater where it may fall into bathtub or other water container.

• 

The cable should be routed in such a way that the heating panel and other objects do not lie on 

it. Also, do not run the cord under carpets or other materials. Keep the cord away from busy areas 

where it may be accidentally pulled out or where there is a risk of tripping or tipping over.

• 

To prevent a possible fire, do not block the space between the heater and the wall which is for air 

intake or exhaust in any manner. 

• 

A heater has hot and arcing or sparking parts inside. Do not use it in the areas where gasoline, paint, 

or flammable liquids are used or stored.

• 

Use this heater only as described in this manual. Any other use not recommended by the 

manufacturer may cause fire, electric shock, or injury to persons.

• 

Avoid the use of an extension cord because the extension cord may overheat and cause a risk of fire. 

• 

To prevent overloading a circuit, do not plug the heater into a circuit that already has other appliances 

working. Do not install the heater under the wall socket.

• 

It is normal for the plug to feel warm to the touch; however, improperly mating the electrical outlet 

and plug may cause overheating and distortion of the plug. Contact a qualified electrician to replace 

loose or worn outlet.

• 

The output of this heater may vary and its temperature may become intense enough to burn 

exposed skin. Use of this heater is not recommended for persons with reduced sensitivity to heat or 

an inability to react to avoid burns.

• 

Warning! In order to avoid overheating, do not cover the heater.

• 

Do not leave the device unattended when it is switched on. This also applies to remote control and 

mobile application control using.

Summary of Contents for ROT 600E

Page 1: ...PANELOWY PROMIENNIK CIEPŁA NA PODCZERWIEŃ INFRARED PANEL HEATER ROT 600E ROT 720E ROT 960E Instrukcja obsługi User manual ...

Page 2: ...o zakończeniu pracy urządzenia przed czyszczeniem lub w przypadku stwierdzenia nieprawidłowej pracy należy zawsze odłączyć urządzenie od źródła zasilania przez wyciągnięcie wtyczki z gniazda sieciowego Nie wolno używać produktu z uszkodzonym przewodem lub wtyczką lub gdy produkt działa nieprawidłowo został upuszczony lub wygląda na uszkodzony W takim wypadku należy zwrócić kompletny produkt do mie...

Page 3: ...dą lub zanurzony należy natychmiast odłączyć urządzenie poprzez wyciągnięcie wtyczki z gniazda sieciowego Uwaga Dotykającurządzenia należyupewnićsię żeręcesąsuche Nienależydotykaćurządzenia wtyczki lub przewodu mokrymi rękoma pod rygorem porażenia prądem elektrycznym oraz utraty życia lub zdrowia Należy zachować niniejszą instrukcję 2 ROZPAKOWANIE I INSTRUKCJA MONTAŻU URZĄDZENIA Przed użyciem nale...

Page 4: ...NTAŻU NA SUFICIE Odległość pomiędzy krawędziami panelu grzewczego a podłogą ścianą sufitem i innymi przeszkodami musi być większa niż 20 cm Minimalna odległość od sufitu to 4 cm umożliwia to swobodny przepływ powietrza oraz zapobiega przegrzaniu panelu grzewczego Minimalna odległość panelu przedniego urządzenia od podłogi to 185 cm Do powieszenia panelu należy wybrać sufit wykonany z niepalnego ma...

Page 5: ...aj otwory wiertarką 3 Włóż plastikowe kołki rozporowe w wywiercone otwory 4 Przykręć wspornik za pomocą śrub zabezpieczonych podkładkami 5 Zamontuj panel na wsporniku i upewnij się że jest to wykonane zgodnie z poniższym rysunkiem ...

Page 6: ...chomić panel grzewczy Na wyświetlaczu pojawi się aktualna temperatura w pomieszczeniu 4 Aby wyłączyć urządzenie naciśnij ponownie przycisk Odłącz wtyczkę od gniazda sieciowego Termostat Po naciśnięciu przycisku lub na wyświetlaczu będzie migać 5 razy zadana wartość temperatury W tym czasie należy ustawić żądaną temperaturę używając przycisków lub Po każdym naciśnięciu przycisku wartość temperatury...

Page 7: ... konfiguracji sieć ta musi mieć dostęp do internetu i nie mogą być zablokowane porty Pracę urządzenia może kontrolować tylko jedna aplikacja mobilna jednocześnie Jeżeli chcesz zmienić telefon z którego obsługiwane jest urządzenie odinstaluj urządenie w aplikacji na tym telefonie i skonfiguruj połączenie z nowym telefonem zgodnie z opisem w instrukcji 4 1 Zeskanuj telefonem poniższy kod QR lub wysz...

Page 8: ...proces wyszukiwania urządzenia bezprzewodowego w sieci Wi Fi 4 4 6 Znalezione urządzenie zostanie wyświetlone na liście W przypadku problemów należy postępować zgodnie z podpowiedziami aplikacji mobilnej 4 4 7 Potwierdź zakończenie dodawania urządzenia bezprzewodowego 4 4 8 Ustaw własną rozpoznawalną nazwę dla urządzenia 4 4 9 Proces dodawania urządzenia został zakończony ...

Page 9: ...ę automatyczne skanowanie 4 5 2 Twoja sieć w której będzie urządzenie musi pracować w paśmie 2 4GHz Upewnij się że Wi Fi Bluetooth i lokalizacja są włączone 4 5 3 Rozpocznie się proces wyszukiwania urządzenia bezprzewodowego w sieci Wi Fi 4 5 4 Potwierdź zakończenie dodawania urządzenia bezprzewodowego 4 5 5 Proces dodawania urządzenia został zakończony ...

Page 10: ...zadaną temperaturę 5 3 Aby ustawić czas po jakim urządzenie ma się wyłączyć naciśnij przycisk Countdown 5 4 Wybierz czas po jakim urządzenie ma się wyłączyć następnie naciśnij Potwierdź Confirm 5 5 Naciśnij przycisk Smart Timer aby ustawić program tygodniowy 5 6 Ustaw godzinę włączenia wyłączenia urządzenia w danym dniu oraz temperaturę zadaną następnie naciśnij Save Zapisz ...

Page 11: ...IGHT Podświetlenie wygaszenie wyświetlacza znajdującego się na panelu grzewczym Włącz wyłącz urządzenie 7 ROZWIĄZYWANIE PROBLEMÓW Jeżeli urządzenie nie włącza się postępuj zgodnie z poniższymi instrukcjami Sprawdź bezpiecznik sieci elektrycznej budynku lokalu Sprawdź czy panel grzewczy jest podłączony i gniazdko elektryczne działa prawidłowo Jeżeli w dalszym ciągu urządzenie nie działa prawidłowo ...

Page 12: ...E i ROT 720E Akcesoria do montażu ściennego plastikowe kołki rozporowe 4 szt metalowe wkręty 4 szt Akcesoria do montażu na suficie plastikowe kołki rozporowe 4 szt metalowe wkręty 4 szt podkładki do wkrętów 4 szt wspornik typu H 1 szt 11 UTYLIZACJA INFORMACJE DOTYCZĄCE PRAWIDŁOWEJ UTYLIZACJI PRODUKTU ZGODNIE Z DYREKTYWĄ EUROPEJSKĄ 2012 19 EU Po zakończeniu używania urządzenia nie wolno go utylizow...

Page 13: ...ity for examination electrical or mechanical adjustment or repair Indoor use only wall or ceiling mounted and free standing For safety reasons manufacturer do not recommend to use standing feet in model ROT 960E This heater is not intended for use in bathrooms laundry areas and similar indoor locations Never locate heater where it may fall into bathtub or other water container The cable should be ...

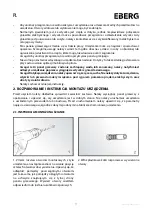
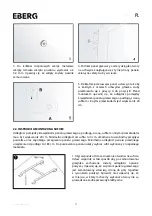
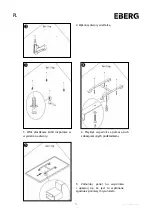
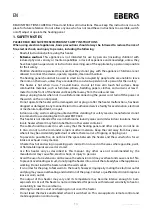
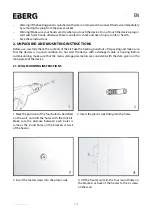
Page 14: ...packing and make sure that the devices is in good condition Do not start the device with a damaged cable or housing Before commissioning make sure that the mains voltage parameters are consistent with the data given on the rating plate of the device 2 1 WALL MOUNTING INSTRUCTIONS 1 Mark the positions of the four holes to be drilled on the wall and drill the holes with the drill bit Make sure the d...

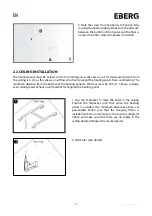
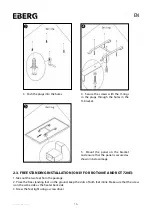
Page 15: ...ill prevent the heating panel from overheating The minimum distance from the bottom of the heating panel to the floor must be 185 cm Choose a sturdy even ceiling made of heat proof material for hanging the heating panel 1 Use the H bracket to mark the holes in the ceiling Position the H bracket such that when the heating panel is installed the minimum distances above are guaranteed Make sure that ...

Page 16: ... bracket and ensure that the panel is secured as shown in below image 2 3 FREE STANDING INSTALLATION ONLY FOR ROT 600E AND ROT 720E 1 Take out the two feet from the package 2 Place the free standing feet on the ground keep the slots of both feet inline Make sure that the screw is on the same side as the heater back side 3 Screw the feet tight using a screw driver ...

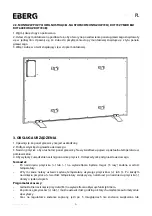
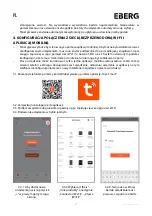
Page 17: ...ch press it will go an hour forwards or backwards The timer time is set after 5x unchanged blinking The display will now alternately show the room temperature and the set number of hours The heater will switch itself off after the set number of hours 4 CONFIGURATION OF CONNECTION WITH WI FI WIRELESS NETWORK AND MOBILE APPLICATION In order to be able to remotely control a configured device using th...

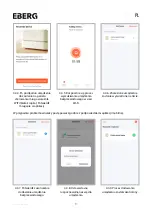
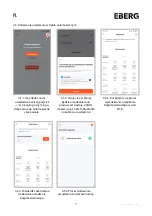
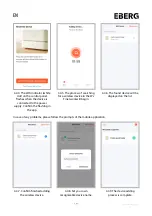
Page 18: ...nnect the device to the power supply and make sure that it is within the range of the network 4 4 Adding the device in manual mode 4 4 1 To add a new device press the button in the top right corner of the screen 4 4 2 Select Others and then Connector Wi Fi 4 4 3 Your network in which the device will be used must operate in the 2 4GHz band Set the network and password ...

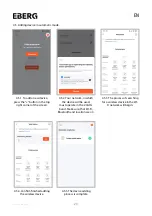
Page 19: ... the app 4 4 5 The process of searching for a wireless device in the Wi Fi network will begin 4 4 6 The found device will be displayed on the list In case of any problems please follow the prompts of the mobile application 4 4 7 Confirm finished adding the wireless device 4 4 8 Set your own recognizable device name 4 4 9 The device adding process is complete ...

Page 20: ...of the screen 4 5 2 Your network in which the device will be used must operate in the 2 4GHz band Make sure that Wi Fi Bluetooth and location are on 4 5 3 The process of searching for a wireless device in the Wi Fi network will begin 4 5 4 Confirm finished adding the wireless device 4 5 5 The device adding process is complete ...

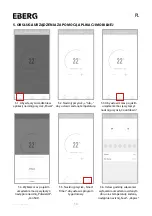
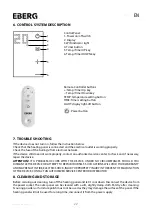
Page 21: ... 2 Press the or button to set the set temperature 5 3 Press the Countdown button to set the time after which the device turns off 5 4 Set the time after which the device turns off press Confirm button 5 5 Press Smart Timer button to set the weekly program 5 6 Set the time of switching on off the device and the set temperature then press Save button ...

Page 22: ...operly contact an authorized service center to check and if necessary repair the device ATTENTION IF A PROBLEM OCCURS WITH THE DEVICE UNDER NO CIRCUMSTANCES SHOULD YOU DISMANTLE THE DEVICE OR ATTEMPT TO REPAIR YOURSELF SUCH ACTIONS WILL VOID YOUR WARRANTY ANDMAYRESULTINFIRE ELECTRICSHOCK INJURYORPROPERTYINJURY INTHEEVENTOFMALFUNCTION OF THE DEVICE CONTACT AN AUTHORIZED SERVICE CENTER OR DISTRIBUTO...

Page 23: ...OF THE DEVICE INFORMATION REGARDING THE CORRECT DISPOSAL OF THE PRODUCT IN ACCORDANCE WITH THE EUROPEAN DIRECTIVE 2012 19 EU At the end of its working life the device must not be disposed of with household waste We pay particular attention to the key role of the consumer in the recycling of this type of waste The device must be disposed of at a waste disposal center Sorting waste such as old elect...

Page 24: ...aną w dokumentacji Technicznej 5 Stwierdzone uszkodzenia urządzenia objętego Gwarancją należy zgłosić Climateo eu Sp z o o Kokotów 703 32 002 Kokotów tel 48 12 352 34 25 6 Zgłoszenie reklamacyjne powinno zawierać 1 Model urządzenia 2 Numer seryjny 3 Datę zgłoszenia reklamacji 4 Opis uszkodzenia 5 Datę zakupu 6 Kopię dowodu zakupu 7 Zgłoszenia reklamacyjne będą rozpatrzone w terminie nie dłuższym n...

Page 25: ...rzedawcy Model Nr fabr nr silnika Nr rachunku faktury Data sprzedaży Nazwa i adres firmy Telefon kontaktowy Osoba do kontaktu Dane zgłaszającego reklamację Adnotacje o przebiegu napraw Data zgłoszenia Data naprawy Uszkodzenie Rodzaj naprawy Wykonał serwis podpis i pieczęć ...

Page 26: ...Kokotów 703 32 002 Kokotów biuro eberg eu tel 48 12 352 34 25 www eberg eu ...

Reviews: