background image

ERI

EN

21

www.eberg.eu

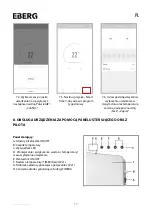
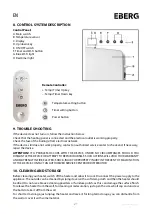
8. CONTROL SYSTEM DESCRIPTION

Control Panel:

A. Main switch 

B. Temperature sensor

C. Display

D. Up/down key

E. ON/OFF switch

F. Timer and Wi-Fi button

G. Blue Wi-Fi light

H. Red timer light

Remote Controller: 

+: Temp./Timer Up key
–: Temp./Timer Down key

: Temperature setting button

: Timer setting button

: Power button

9. TROUBLE SHOOTING

If the device does not turn on, follow the instruction below:

Check that the heating panel is connected and the electrical outlet is working properly.

Check the fuse of the builing’s/flat’s electrical network.

If the device still doea not work properly, contact an authorized service center to check and, if necessary,

repair the device.

ATTENTION!

 IF A PROBLEM OCCURS WITH THE DEVICE, UNDER NO CIRCUMSTANCES SHOULD YOU 

DISMANTLE THE DEVICE OR ATTEMPT TO REPAIR YOURSELF. SUCH ACTIONS WILL VOID YOUR WARRANTY 

AND MAY RESULT IN FIRE, ELECTRIC SHOCK, INJURY OR PROPERTY INJURY. IN THE EVENT OF MALFUNCTION 

OF THE DEVICE, CONTACT AN AUTHORIZED SERVICE CENTER OR DISTRIBUTOR. 

10. CLEANING AND STORAGE

Before cleaning your heater, switch off the heater and allow it to cool. Disconnect the power supply to the 

appliance. The outside can be cleaned by wiping it over with a soft damp cloth and then the heater should 

be dried. Do not use abrasive cleaning powders or furniture polish, as this can damage the surface finish. 

To release the heater from the wall, for cleaning or redecoration, just open the screw bolt cap and unscrew 

the bolts to take it off from the wall. 
For short term storage, just unplug the heater and leave it; for long term storage, you can dismantle from 

the wall or cover it with some material. 

Summary of Contents for ERI 425 WiFi

Page 1: ...PANELOWY PROMIENNIK CIEPŁA NA PODCZERWIEŃ INFRARED PANEL HEATER ERI 425 WiFi Instrukcja obsługi User manual ...

Page 2: ...odpowierzchni panelu przedniego grzejnika oraz trzymać z dala od bocznej i tylnej części urządzenia Po zakończeniu pracy urządzenia przed czyszczeniem lub w przypadku stwierdzenia nieprawidłowej pracy należy zawsze odłączyć urządzenie od źródła zasilania przez wyciągnięcie wtyczki z gniazda sieciowego Przed wyciągnięciem wtyczki należy upewnić się że urządzenie jest wyłączone za pomocą głównego pr...

Page 3: ...ie wolno pozostawiać włączonego urządzenia bez nadzoru Dotyczy to także zdalnego sterowania przy zastosowaniu aplikacji mobilnej lub pilota Uwaga Jeśli panel grzewczy zostanie zachlapany wodą lub zanurzony należy natychmiast odłączyć urządzenie poprzez wyciągnięcie wtyczki z gniazda sieciowego Uwaga Dotykając urządzenie należy upewnić się że ręce są suche Nie należy dotykać urządzenia wtyczki lub ...

Page 4: ...źniejszy demontaż Aby zdjąć urządzenie ze ściany należy usunąć zaślepki odkręcić śruby śrubokrętem a następnie zdemontować grzejnik 3 MONTAŻ W POZYCJI WOLNOSTOJĄCEJ NA STOPACH MONTAŻOWYCH 1 Ustaw stopy montażowe na podłożu tak aby otwory na posadowienie grzejnika znajdowały się w jednej linii Dopasuj panel grzewczy do otworów w stopach montażowych Odległość stopy od krawędzi grzejnika powinna wyno...

Page 5: ...nia 4 Naciśnij przycisk aby uruchomić panel grzewczy Na wyświetlaczu pojawi się wartość aktualnej temperatury w pomieszczeniu 5 Aby wyłączyć panel grzewczy naciśnij ponownie przycisk Urządzenie będzie się znajdowało w trybie czuwania Wyłącz je głównym wyłącznikiem z boku obudowy wyłączone O kontrolka zgaśnie Jeżeli urządzenie nie będzie używane przez dłuższy czas należy wyjąć wtyczkę z gniazda sie...

Page 6: ...podłączone do sieci zasilającej znajdować się w zasięgu zapisanej w jego pamięci sieci Wi Fi o nazwie SSID oraz z hasłem ustawionym podczas konfiguracji sieć ta musi mieć dostęp do internetu i nie mogą być zablokowane porty 2 Pracę urządzenia może kontrolować tylko jedna aplikacja mobilna jednocześnie Jeżeli chcesz zmienić telefon za pomocą którego obsługiwane jest urządzenie na inny odinstaluj ur...

Page 7: ... 6 4 3 Twoja sieć w której będzie urządzenie musi pracować w paśmie 2 4GHz 6 4 4 Gdy urządzenie znajduje się w trybie czuwania na wyświetlaczu mruga niebieska dioda szybkie mruganie Po twierdź mruganie w aplikacji 6 4 5 Rozpocznie się proces wyszukiwania urządzenia bezprzewodowego w sieci Wi Fi 6 4 6 Znalezione urządzenie zostanie wyświetlone na liście ...

Page 8: ...a 6 4 9 Proces dodawania urządzenia został zakończony 6 5 Dodawanie urządzenia w trybie automatycznym 6 5 1 Aby dodać nowe urządzenie naciśnij przycisk w prawym górnym rogu Rozpocznie się automatyczne skanowanie 6 5 2 Twoja sieć w której będzie urządzenie musi pracować w paśmie 2 4GHz Upewnij się że Wi Fi Bluetooth i lokalizacja są włączone 6 5 3 Rozpocznie się proces wyszukiwania urządzenia bezpr...

Page 9: ...ces dodawania urządzenia został zakończony 7 OBSŁUGA URZĄDZENIA ZA POMOCĄ APLIKACJI MOBILNEJ 7 1 Aby włączyć urządzenie w aplikacji naciśnij przycisk Power 7 2 Naciśnij przycisk lub aby ustawić zadaną temperaturę 7 3 Aby ustawić czas po jakim urządzenie ma się wyłączyć naciśnij przycisk Countdown ...

Page 10: ...niu oraz temperaturę zadaną następnie naciśnij Save Zapisz 8 OBSŁUGA URZĄDZENIA ZA POMOCĄ PANELU STERUJĄCEGO ORAZ PILOTA Panel sterujący A Główny przełącznik ON OFF B Czujnik temperatury C Wyświetlacz LED D Zmniejszenie zwiększenie wartości temperatury czasu wyłączenia urządzenia E Przełącznik ON OFF F Nastawa temperatury TIMER Reset Wi Fi G Niebieska dioda sygnalizująca połączenie z Wi Fi H Czerw...

Page 11: ...PODEJMOWAĆ PRÓBY SAMODZIELNEJ NAPRAWY TAKIE DZIAŁANIA BĘDĄ SKUTKOWAĆ UTRATĄ GWARANCJI I MOGĄ SPOWODOWAĆ POŻAR PORAŻENIE PRĄDEM USZKODZENIE MIENIA LUB OBRAŻENIA CIAŁA W PRZYPADKU NIEPRAWIDŁOWEJ PRACY URZĄDZENIA NALEŻY SKONTAKTOWAĆ SIĘ Z AUTORYZOWANYM SERWISEM LUB DYSTRYBUTOREM 10 CZYSZCZENIE I PRZECHOWYWANIE Przed przystąpieniem do czynności konserwacyjnych wyłącz panel grzewczy i pozwól mu ostygną...

Page 12: ...gę Segregacja odpadów i urządzeń elektrycznych zapobiega potencjalnie negatywnym skutkom dla środowiska i zdrowia ludzkiego wynikającym z nieodpowiedniej utylizacji a także pozwalają na recykling materiałów które można odzyskać w celu osiągnięcia znacznych oszczędności energii i zasobów Obowiązek oddzielnej utylizacji jest podkreślony symbolem przekreślonego kosza na śmieci umieszczonego na produk...

Page 13: ... or after the product malfunctions or is dropped or appears damaged in any way Return the complete product to the place of purchase for inspection repair or replacement Indoor use only wall mounted or free standing This heater is not intended for use in bathrooms laundry areas and similar indoor locations Never locate heater where it may fall into bathtub or other water container The cable should ...

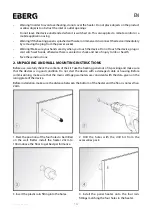
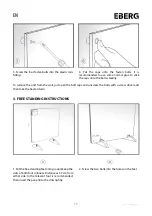
Page 14: ...tructions 2 UNPACKING AND WALL MOUNTING INSTRUCTIONS Before use carefully check the contents of the kit Take the heating panel out of its packing and make sure that the devices is in good condition Do not start the device with a damaged cable or housing Before commissioning make sure that the mains voltage parameters are consistent with the data given on the rating plate of the device Before insta...

Page 15: ...ly To remove the unit from the wall just open the bolt caps and unscrew the bolts with a screw driver and then take the heater down 3 FREE STANDING INSTRUCTIONS 1 Put the free standing feet onto ground keep the slots of both foot collinear Distance as 5 7cm from either side to the relevant foot is recommended then insert the panel into the slots lightly 2 Screw the two bolts into the holes on the ...

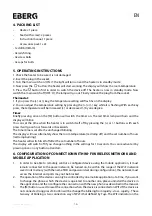
Page 16: ... or backwards The timer time is set after 5x unchanged blinking The display will now alternately show the room temperature red lamp off and the set number of hours red lamp burning The heater will switch itself off after the set number of hours The display will switch off if you change nothing in the settings for 10 seconds You can reactivate it by pressing once on any button at random 6 CONFIGURA...

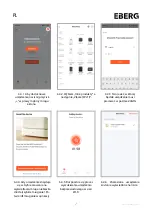
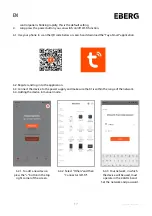
Page 17: ...rt application 6 2 Register and log in to the application 6 3 Connect the device to the power supply and make sure that it is within the range of the network 6 4 Adding the device in manual mode 6 4 1 To add a new device press the button in the top right corner of the screen 6 4 2 Select Others and then Connector Wi Fi 6 4 3 Your network in which the device will be used must operate in the 2 4GHz ...

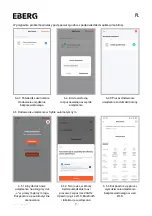
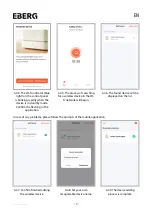
Page 18: ... application 6 4 5 The process of searching for a wireless device in the Wi Fi network will begin 6 4 6 The found device will be displayed on the list In case of any problems please follow the prompts of the mobile application 6 4 7 Confirm finished adding the wireless device 6 4 8 Set your own recognizable device name 6 4 9 The device adding process is complete ...

Page 19: ...of the screen 6 5 2 Your network in which the device will be used must operate in the 2 4GHz band Make sure that Wi Fi Bluetooth and location are on 6 5 3 The process of searching for a wireless device in the Wi Fi network will begin 6 5 4 Confirm finished adding the wireless device 6 5 5 The device adding process is complete ...

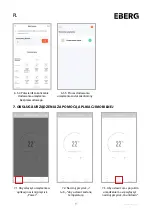
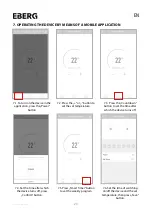
Page 20: ... 2 Press the or button to set the set temperature 7 3 Press the Countdown button to set the time after which the device turns off 7 4 Set the time after which the device turns off press Confirm button 7 5 Press Smart Timer button to set the weekly program 7 6 Set the time of switching on off the device and the set temperature then press Save button ...

Page 21: ...THE DEVICE UNDER NO CIRCUMSTANCES SHOULD YOU DISMANTLE THE DEVICE OR ATTEMPT TO REPAIR YOURSELF SUCH ACTIONS WILL VOID YOUR WARRANTY ANDMAYRESULTINFIRE ELECTRICSHOCK INJURYORPROPERTYINJURY INTHEEVENTOFMALFUNCTION OF THE DEVICE CONTACT AN AUTHORIZED SERVICE CENTER OR DISTRIBUTOR 10 CLEANING AND STORAGE Before cleaning your heater switch off the heater and allow it to cool Disconnect the power suppl...

Page 22: ...isposed of with household waste It must be delivered to the appropriate waste disposal plant or dealers who provide a similar service Separate disposal of waste from electrical appliances prevents potential negative consequences for the environment and human health from inappropriate disposal and allows materials to be recycled that can be recovered to achieve significant energy and resource savin...

Page 23: ...aną w dokumentacji Technicznej 5 Stwierdzone uszkodzenia urządzenia objętego Gwarancją należy zgłosić Climateo eu Sp z o o Kokotów 703 32 002 Kokotów tel 48 12 352 34 25 6 Zgłoszenie reklamacyjne powinno zawierać 1 Model urządzenia 2 Numer seryjny 3 Datę zgłoszenia reklamacji 4 Opis uszkodzenia 5 Datę zakupu 6 Kopię dowodu zakupu 7 Zgłoszenia reklamacyjne będą rozpatrzone w terminie nie dłuższym n...

Page 24: ...rzedawcy Model Nr fabr nr silnika Nr rachunku faktury Data sprzedaży Nazwa i adres firmy Telefon kontaktowy Osoba do kontaktu Dane zgłaszającego reklamację Adnotacje o przebiegu napraw Data zgłoszenia Data naprawy Uszkodzenie Rodzaj naprawy Wykonał serwis podpis i pieczęć ...

Page 25: ......

Page 26: ...Kokotów 703 32 002 Kokotów biuro eberg eu tel 48 12 352 34 25 www eberg eu ...

Reviews: