


2
C
ongratulations on your new EXRC purchase! EXRC pilots experience superior remote control
fl ight and excellence in the look and feel of our products while commanding the skies. Now
that you are a honorary EXRC pilot, we recommend reading through this manual thoroughly before
attempting your fi rst fl ight. Inside this manual you will fi nd fl ight tips, safety precautions, and care
instructions to keep your EXRC helicopter in tip-top shape for multiple fl ight missions. No need to
make sure your seats and tray tables are in the upright and locked position, no need to worry about
loss of cabin pressure, and no fl ight attendants to do a fi nal check before air-craft take off . Just
follow the instructions, enjoy your EXRC helicopter to the fullest and command the skies.
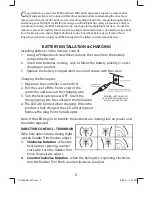
BATTERY INSTALLATION & CHARGING
Installing Batteries in the Remote Control:
1. Using a Phillips-head screwdriver, remove the screw from the battery
compartment cover.
2. Insert 6 AA batteries, making sure to follow the battery polarity (+ and -)
drawing on product.
3. Replace the battery compartment cover and secure with the screw.
Charging the Helicopter:
1. Make sure the controller is turned ON.
2. Pull the cover off the front center of the
controller, and take out the charging wire.
3. Turn the helicopter power OFF. Insert the
charging plug into the socket on the helicopter.
4. The LED will turn red when charging. When the
product is fully charged, the LED will turn green.
Remove the plug from the helicopter.
Note: If the LED begins to twinkle, the batteries are running low on power and
should be replaced.
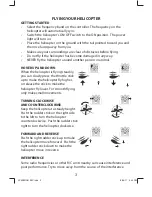
DIRECTION CONTROL - TRIM KNOB
If the helicopter rotates during fl ight,
use the Rudder Trim Knob to adjust.
1. Clockwise
Rotation
- when the
helicopter is spinning counter-
clockwise, turn the Rudder Trim
Knob clockwise to adjust.
2. Counterclockwise
Rotation
- when the helicopter is spinning clockwise,
turn the Rudder Trim Knob counterclockwise to adjust.
REQUIRES APPROXIMATELY
20-30 MINUTES CHARGE FOR
A FULL 5-6 MINUTE FLIGHT.
XC5380IS01EXC.indd 2
XC5380IS01EXC.indd 2
8/29/11 3:43 PM
8/29/11 3:43 PM


