8
– CIS961 and CIS991
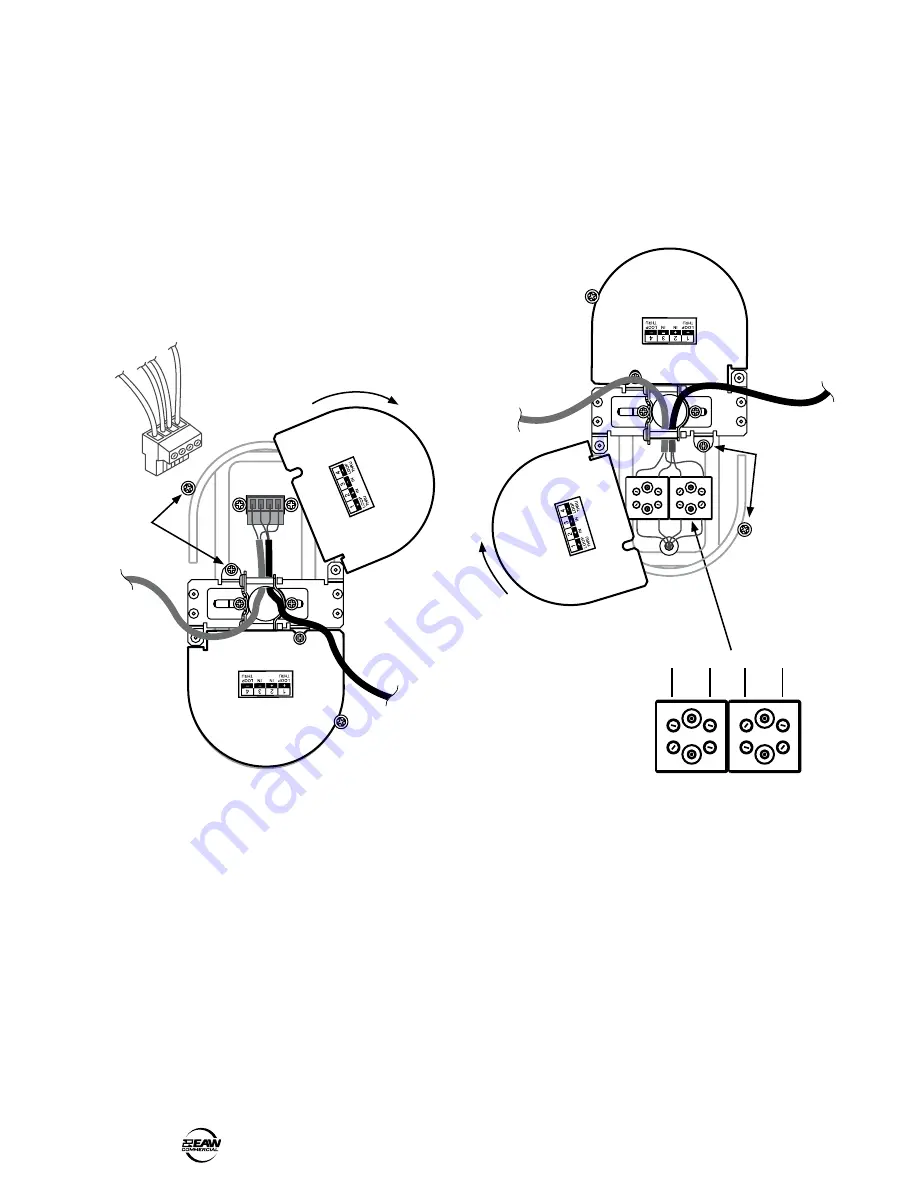
Phoenix-type connections
1. Loosen two locking screws (shown below) and
rotate the cover plate to gain access to the input
terminals. The loudspeaker is supplied with a
Phoenix-type connector pressed in place.
2. Pass the cables through the strain-relief clamp.
3. Pull off the supplied Phoenix-type connector
and attach the loudspeaker cables using a small
screwdriver. The two inner connections are labeled
IN + and IN –.
4. If connecting another loudspeaker in a distributed
system (in parallel), connect the speaker cable
running to the next speaker to the outer “+” and
“–” terminals labeled LOOP THRU.
5. Press the Phoenix-type connector in place.
6. Tighten the strain relief screws to secure the
speaker cable or flexible conduit. Give the cables
some slack before securing the strain-relief clamp.
Close the terminal cover plate and tighten both
locking screws firmly.
IN
+
IN
–
LOOP
THRU
–
LOOP
THRU
+
From amplifier
To next
loudspeaker
Locking screws
Screw terminal connections
1. Loosen two locking screws and rotate the cover
plate to gain access to the screw terminals.
2. Pass the cables through the strain-relief clamp.
3. Secure the loudspeaker cables using a small
screwdriver. The two inner connections are labeled
IN + and IN –.
4. If connecting another loudspeaker in a distributed
system (in parallel), connect the speaker cable
running to the next speaker to the outer “+” and
“–” terminals labeled LOOP THRU.
5. Tighten the strain relief screws to secure the
speaker cable or flexible conduit. Give the cables
some slack before securing the strain-relief clamp.
Close the terminal cover plate and tighten both
locking screws firmly.
From amplifier
To next
loudspeaker
Locking screws
Loop
Thru +
Loop
Thru – IN – IN +
Close-up view


