Connecting a NetCommWireless NTC-140W
Series Router to an Eaton® Network Card
2
© 2017. Eaton Corporation. All Rights Reserved.
Connecting the Router to a Network-MS Card
To connect the NTC-140W Series router to a Network-MS card:
• Connect an Ethernet cable from the
ETHERNET
port on the Net-
work-MS card (Figure 5) to the
LAN
port on the NTC-140W Series
router. Use the included Ethernet cable or equivalent.
• If the Network-MS is located inside the UPS chassis, route the cable
out of the chassis via a conduit hole that is protected by a rubber
grommet
Once connected, the LEDs on the Network-MS card’s
ETHERNET
port
should light and the green LED at the top left of the
Settings/Sensor
port should blink.
Configuring a Network-MS Card
To troubleshoot or set up the Network-MS card, refer to Sections 3–5
of the card’s
Quick Start Instructions
for information on connecting
a computer running a terminal emulation program (such as PuTTy or
HyperTerminal) to the card’s
Settings/Sensor
port using the supplied
serial-to-RJ-45 cable.
The Network-MS default configuration includes a DHCP network con-
figuration. For a new installation, no changes are necessary on the
Network-MS card. The only steps necessary are to add the SMTP relay
information (
mail.eaton.com
) and verify that the e-mail recipient (
moni-
) is properly configured. The router does not require
any additional setup steps.
To configure the Network-MS card, connect to the
Settings/Sensor
port with the serial-to-RJ-45 cable and launch a terminal emulation ses-
sion. Use the serial settings 9600 baud, 8 data bits, 1 stop bit, no parity,
and no flow control (Figure 6).
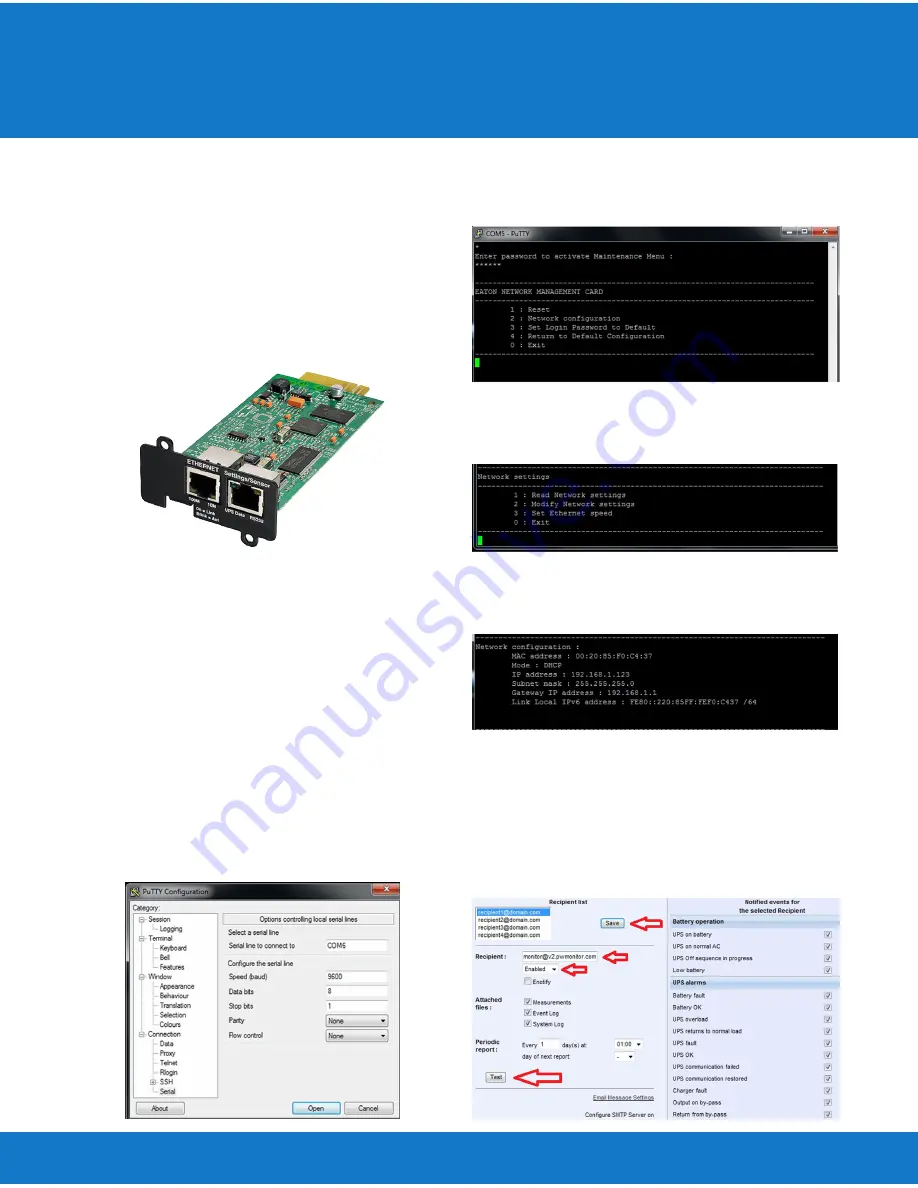
Figure 5. Network-MS Card
Figure 6. Network-MS Card Serial Communications Settings
At the blinking screen, press
Enter
. You should be prompted to enter a
password. Enter the password (default is admin) to display the Network-
MS card main menu (Figure 7).
Figure 7. Network-MS Card Main Menu
From the Network-MS card main menu, press
2
(Network configura-
tion). The
Network settings
menu displays (Figure 8).
Figure 8. Network-MS Card Network Settings Menu
From The
Network settings
menu, press
1
(Read Network settings). The
Network configuration
displays (Figure 9).
Record the IP address to access the Network-MS card’s graphical user
interface (GUI). Launch a web browser and navigate to the Network-MS
card’s IP address (Figure 10).
Ensure that
is listed in the
Recipient list
,
that the address is
Enabled
, and that all of the checkboxes in the
Noti-
fied events
list are checked. Click
Test
to send an email to any recipient
listed.
Proceed to the section titled,
Run the PredictPulse Wizard
.
Figure 9. Network-MS Card Network Configuration
Figure 10. Network-MS Card GUI


