


Connecting a NetCommWireless NTC-140W
Series Router to an Eaton® Network Card
Introduction
This document provides instructions for connecting a NetComm Wire-
less NTC-140W series wireless router to one of the following Eaton
connectivity cards:
• Power Xpert Gateway UPS (PXGX-UPS)
• PXGMS Power Xpert Gateway Minislot UPS (PXGMS)
• Network-MS
Prerequisites
• Eaton UPS with a PXGX-UPS, PXGMS, or Network-MS card
• PuTTy or HyperTerminal software
• USB-to-USB (Type B) cable for PXGX-UPS
• USB-to-USB (MiniTypeB) for PXGMS
• RJ-45 to 9-pin female serial (D shell) for Network-MS
• Serial COM port or USB-to-serial 9-pin male adapter
NTC-140W Series Router Installation Guidelines
Refer to the
Quick Start Guide
provided with the NetComm Wireless
NTC-140W Series Router for instructions on mounting the router and
connecting power.
Note:
The router must be powered by a 120V outlet powered by the
UPS. This ensures that the router is protected during a power outage.
Connecting the Router to a PXGX-UPS or PXGMS Card
Connect the NTC-140W Series router and Eaton network card. Use the
included Ethernet cable or equivalent.
For a PXGX-UPS card:
• Connect the Ethernet cable from the
LAN
port on the NTC-140W
Series router to the
Upstream
port on the card (Figure 1)
For a PXGMS card:
• Connect the Ethernet cable from the
Ethernet
port on the card (Fig-
ure 2) to the
LAN
part on the NTC-140W Series router
Route the Ethernet cable into the UPS via the appropriate conduit holes.
Once connected, the LEDs on the active Ethernet port, as well as the
green
Power
LED, should light.
© 2017. Eaton Corporation. All Rights Reserved.
Part Number: P-164000722
Revision: B0
November 2017
Configuring a PXGX-UPS or PXGMS Card
To troubleshoot or set up the PXGX-UPS or PXGMS card, refer to Sec-
tions 3–5 of the card’s
Quick Start Guide
for instructions on connecting
a Windows-based computer to the card’s
Setup
port using a USB cable.
For a new installation, the PXGX-UPS or PXGMS card will use default
configuration settings. The only steps necessary are to add the SMTP
relay information (
mail.eaton.com
) and to verify that the e-mail recipient
(
) is properly configured as described below.
The router does not require any additional setup steps.
If installing on an existing PXGX-UPS or PXGMS card, reset the card to
factory default settings as follows:
• Locate the onboard DIP switch and set switch 6 to ON
• Reboot the card to restore the factory defaults
• Return switch 6 to OFF and reboot the card
For more information on restoring the factory default settings, refer to
the
User’s Guide
provided with the card.
To configure the PXGX-UPS or PXGMS card, connect to the card’s
Set-
up
port using a USB cable. Once connected, open an internet browser
and navigate to http://192.168.200.101.
Log in using the default credentials:
Username: admin
Password: admin
From the
Configuration
menu (Figure 3), select
to display the
tab (Figure 4).
Figure 3. Configuration Menu
Figure 1. Power Xpert Gateway UPS (PXGX-UPS) Card
Figure 2. Power Xpert Gateway UPS (PXGX-UPS) Card
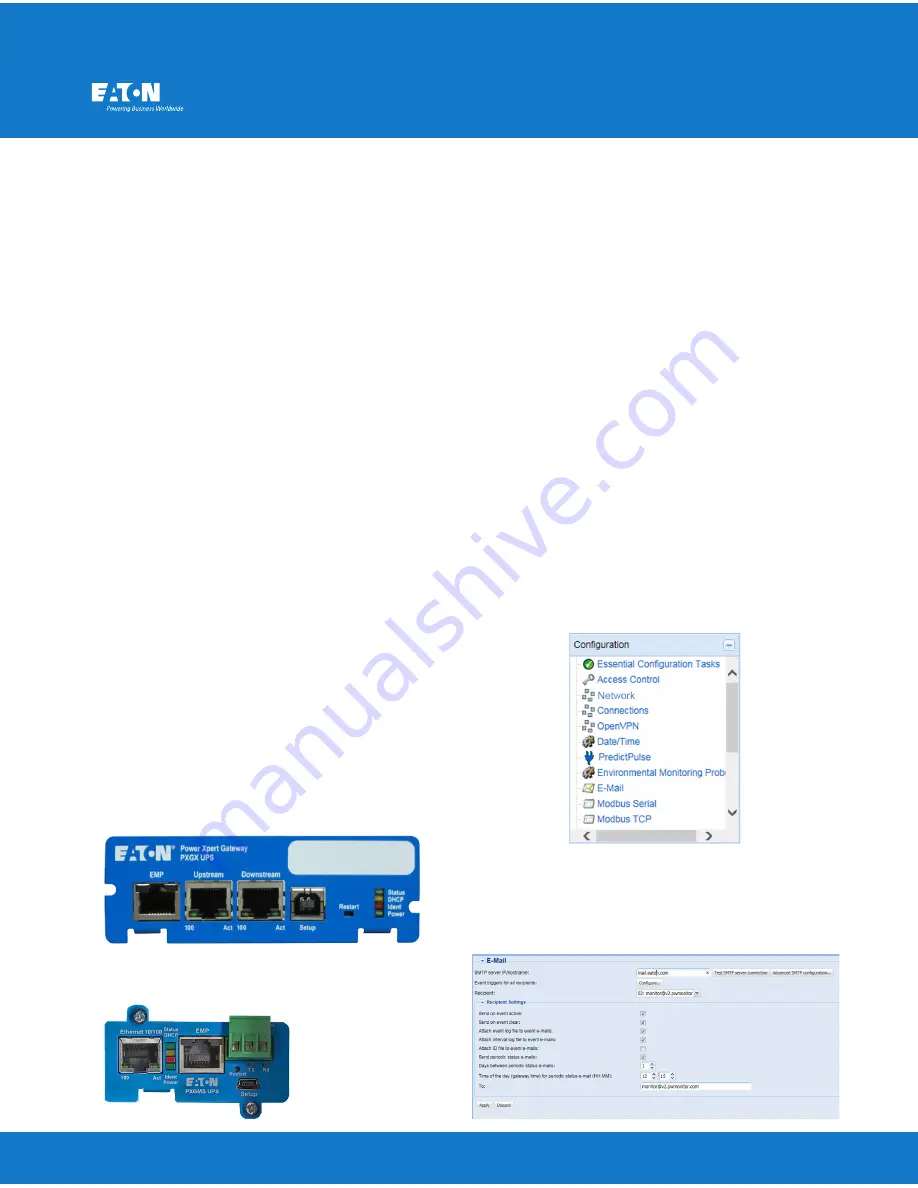
Ensure that the SMTP server/IP hostname is
mail.eaton.com
and that
an e-mail recipient is set up for
.
Proceed to the section titled,
Run the PredictPulse Wizard
.
Figure 4. E-Mail Tab