background image

2

EATON    

 IB507014EN


 Installation instructions


Installation Instructions – OHB Y-Toggle and V-Hanger

Y-Toggle Installation

ote:

N

Fixture to be installed no less than 12” [305mm] 

from the ceiling surface.  

Fixture CANNOT be used as a surface mounted 

fixture.

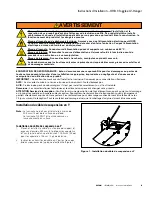
Cable/Y-Toggle Suspension Installation

1.  Locate and install cable to the support structure with 

the cables spaced approximately 21” [534mm] for 2FT 

fixture and approximately 43” [1093mm] for 4FT fixture 

apart.

2.  Slip the toggle ends through the holes on the upper 

flanges of the end plate. (Figure 1.)

Figure 1.   Cable/Y-Toggle Installation

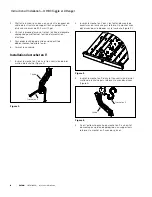
Figure 2.   

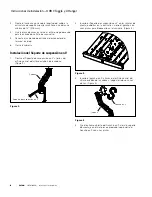
Figure 3.   

Figure 4.   

V-Hanger Installation

1.  Slide V-Hanger through center hole of last link of chain. 

(Figure 2.)

3.  Level the fixture by adjusting the cable length to 

the support structure while maintaining a minimum 

distance of 12” [305mm].

4.  Use the access plate and remove the desired knockout 

for supply voltage entry.

5.  Connect input wiring to driver disconnect provided.
6.  Close Cover.

2.  Insert V-Hanger into open mounting slots on fixture and 

close hook with pliers to lock into fixture. (Figure 3.)

Chain

V-Hanger

3.  Insert S-Hook through center hole of last link of chain 

then close with pliers. (Figure 4.)

4.  Attach open S-Hook end to appropriate ceiling mounting 

eyelet or bracket, then close S-Hook with pliers.

S-Hook

Chain

Summary of Contents for Metalux OHB Series

Page 1: ...fore handling or servicing Risk of Personal Injury Due to sharp edges handle with care Failure to comply with these instructions may result in death serious bodily injury and property damage WARNING D...

Page 2: ...Cable Y Toggle Installation Figure 2 Figure 3 Figure 4 V Hanger Installation 1 Slide V Hanger through center hole of last link of chain Figure 2 3 Level the fixture by adjusting the cable length to th...

Page 3: ...prudente ou n gligente et d une mauvaise manipulation ou utilisation de ce produit IMPORTANT Lisez attentivement avant d installer le luminaire Conservez pour consultation ult rieure AVIS La vis verte...

Page 4: ...isez la plaque d acc s et retirez l entr e d fon able appropri e pour effectuer l entr e d alimentation lectrique 5 Raccordez le c blage d entr e au dispositif de d branchement de pilote fourni 6 Ferm...

Page 5: ...decuado descuidado o negligente de este producto IMPORTANTE Lea atentamente antes de instalar la luminaria Conserve estas instrucciones para tenerlas como referencia futura AVISO El tornillo de conexi...

Page 6: ...cceso y retire el orificio ciego deseado para la entrada de voltaje de suministro 5 Conecte el cableado de entrada al desconector del terminal incluido 6 Cierre la cubierta Instalaci n del Soporte de...

Page 7: ...7...

Page 8: ...n com LightingWarrantyTerms para conocer nuestros t rminos y condiciones FCC Statement Note This equipment has been tested and found to comply with the limits for a Class A digital device pursuant to...

Reviews: