background image


DOCUMENT 1136 

REV. G 

Instruction Manual 

Pro APF Series LED 

ICAO TCL, IHP, & STP 


10 


9.6. Connect the light unit lead(s) to the isolation transformer(s)

Clean the mounting flange area of the light 

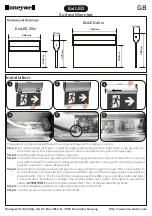
base. Install the light unit into the light base per section 8.4. 
 

9.6        Pressure Test 


A light unit should be subjected to a 140kpa (20-psi) air pressure test to verify that it is waterproof 
whenever it has been opened or components have been replaced. A tire valve style pressure fitting is 
located on the bottom of the inner cover. Pressurize the unit to 140kpa (20-psi) then place it in a tub of 
water or use a soap solution to locate escaping air bubbles. Carefully inspect the areas around the lens, 
inner cover seal, and feed-through adapter for leaks. Relieve the internal air pressure before installing the 
light unit or attempting to repair a leak. 


WARNING: 

WARNING 


Do not exceed 140 kPa (20-psi) when pressure testing the light unit. Serious 

injury and/or permanent damage to the light unit may result if a higher air 

pressure is used. Once the pressure test is complete, be sure to relieve the air 

pressure. 


9.7        Power Supply Replacement 


CAUTION: 

CAUTION 


Power supply is hot when light unit is energized and remains hot for a short 

time after light unit is turned off. 


Refer to section 10 to determine the appropriate replacement kit for your light unit. 

Remove and secure 

power to the light unit.

 Separate the optical assembly from the light base by removing the two bolts. There 

are two pry slots in the optical housing to help separate the optical assembly from the light base. Disconnect the 
light unit lead(s) from the isolation transformer(s). Turn the optical assembly upside down and remove the four 
screws holding the inner cover to the light housing. Disconnect the power supply leads from the feed-through 
terminals and LED module and arctic kit, if applicable.  
 
For P1 light units, remove the three power supply bracket screws.  Remove the power supply bracket with 
attached power supply. Remove the three power supply screws and discard the old power supply as an 
electronics assembly. Configure the jumper settings for the new power supply per Table 1. Reconnect internal 
cables per appropriate wiring diagram, Figure 7 through Figure 10. 


IMPORTANT: 

Summary of Contents for CROUSE-HINDS PRO APF Series

Page 1: ...ight TCL ICAO Intermediate Hold Position Light IHP ICAO Stop Bar Light STP ICAO ANNEX 14 Third Edition Figure A2 12 Through A2 16 IEC TS 61827 2004 EATON Crouse Hinds Series 1200 Kennedy Road Windsor...

Page 2: ...ABLE 1 WITH REVISED JUMPER SETTINGS ADDED DANGER WARNINGS TO SECTIONS 4 AND 4 1 ADDED SECTIONS 8 3 AND 8 4 KF CS D A215 039 REVISE COPYWRITE NOTE ADD 2 PIECE LOCKWASHER TO SECTION 7 DELETE POLYURETHAN...

Page 3: ...TP iii 2 Product Warranty Warranty Refer to Eaton s Crouse Hinds Airport Lighting Products Terms and Conditions for product specific warranty information Refer to Cooper Crouse Hinds Airport Lighting...

Page 4: ...r unsafe practice will result in severe injury or death WARNING WARNING The hazard or unsafe practice could result in severe injury or death CAUTION CAUTION The hazard or unsafe practice could result...

Page 5: ...safety precautions have been incorporated in this equipment the following rules must be strictly observed DANGER 4 1 Keep Away from Live Circuits Operating and maintenance personnel must at all times...

Page 6: ...8 2 Installation of a Light Unit 4 8 3 Toeing Figures 5 8 4 Metric Installation Bolt Torque Method 6 8 5 Heico Lock Installation Guidelines 7 9 Maintenance 7 9 1 Cleaning Lenses 7 9 2 Light Module Rep...

Page 7: ...DOCUMENT 1136 REV G Instruction Manual Pro APF Series LED ICAO TCL IHP STP 1 6 Part Number Explanation ICAO TCL IHP STP...

Page 8: ...DOCUMENT 1136 REV G Instruction Manual Pro APF Series LED ICAO TCL IHP STP 2...

Page 9: ...ght emitting lenses are held into the optical housing with a bracket gasket and elastomeric boot All IHPs all STPs and one plug P1 TCLs have one power supply fastened to the inner cover Two plug P2 op...

Page 10: ...ng flange and gasket sealing surfaces on the light base are clean Coat the optional gasket on the inner cover with Dow Corning FS 1292 grease Connect the plug s from the light unit to the secondary ie...

Page 11: ...ght beam that is angled with respect to the alignment of the light fixture Refer to the product options in Section 6 to determine if your light unit is straight toed or curved The figures below show t...

Page 12: ...commended as installation tools Check torque re torque all bolts within 2 weeks of initial installation Maintain all bolts by checking torque and re torqueing per FAA specifications If other lubricant...

Page 13: ...field servicing be limited to bolt torque checks per section 9 10 4 and cleaning the lens as described in section 9 1 For extensive field service refer to sections 9 and 10 for instructions and spare...

Page 14: ...lb Perform a pressure test as described in paragraph 9 6 Connect the light unit lead s from the isolation transformer s Clean the mounting flange area of the light base Place the light unit into the...

Page 15: ...ly in the lens opening and press it into place Verify that the lens boot is not pinched in the lens opening Using a new lens retaining gasket fasten the lens retaining bracket and heater tie down scre...

Page 16: ...sed Once the pressure test is complete be sure to relieve the air pressure 9 7 Power Supply Replacement CAUTION CAUTION Power supply is hot when light unit is energized and remains hot for a short tim...

Page 17: ...ical housing s o ring per paragraph 9 3 Assemble the inner cover onto the optical housing The screw hole patterns on the inner cover and optical housing are offset to insure proper alignment Torque th...

Page 18: ...only if practical Whenever snowplows must traverse in pavement light units they should be traveling at less than 5 mph or have the blades lifted clear of the units Recommended snow removal techniques...

Page 19: ...21644 1 8 TCL IHP STP ICAO Fig A2 12 13 15 Arctic Kit Replacement Kit 13 21644 2 8 TCL IHP STP ICAO Fig A2 14 16 Arctic Kit Replacement Kit Power Supply Replacements 14 21645 1 Power Supply Replaceme...

Page 20: ...e can while the fixture is powered Dangerous voltage may be present on the primary and secondary sides of the isolation transformer Contact Crouse Hinds Airport Lighting for assistance prior to operat...

Page 21: ...5W isolation transformer or a voltage limited constant DC current source be used to test failed fixtures to limit the input voltage A buzzing or humming noise coming from the isolation transformer may...

Page 22: ...ng jumpers o See Table 1 for proper jumper setting More than 25 of the driven LED Shorted o Replace LED module per section 9 2 Figure 3 Power Supply Status LED Location If the status LED is not visibl...

Page 23: ...DOCUMENT 1136 REV G Instruction Manual Pro APF Series LED ICAO TCL IHP STP 17 12 Tables and Figures Figure 4 Top View of Light Unit...

Page 24: ...DOCUMENT 1136 REV G Instruction Manual Pro APF Series LED ICAO TCL IHP STP 18 Figure 5 Front View of Light Unit Feed Through fitting Fixture Lead Pressure Port Inner Cover...

Page 25: ...DOCUMENT 1136 REV G Instruction Manual Pro APF Series LED ICAO TCL IHP STP 19 Figure 6 Sectioned View of Light Unit...

Page 26: ...OUT HEATERS Figure 9 UNIDIRECTIONAL UNIT P1 CONFIG WITH HEATER FEED THRU ASSEMBLY P1 P100 P101 P103 P102 J203 J300 LED MODULE SIDE A J200 RED BLACK P100 P101 P103 P102 LED MODULE SIDE A LED MODULE SID...

Page 27: ...IRECTIONAL UNIT P2 CONFIG WITHOUT HEATERS LED MODULE SIDE B P100 P101 P103 P102 LED MODULE SIDE A HEATER SIDE A HEATER SIDE B J203 J300 J200 RED BLACK FEED THRU ASSEMBLY P1 P100 P101 P103 P102 LED MOD...

Page 28: ...2 BIDIRECTIONAL UNIT P2 CONFIG WITH HEATERS P100 P101 P103 P102 LED MODULE SIDE A HEATER SIDE A FEED THRU ASSEMBLY P1 FEED THRU ASSEMBLY P1 J203 J300 J200 RED BLACK P100 P101 P103 P102 LED MODULE SIDE...

Page 29: ...ro APF Series LED ICAO TCL IHP STP 23 Figure 13 BIDIRECTIONAL UNIT B1 CONFIG WITHOUT HEATERS P100 P101 P103 P102 LED MODULE SIDE B P100 P101 P103 P102 LED MODULE SIDE A FEED THRU ASSEMBLY P1 J203 J300...

Page 30: ...LED ICAO TCL IHP STP 24 Figure 14 BIDIRECTIONAL UNIT B1 CONFIG WITH HEATERS P100 P101 P103 P102 LED MODULE SIDE B HEATER SIDE B P100 P101 P103 P102 LED MODULE SIDE A HEATER SIDE A FEED THRU ASSEMBLY...

Page 31: ...X X Table 1 Light Unit Part Numbers and Jumper Settings 19 17 15 13 11 9 7 5 3 1 20 18 16 14 12 10 8 4 2 19 17 15 13 11 9 7 5 3 1 20 18 16 14 12 10 8 4 2 19 17 15 13 11 9 7 5 3 1 20 18 16 14 12 10 8 4...

Page 32: ...10 15 8 3 10 15 14 3 10 15 65 IHPI 6 9 10 15 STPI 7 1 10 15 FIG 2 14 TCLI 9 4 10 15 12 8 10 15 18 8 10 15 65 TCLI 8 6 10 15 11 3 10 15 17 3 10 15 65 IHPI 9 4 10 15 STPI 9 8 10 15 FIG 2 15 TCLI 7 9 10...

Page 33: ...00 TCLI 23 1 20 25 40 3 30 45 46 3 20 25 100 IHPI 22 9 20 25 STPI 23 1 20 25 FIG 2 14 TCLI 25 4 30 45 44 8 30 45 50 8 20 25 100 TCLI 24 6 20 25 43 3 30 45 49 3 20 25 100 IHPI 25 4 20 25 STPI 25 8 30 4...

Reviews: