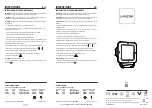
1. Unpack EON Wall Fixture and ensure all included
parts are present (303-W1 or 303-W2 fixture,
Universal Mounting Plate, 8-32 Flat Head Screws
(2x), and Class 2 Driver). Wire connectors, 5/64” and
9/64” allen keys, and junction box mounting hardware
are required but not included. (Figure 1.)
2. Ensuring that the order of parts illustrated below is
followed, connect the fixture leads (red/black) to the
driver output leads (red/black) using waterproof wire
connectors (not included).
3. Connect incoming line voltage from junction box to
input wire side of driver. Ground to junction box. See
EON General Wiring Diagram for more information.
ote:
N
Recommended junction boxes include 2-1/8” deep,
4” square weld/drawn Crouse-Hinds part numbers
TP403, TP434, TP494, TP196, TP395, or equivalent.
Use with included universal mounting plate or with
Crouse-Hinds part number TP480 or equivalent
with similar mounting hole locations.
4. Push all wiring and driver into the junction box. Keep
line voltage and driver output leads separated. Place
the mounting plate over the junction box and secure
with two screws. (Figure 2.)
5. Align gasket over junction box and insert Insert the
two included screws into the mounting plate holes.
Secure the backplate to the mounting plate using a
5/64” allen key. (Figure 3.)
ote:
N
303-W1Fixture may be mounted in uplight or
downlight position. Uplight position shown here.
303-W2 is simultaneous uplight and downlight. The
uplight and downlight components may have been
specified with different light distribution and should
be mounted according to the labels on the lens.
6. Using a 9/64” allen key, loosen the knuckle bolt and
flip the fixture head out of the upright locked shipping
position and into normal position. Tighten the knuckle
bolt with a 9/64” allen key. (Figure 4.)
Figure 1.
Figure 2.
Figure 3.
Figure 4.
Fixture
Leads
Driver
Driver
Output Leads
Low Voltage
Leads
Driver Input
Leads
Universal
Mounting Plate
Backplate
and Gasket
Mounting
Hardware
303-W1
303-W2
Wall Fixture
INSTALLATION
Installation Instructions – EON Wall Mounted Fixture 303-W1/303-W2
ADL141237 www.eaton.com
Installation Instructions – EON Wall Mounted Fixture 303-W1/303-W2
3


