background image


20 


2. Set your desired video copy parameters. 

• Using Front Panel/Remote: Use and press either 


  buttons to highlight different parameters and  

                                               press 

  button to get into the sub-menu to change the value.  When the value is  

                                               changed, press 

  button again to save.  Values below can be changed. 

• Using Mouse: Click on the different parameters and click to change the value.  Values below can be changed. 
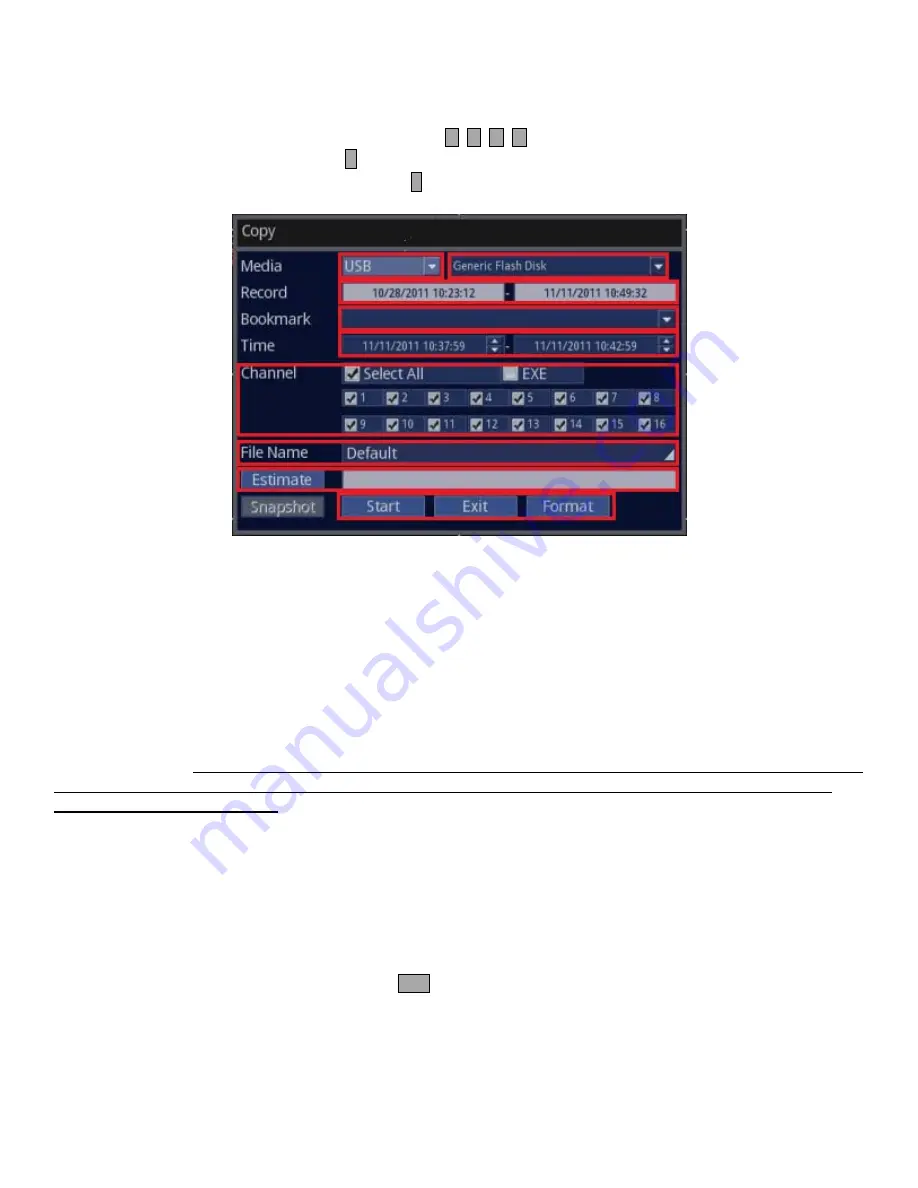


Media

: USB or USB(MP4).  USB(MP4) is a industry standardized video file where it can be played in Quick Time or VLC 

Player.  Also, since there can be more one similar devices connected to the DVR, you can also choose which device to 
use, which is located on the right side of media selection. 

Record: Informational purpose only:  

This section displays the earliest recording date/time to the latest recording time 

that are present on the DVR. 

Bookmark

: During playback of video, user could have bookmarked certain section.  If it was bookmarked, the lists will 

show up here. 

Time

: Enter your desired start and the end time of your video to be copied. 

Channel

: By factory default, “Select All” is checked, therefore, all the channels or cameras will be copied.  However, 

should you want to copy only the specific cameras, you can unselect “Select All” and check only the cameras that you 
desire to be copied.  NOTE: When “EXE” is checked, DVR will make self executable file where it can be played on any PC 
without the need of installing NUVICO player software to view the file.  Extremely useful if you want to give the copied 
video to law enforcement and etc. 

File Name

: By factory default, the file name will be start date/time of the video.  Should you want to customize the file 

name, you can enter it here. 

Estimate

: If you are unsure about the file size outcome, you can click on “Estimate” and the DVR will estimate the total 

size of the copied file for you. 

Start/Exit/Format

: When all the values are entered, you can either Start the copying process, Exit the copying process, or 

you can choose to Format (Erase the entire contents) the USB Thumbdrive.


3. To exit out to the Live screen. 

• Front Panel/Remote: Press and hold onto 

ESC

 button for 2 seconds. 

• Mouse: Right click on your mouse twice.


Summary of Contents for ED-C1600

Page 1: ...QUICK SETUP MANUAL easynet Compact Series DVR ED C400 C800 C1600...

Page 2: ......

Page 3: ...website www nuvico com TABLE OF CONTENTS HOW TO SET REMOTE CONTROL ID 2 HOW TO START THE DVR 3 HOW TO SET DATE TIME 4 QUICK RECORD SETUP 6 HOW TO SETUP IP ADDRESS UNDER THE NETWORK SETUP 10 HOW TO SEA...

Page 4: ...2 HOW TO SET REMOTE CONTROL ID Example How to program ID 1 Factory Default into the remote control It is a 3 step process Press ID button then press 1 button then finally press ID button again to save...

Page 5: ...USB mouse into any available USB port 2 Connect the power cable from the power source outlet preferably a UPS to the back of the DVR Turn on and start the DVR Using Front Panel Remote Press the POWER...

Page 6: ...s started it is important to setup the time and the date 1 Follow the instructions below Using Front Panel Remote Press MENU button and press button Using Mouse Click on the Setup Menu icon 2 Access D...

Page 7: ...active internet connection is maintained Time Zone Select appropriate Time Zone for your location Format Allows the format and display of DATE Time to be customized Time Set or modify the Date and Tim...

Page 8: ...meras 1 Follow the instructions below Using Front Panel Remote Press MENU button and press button Using Mouse Click on the Setup Menu icon 2 Access the GLOBAL RECORD sub menu Front Panel Remote Press...

Page 9: ...west and 4CIF being the best PPS 1 2 4 7 15 30 Refers to pictures per second for all cameras 1 being jerky and 30 being smooth real time video Quality Q1 Q2 Q3 Q4 Q5 Refers to detail level for all cam...

Page 10: ...e Quality Priority Mode it will automatically adjust its recording frame rate and resolution based on the number of days specified to give you the highest picture quality possible Frame Rate Smoother...

Page 11: ...nel Remote Press button to highlight Save and press button to save Mouse Click on Save to save 6 To exit out to the Live screen Front Panel Remote Press and hold onto ESC button for 2 seconds Mouse Ri...

Page 12: ...or viewing video across a local area network or through the internet 1 Follow the instructions below Using Front Panel Remote Press MENU button and press button Using Mouse Click on the Setup Menu ico...

Page 13: ...Remote For DHCP Press button and press to check or uncheck For IP Netmask Gateway DNS1 DNS2 Port follow the instructions below These parameters are given by your Internet Service Provider or Network A...

Page 14: ...uctions below These parameters are given by your Internet Service Provider or Network Administrator on a corporate network environment Highlight and click the IP portion on the screen Virtual numeric...

Page 15: ...e Server Address given by your Internet Service Provider or Network Administrator Port 7000 is the factory default This port number is customizable and can be changed Host Name Type the address that i...

Page 16: ...nel Remote Press button to highlight Save and press button to save Mouse Click on Save to save 6 To exit out to the Live screen Front Panel Remote Press and hold onto ESC button for 2 seconds Mouse Ri...

Page 17: ...low the instructions below Using Front Panel Remote Press SEARCH button Using Mouse Click on the Search icon 2 Select Time Search Using Front Panel Remote Press button twice to highlight Time Search a...

Page 18: ...utton couple of times to highlight Start and press button Your desired video will start playing Using Mouse Click on the desired group such as Month Day Year Hour Minute Second and click on the part o...

Page 19: ...instructions below Using Front Panel Remote Press SEARCH button Using Mouse Click on the Search icon 2 Select Calendar Search Using Front Panel Remote Press button three times to highlight Calendar S...

Page 20: ...e same method for year and day Using Mouse Click on either the Year Date or Day and change to the desired value 4 Select your desired time of the day Using Front Panel Remote Press buttons to highligh...

Page 21: ...n Mouse Click on the X Close HOW TO COPY VIDEOS INTO USB Please make sure to insert the USB Thumbdrive into the DVR first before proceeding to the next step 1 Follow the instructions below Using Front...

Page 22: ...start and the end time of your video to be copied Channel By factory default Select All is checked therefore all the channels or cameras will be copied However should you want to copy only the specifi...

Page 23: ...the DVR 2 Follow the instructions below Using Front Panel Remote Press SEARCH button Using Mouse Click on the Search icon 3 Choose USB Using Front Panel Remote Use and press either buttons to highligh...

Page 24: ...22 4 DVR will search for video from your desired medium 5 DVR will display videos that are available on your desired medium 6 Follow Time Search method that is explained on page 15...

Page 25: ...ons below Using Front Panel Remote Press LOCK button Using Mouse Click on the Log In icon 2 You need to input admin password 0 0 0 0 0 0 for the DVR Using Front Panel Remote Use and press either butto...

Page 26: ...to highlight 0 then press button six times Finally use and press either button to highlight and press button Using Mouse Highlight 0 and click six times then highlight and click 4 Lastly when you sele...

Page 27: ......

Page 28: ...om unauthorized resellers htm NUVICO Corporate Headquarters 53 Smith Street Englewood NJ 07631 Tel 201 541 1605 Toll Free 866 523 1700 Fax 201 541 1620 sales nuvico com www nuvico com NUVICO Internati...

Reviews: