


PANTONE 072 C
PANTONE 123 C
Support Line: 0333 030 0777
For more innovative products from Easylife please visit:
www.easylifegroup.com
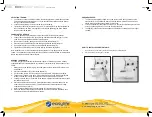
BOTTOM BOBBIN PLACEMENT:
1. Remove cover by lifting up where it has popped up at rear.
2. Place the bobbin with thread of your choice in the bobbin holder (J) Leaving about I0
inches of thread extended out from the bobbin holder (J).
3. Place the bobbin with thread of your choice in the bobbin holder(J) Leaving about 5
inches of thread and put into the gap (H).
4. Turn hand wheel (K) anti-clockwise (toward you). Needle (R) will go down, picking up the
bobbin thread. Turn handwheel (K) until needle (R) has descended completely and then
come up again to its highest raised point. Stop when needle (R) starts to go down again.
5. Raise the presser foot (F) and bring the spool thread around to the front. Pull it gently
up and you will see it has caught the bobbin thread. Pull the two threads toward the rear
(away from you) and lay them under the presser foot (F).
6. Snap the bobbin compartment (I) cover down an into place.
Note: lt is essentiaI that threading both top and bottom be done properly. Check carefully and
do one practice stitch before beginning to sew. Improper threading will damage the lockstich.
The machine may have come pre-threaded from the factory. Look at this threading carefully
before removing it to replace the thread or bobbin with different thread. Then folIow the
preceding instructions to rethread.
THREADING MAIN UNIT USING SIDE BOBBIN:
(Follow steps 4-11 on previous page with these exceptions).
1. Pull bobbin spindle (U) out from main unit.
2. Insert bobbin spindle (U) through center hole of threaded bobbin.
3. Insert bobbin spindle (U) (with bobbin attached) into bobbin holder (V). Make sure bobbin
spindle (U) with bobbin are tightly secured to main unit.
Note: Thread main unit with side bobbin simultaneously with thread spooI for a double stitch
method. Side bobbin is to be used only if your using this particuIar method of stitching.
Paper weight 60gsm
Genius blue is
C90, M7, Y0, K0
Genius green is
C90, M7, Y0, K0
everyday solutions
™
Est. 1992
OPERATlNG THE MACHINE (Without the Foot PedaI):
Follow these simple steps:
1. Lift the needle (R) above the presser foot (F) by turning the hand wheel (K) slightly in
clockwise direction (away from you).
2. Raise the presser foot (F) by lifting up on the lever on the rear of the machine above the
presser foot bar
3. Position fabric to be sewn under the presser foot (F) with presser foot (F) in raised
position. Make certain seam direction is toward you, aligned with the presser foot (F),
with seam location directly under the needle (R).
4. Lower the presser foot (F) by releasing the presser foot lever (G) downward.
5. Rotate the hand wheel (K) in a clockwise direction two full turns to lock and start seam.
Stop.
6. Select speed by pressing speed button (L) on face of machine. High speed, button is
extended out. Low speed, button is in, flush with machine. Use low speed for intricate
work which requires a lot of stopping, starting and turning fabric. Use high speed for long
uninterrupted seams.
7. Turn power switch (A) to “ON” position.
8. Gently guide the fabric to keep the seam straight by pressing lightly down with your
fingertips on both sides as it feeds through the presser foot (F)
9. When the seam is finished, turn switch (A) off.
10. Raise the needle (R) above the fabric by turning the hand wheel (K) sightly in a
clockwise direction.
11. Raise presser foot (F) by lifting the presser foot lever (G).
12. Pull fabric toward you leaving about 10 inches of thread between the fabric and the
machine.
13. Cut thread close to fabric, leaving excess thread loosely lying on the sewing deck in the
direction of the presser foot (F) and toward you.
14. Begin the next seam in the same manner as above by following operating steps above.
TO USE THE FOOT PEDAL:
(Follow steps 1 - 14 on previous page with these exceptions)
1. Make certain machine is in “Off” position.
2. Plug the foot pedal jack (M) into back of machine.
3. Turn machine on by pressing the foot pedal.
4. Press gently on the foot pedal to run the machine. Let up to stop. When you are finished
sewing a seam, ease your foot up and off of the foot pedal.
Note: The on-off switch on the machine should be in the “0FF” position when using the foot
pedal.


