


PANTONE 072 C
PANTONE 123 C
Support Line: 0333 030 0777
For more innovative products from Easylife please visit:
www.easylifegroup.com
Dear Customer
Thank you for purchasing the Mini Sewing Machine.
Ideal for hemming, alterations and repairs…along with more ambitious projects, this lightweight,
compact and portable Mini-Sewing Machine boasts features usually found in bigger (and more
expensive) machines. For instance, an extension table for larger items and stability, a foot pedal to
keep your hands free, a U-shape slot design for sleeves and pants and two sewing speeds. It can
even sew thick fabric and multiple layers (up to 8 layers of thin Jeans). With functions for double
threading (to make stitches flatter, firmer and uninterrupted), tension adjustment and automatic winding
(for high-quality sewing), built-in winding pole and spool assist to rewind the bobbins…and more!
Powered with supplied 800mA mains adaptor, or 4xAA batteries (not included), it’s perfect for daily use,
crafting, beginners, DIY, even outdoor use, complete with 4 bobbins, needle and threader. Measures
L20xH19xW9cm, with table work surface of W10xL16cm, imprinted cm and inch markings.
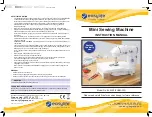
PARTS & ACCESSORIES
Thread Spindle (C)
Thread Spool (E)
Bobbin Holder (V)
Bobbin winder Spool (T)
Hand Wheel (K)
Bobbin Spindle (U)
ON/OFF light (X)
ON/OFF switch (A)
Speed Button (L)
Takeup Lever (D)
Presser foot (F)
Bobbin Holder (J)
Light (W)
Bobbin (S)
Needle (R)
Adjusting Screw (Q)
Needle Clamp (P)
Needle Clamp Screw (O)
Bobbin Compartment (I)
Battery Compartment (B)
(on underside of machine)
Paper weight 60gsm
Genius blue is
C90, M7, Y0, K0
Genius green is
C90, M7, Y0, K0
everyday solutions
™
Est. 1992
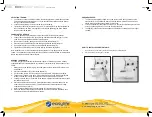
GETTING STARTED
(Refer to illustrations for locations and configuration of components).
AFTER REMOVlNG MACHINE FROM PACKING BOX:
1. Make certain On/Off switch (A) is in Off position before inserting batteries.
2. Put 4 AA batteries into the battery compartment (B) on underside of
machine.
3. Push switch (A) to turn on or off. ln “On” position switch is flush with
machine. ln “Off” position switch is extended out. Machine wilI start sewing
immediately. Be sure the machine is properly threaded and fabric is
positioned for sewing before you turn on machine.
THREADING MAIN UNIT USING THREAD SPINDLE:
1. Raise thread spindle (C) by grasping the
exposed top and pulling upward until thread
spindle (C) is fully extended.
2. Place thread spool (E) on the thread spindle (C)
as shown.
3. Pull thread from the thread spool (E) on the
thread spindle(C). and put it through the first
thread guide (1) in the direction toward front of
machine.
4. Bring thread across to the second thread guide
(2). Thread goes over the tension adjusting
screw (N) and must be positioned between the
two washers behind the tension adjusting screw
(N). This is what provides the Iockstick tension to
the thread.
5. Pull thread from tension adjusting screw (N)
guide through thread guide (3) in the direction toward front of machine.
6. Pull thread through thread guide (4) on the take-up lever (D) inserting in the direction
toward the front of the machine.
7. Pull thread down to thread guide (5) and insert thread trom the top downward.
8. Pull thread downward through thread guide (6). lf necessary, lower the needle (R) to
reach this thread guide by turning the handwheel (K) slightly anti-clockwise (in the
direction toward you) to lower the needle (R).
9. Insert thread through eye (7) of the needle from the front toward the back of the
machine. (Use threader if necessary). lf necessary, raise the needle (R) to reach eye
level by turning the handwheel (K) slightly clockwise (in the direction away from you).
10. Raise the Presser Foot (F) by lifting up the lever at the rear of machine (G).
11. Pull about 10 inches of thread through the needle (R) and lay it on the deck under the
presser foot (F) running in the direction away from you.
MAIN UNIT (back view)
Presser Foot Lever (G)
Foot Pedal Jack (M)
DC Jack 6V
(use by AC Adapter)
ACCESSORIES
Needle
Needle Threader
Foot Pedal
Four Metal Bobbins
C
D
V
T
K
U
A
L
N
B
J
F
H
I
R
Q
P
O
E
S
G
M
DC
Jack
6V
Foot Pedal
Four Metal
Bobbins
Needle
Needle Threader


