background image

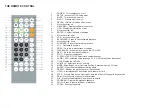
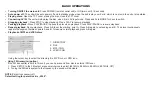
THE REMOTE CONTROL

POWER – Turn the player on or off

1. 

SETUP – Access the OSD setup menu

2. 

MUTE – Turn the sound on or off

3. 

EJECT – Press to eject the disc

4. 

RECALL – Return to the disc’s Root menu

5. 

Move the cursor up

6. 

MENU PBC – Display the Root menu of disc

7. 

OSD – Display the information of disc

8. 

Move the cursor left

9. 

ENTER – Confirm the items or settings

10. 

Move the cursor right

11. 

VOL+  Increase the volume

12. 

BACKWARD – Press to Fast backward playback

13. 

Move the cursor down

14. 

FORWARD – Press to fast forward playback

15. 

VOL -  Decrease the volume

16. 

PREV – Go to the previous track or chapter

17. 

PLAY/PAUSE – Press to play or pause the CD or DVD

18. 

NEXT – Go to the next track or chapter

19. 

STOP – Press to stop playback

20. 

21-23,25-27,29-31,33-34 Select track numbers directly

21. 

24. 

AUDIO – DVD: selekt the audio language, VCD or CD: select the audio channel 

28.  

TITLE- Display the DVD title

32. 

SUBTITLE – Select and turn on sub-title 

35. 

MODE (Select Bright, Color, Contrast, Scalling, Reverse mode, AV, Volume)

36. 

ANGLE – Press to selekt a different filming angle 

37.  

REPEAT – Repeat the track, chapter or the entire disc

38. 

GOTO – Start playback AT a selected track, chapter or time

39. 

STEP – Press to step by one Frome each time the button is Pressem In pause mode

40. 

RDM – Play chapters or tracks In random order

41. 

A-B  - Press to repeat playback from point A to point B

42. 

PROGRAM – Program the playback sequence

43. 

SLOW – Press to reduce thr Speer of playback

44. 

ZOOM – Zooming the picture

Summary of Contents for ET-PT700

Page 1: ...ET PT700 ENGLISH POLSKI DEUTCH E TINA ESPA OL ROMANA...

Page 2: ...E RISK OF FIRE OR ELECTRONIC SHOCK DO NOT EXPOSE THIS APPLIANCE TO RAIN OR MOISTURE DRIPPING OR SPLASHING AND THAT NOE OBJECTS FILLED WITH LIQUIDS SUCH AS VASES SHALL BE PLACED ON THE APPARATUS DANGER...

Page 3: ...e proper use of this product please read this owner s manual carefully and return it for future reference Use of controls adjustments or the performance of procedures other than those specified may re...

Page 4: ...t or move the player Doing so may damage the disc PLACE OF INSTALATION Select a stable place near the TV or stereo system to which you going to connect the player Do not place the player on top of a T...

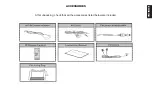
Page 5: ...ACCESSORIES After unpacking check that all the accessories listed below are included ENGLISH...

Page 6: ...tions Disc type DVD Video Video CD CD DA MP3 MP4 JPEG Power Power adapter 230V 12V 1 5A Power adapter 12V 1 5A Optional battery 7 4V Audio output LINE OUT 20Hz 20kHz Earphone output Coaxial Digital au...

Page 7: ...THE FRONT OF THE PLAYER TFT Cover 1 LCD Display 2 Speaker 3 Control key 4 IR receiver window 5 Open TFT cover 6 PART IN THE BACK OF THE PLAYER Support 1 Battery optional 2 Screw 3 PART IN THE BOTTOM O...

Page 8: ...st forward or backward play mode x2 x4 x8 x20 3 Mode and buttons Press and use buttons to adjust 4 Brightness level 0 level 50 MAX o Contrast level 0 level 50 MAX o Color level 0 level 50 MAX o Scalli...

Page 9: ...ge when charging the yellow LED will be light When battery is full the LED is off 5 Power indicator red 6 The LED is light The AC DC adapter or battery is connected The LED is flash The AC DC adapter...

Page 10: ...he CD or DVD 18 NEXT Go to the next track or chapter 19 STOP Press to stop playback 20 21 23 25 27 29 31 33 34 Select track numbers directly 21 24 AUDIO DVD selekt the audio language VCD or CD select...

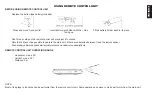
Page 11: ...trol unit or subject it to shocks Note that it May not be possible to operate the main unit if there are obstacles between it and the remote sensor Nie nara aj odbiornika podczerwieni odtwarzacza na n...

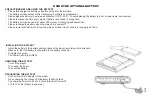
Page 12: ...ions Please recharge the battery when the main unit is power off Please remove the battery unit from the main unit when it is not used In a long period of time INSTALLING THE BATTERY Install the batte...

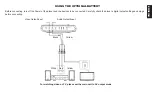
Page 13: ...the player and the devices to be connected Carefully check the player s digital output settings and plugs before connecting Video Output Input Audio Output Input Black Yellow White Red Yellow For watc...

Page 14: ...when playback Press PLAY PAUSE to resume playback Repeat playback During playback Press A B to set the starting point A Press A B again to set ending point B The player continuously repeats the segme...

Page 15: ...dzenia Nast pnie nale y j przechowa w bezpiecznym miejscu gdzie w razie konieczno ci b dzie mo na z niej skorzysta ABY ZREDUKOWA RYZYKO POPARZENIA LUB PORA ENIA PR DEM NIE WYSTAWIAJ TEGO URZ DZENIA N...

Page 16: ...yp Semiconductor Laser GaAIAs D ugo fali 650 nm 780nm Moc 5mW K t padania 60 stopni WENTYLACJA Produkt powinien znajdowa si w przewiewnym i wentylowanym miejscu nie nara onym na dzia anie py u kurzu o...

Page 17: ...d kopiowaniem s nagrane na niekt rych p ytach Podczas nagrywania lub odtwarzania takich p yt pojawi si zak cenia obrazu Produkt ten wykorzystuje technologi chroni c przed kopiowaniem kt ra jest metod...

Page 18: ...e Absolutnie nie wolno k a adnych przedmiot w na odtwarzaczu Mo e to spowodowa uszkodzenie urz dzenia i utrat gwarancji JE LI ODTWARZACZ NIE JEST U YWANY ZALECA SI WY CZENIE GO Z ZASILANIA Zapobiegnie...

Page 19: ...AKCESORIA Po rozpakowaniu pude ka opr cz odtwarzacza powinny znajdowa si nast puj ce akcesoria POLSKI...

Page 20: ...DA MP3 MP4 JPEG Zasilanie Zasilacz domowy 230V 12V 1 5A Zasilacz samochodowy 12V 1 5A Opcjonalna bateria 7 4V Wyj cia Audio LINE OUT 20Hz 20kHz Wyj cie s uchawkowe Wyj cie cyfrowe COAXIAL Rozmiar 200m...

Page 21: ...anu LCD TFT 1 Ekran LCD TFT 2 G o niki 3 Przyciski kontrolne 4 Odbiornik podczerwieni IR 5 Otwieranie nap du optycznego 6 TY URZ DZENIA Podp rka 1 Bateria opcjonalnie 2 ruba mocuj ca baterii 3 SP D UR...

Page 22: ...w Scaling skalowanie Reverse odwr cony obraz AV 4 Mode Tryb AV IN Volume G o no Jasno mo liwo ustawienia warto ci od 0 do 50 MAX o Kontrast mo liwo ustawienia warto ci od 0 do 50 MAX o Kolor mo liwo...

Page 23: ...xial 4 Wska nik baterii dioda podczas adowania baterii wieci si na kolor ty 5 Wska nik zasilania gdy urz dzenie jest w czone i zasilane dioda wieci si na kolor czerwony gdy urz dzenie jest 6 wy czone...

Page 24: ...auza 18 Skok o jedn cie k do przodu 19 Stop 20 21 23 25 27 29 31 33 34 Wyb r cie ki 21 24 DVD Wyb r j zyka dialog w VCD CD Wyb r kana u 28 Wy wietlanie tytu u p yty DVD 32 Napisy lektorskie 35 MODE Us...

Page 25: ...r uwag aby pomi dzy pilotem a urz dzeniem nie by o przeszk d Nie nara aj odbiornika podczerwieni odtwarzacza na nadmierne na wietlenie WARUNKI WSP PRACY PILOTA Z ODTWARZACZEM Odchylenie w pionie max 3...

Page 26: ...onym urz dzeniu Zaleca si od czenie baterii od odtwarzacza gdy nie b dzie on u ywany przez d u szy czas INSTALOWANIE BATERII Wstaw bateri w przeznaczon do tego wn k z ty u odtwarzacza Upewnij si e sty...

Page 27: ...nym odtwarzaczu DVD Prosimy zwr ci szczeg ln uwag na prawid owe umieszczanie wtyk w w gniazdach Video Output Input Audio Output Input ty Czarny Bia y Czerwony ty Aby sygna Video by przesy any na wyj c...

Page 28: ...tawi punkt ko cowy odtwarzania Urz dzenie automatycznie rozpocznie odtwarzanie pomi dzy punktami Wci ni cie powt rne przycisku A B anuluje funkcj Odtwarzanie plik w MP3 i JPEG KATALOGI 1 PLIKI 2 SYMBO...

Page 29: ...orgf ltig die Bedienungsanleitung und bewahren Sie diese f r sp tere Zwecke auf Um das Risiko der Hautverbrennung oder Stromschlags zu vermeiden sch tzen Sie das Ger t vor Regen und Feuchtigkeit Verme...

Page 30: ...Winkel 60 Grad BEL FTUNG Halten Sie das Produkt immer in gut bel fteten R umen die entsprechende Ventilation des Produkts versichern Schuetzen Sie das Produkt vor Schmutz Staub und anderen Mittel die...

Page 31: ...er Wiedergabe oder Aufbrennung solcher Platten werden Bildst rungen auftreten Das Produkt nutzt Kopierschutz Technologie die durch etliche Patentrechte in USA sowie andere Urheberrechte der Firma Macr...

Page 32: ...er Monitor Legen Sie keine Gegenst nde auf dem Player es k nnte den Player besch digen und Verlust der Garantierechte zur Folge haben WIRD DER PLAYER EBER L NGERE ZEIT NICHT BENUTZT TRENNEN SIE ES VOM...

Page 33: ...ACCESSOIRES Im Lieferumfang finden Sie au er dem Player folgende Accessoires DEUTCH...

Page 34: ...D CD DA MP3 MP4 JPEG Stromversorgung Stromnetzteil 230V 12V 1 5A Autonetzteil 12V 1 5A Batterie optional 7 4V Audio Ausg nge LINE OUT 20Hz 20kHz Kopfh rerausgang Digitalausgang COAXIAL Ausma 200mmX164...

Page 35: ...rgeh use 1 LCD TFT Monitor 2 Lautsprecher 3 Kontrolltasten 4 Infrarot Sensor IR 5 ffnung des CD Laufwerks 6 R CKSEITE DES GER ETS St tze 1 Batterie optional 2 Befestigungsschraube der Batterie 3 UNTER...

Page 36: ...st Kontrast Color Farbs ttigung Scaling Skala Reverse Umdrehung des 4 Bildes AV Mode AV Modus IN Volume Lautst rke Helligkeit Einstellungsm glichkeiten von 0 bis 50 MAX o Kontrast Einstellungsm glichk...

Page 37: ...hrend dem Ladevorgang leuchtet die LED Anzeige auf gelb 5 Stromanzeige die Anzeige leuchtet auf rot wenn das Ger t eingeschaltet und an Strom angeschlossen ist die Anzeige 6 blinkt wenn das Ger t ausg...

Page 38: ...sprung um ein Titel vorw rts 19 Stopp 20 21 23 25 27 29 31 33 34 Auswahl der Titel 21 24 DVD Auswahl der Sprache VCD CD Auswahl des Kanals 28 Ausblendung des Titels der DVD Platte 32 Untertitel 35 MOD...

Page 39: ...ng nicht Achten Sie darauf dass zwischen der Fernbedienung und dem Ger t keine H rden sind Schuetzen Sie den Infrarot Sensor auf dem Player vor zu starkem Licht BEDINGUNGEN F R KORREKTE ARBEIT DER FER...

Page 40: ...wenn der Player ber l ngere Zeit nicht benutzt wird INSTALLATION DER BATTERIE Legen Sie die Batterie in das Batteriefach auf der R ckseite des Players Versichern Sie sich dass die Batteriekontakte gut...

Page 41: ...em DVD Player Achten Sie auf richtige Verbindung der Stecker in den Schnittstellen Video Output Input Audio Output Input Gelb Schwarz Wei Rot Gelb Damit der Video Signal zu Video Ausgang gesendet wird...

Page 42: ...n Startpunkt A einzustellen Dr cken Sie nochmal die A B Taste auf der Fernbedienung um den Endpunkt B einzustellen Der Player startet automatisch die Wiedergabe von Punkt A bis Punkt B Dr cken Sie noc...

Page 43: ...od k obsluze Tento n vod uschovejte na bezpe n m m st pro p pad e ho v budoucnu budete pot ebovat ABYSTE P EDE L POP LEN M NEBO RAZU ELEKTRICK M PROUDEM NEVYSTAVUJTE TENTO P STROJ DE T NEBO VLHKU DBEJ...

Page 44: ...z en 60 stup VENTILACE V robek um st te na dob e ventilovan m m st kde nebude vystaven prahu p n a jin m kodliv m l tk m kter m ou zp sobit probl my s ventilac vzduchu uvnit p stroje den ventila n ot...

Page 45: ...d mus b t autorizov no Macromedia Corporation Zp tn in en rstv a demont je p sn zak z n DOLBY P stroj byl v roben pod licenc Dolby Laboratories Ozna en Dolby a symbol dvou p smen D jsou registrovan zn...

Page 46: ...P SLU ENSTV Balen krom p ehr va e m lo by obsahovat tyto p slu enstv...

Page 47: ...MP4 JPEG Nap jen Dom c zdroj 230V 12V 1 5A Autozdroj 12V 1 5A Baterie voliteln p slu enstv 7 4V V stupy Audio LINE OUT 20Hz 20kHz Vstup pro sluch tka Digit ln v stup COAXIAL Rozm r 200mmX164 5mmX38mm...

Page 48: ...LCD TFT 1 Displej LCD TFT 2 Reproduktory 3 Kontroln tla tka 4 Senzor infra z en IR 5 Otev r n optick mechaniky 6 Z DN ST P STROJE Podep r n 1 Baterie voliteln p slu enstv 2 roub pro uchycen baterie 3...

Page 49: ...stran Reverse inverzn obraz AV Mode Re im 4 AV IN Volume Hlasitost Jas Mo nosti nastaven hodnot od 0 a 50 MAX o Kontrast Mo nosti nastaven hodnot od 0 a 50 MAX o Barva Mo nosti nastaven hodnot od 0 a...

Page 50: ...3 Digit ln v stup audio Coaxial 4 Indik tor baterie dioda b hem nab jen baterie svit lut 5 Indik tor nap jen pokud je p stroj zapnut a nap jen dioda svit erven pokud je p stroj vypnut a nap jen dioda...

Page 51: ...kok o jednou skladbu dop edu 19 Stop 20 21 23 25 27 29 31 33 34 Volba stopy 21 24 DVD Volba jazyka dialog VCD CD Volba kan l 28 Zobrazen titulu DVD disku 32 Lektorsk n pisy 35 MODE Nastaven Bright Jas...

Page 52: ...n m Dbejte na to aby mez ovlada em a p strojem nebyly p ek ky Nevystavujte infra senzor p ehr va e nadm rn mu osv cen PODM NKY SPOLUPR CE D LKOV HO OVLADA E S P EHR VA EM Svisl odch len max 30 Horizo...

Page 53: ...l dobu nepou v te odpojte baterie od p ehr va e INSTALACE BATERII Namontujte baterii do ur en ho pro baterie prostoru vzadu p ehr va e Ujist te se e konektory le spr vn Upevn te baterie roubem Indik t...

Page 54: ...vypnut m DVD p ehr va i Dbejte na to aby v echny konektory byly p ipojen ke spr vn m zd k m Video Output Input Audio Output Input lut ern B l erven lut Pokud Video sign l m b t pos lan na v stup VIDEO...

Page 55: ...ro nastaven kone n ho bodu p ehr v n P stroj automatick za ne p ehr vat mezi body A a B Op tovn m stisknut m tla tka A B stornujete funkc P ehr v n MP3 a JPEG soubor ADRES E 1 SOUBORY 2 SYMBOL MP3 SOU...

Page 56: ...el aparato Luego hay que guardarla en el lugar seguro para poder usarla en el caso de necesidad PARA REDUCIR EL RIESGO DE QUEMADURAS O CHOQUE EL CTRICO NO EXPONGAS ESTE APARATO PARA LA INFLUENCIA DE L...

Page 57: ...r bien ventilado no expuesto a la actuaci n del polvo u otros factores nocivos que pueden dificultar el correcto flujo del aire a trav s de los elementos del aparato Todas las aperturas de ventilaci n...

Page 58: ...ohibidos DOLBY El aparado ha sido producido con la licencia Dolby Laboratories Dolby con el s mbolo de dos letras D significan los signos reservados de Dolby Laboratories DURANTE LA REPRODUCCI N EVITA...

Page 59: ...ACCESORIOS Al sacar el aparato del envoltorio junto con el reproductor deben hallarse los accesorios siguientes ESPA OL...

Page 60: ...PEG Alimentaci n Alimentador de casa 230V 12V 1 5A Alimentador de coche 12V 1 5A Pila opcioonal 7 4V Salidas Audio LINE OUT 20Hz 20kHz Salidas para auriculares Salidas digitales COAXIAL Tama o 200mmX1...

Page 61: ...D TFT 1 Pantalla LCD TFT 2 Altavoces 3 Botones de control 4 Recibidor de infrared IR 5 Apertura de la propulsi n ptica 6 PARTE TRASERA DEL APARATO Sost n 1 Pila opcionalmente 2 Tornillo que fija las p...

Page 62: ...saturaci n de los colores Scaling escalar Reverse la 4 imagen inversa AV Mode modo AV IN Volume Volumen Claridad posibilidad de ajustar el valor desde 0 hasta 50 MAX o Contraste posibilidad de ajusta...

Page 63: ...e la pila diodo durante cargar la pila se ilumina con el color amarillo 5 Indicador de alimentaci n si el aparato est puesto en marcha y alimentado el diodo ilumina con el color rojo si el 6 aparato e...

Page 64: ...Saltar por una pista para delante 19 Stop 20 21 23 25 27 29 31 33 34 Selecci n de la pista 21 24 DVD Selecci n del idioma de di logos VCD CD Selecci n del canal 28 Selecci n del t tulo de disco DVD 3...

Page 65: ...y el aparato no hay obst culos No expongas el aparato de infrared de reproductor a la radiaci n demasiada CONDICIONES DE COLABORACI N DE MANDO A DISTANCIA CON EL REPRODUCTOR Inclinaci n en la posici n...

Page 66: ...esconectar la pila del reproductor si no se usa por m s tiempo INSTALACI N DE LA PILA Inserta la pila en la cavidad destinada en la parte trasera Aseg rate que los conectores tienen una conecci n buen...

Page 67: ...agado aparato DVD Por favor que se fijen a la correcta colocaci n de los enchufes Video Output Input Audio Output Input Amarillo Negro Blanco Rojo Amarillo Para que el se al V deo se transmita a la sa...

Page 68: ...de la reproducci n El aparato autom ticamente empezar la reproducci n entre los puntos Al volver a pulsar el bot n A B anular la funci n Reproducci n de los archivos MP3 i JPEG CAT LOGOS 1 ARCHIVOS 2...

Page 69: ...ET PT700 DVD SVCD VCD MPEG4 MP3 JPG LCD 7 DVD PT700...

Page 70: ...Semiconductor Laser GaAIAs 650 nm 780nm 5mW 60...

Page 71: ...20 C 60 C 5 C 45 C Macrovision Macrovision Corporation Macrovision Corporation Macrovision Corporation DOLBY Dolby Laboratories Dolby D Dolby Laboratories...

Page 72: ...TV...

Page 73: ......

Page 74: ...DVD Video Video CD CD DA MP3 MP4 JPEG 230V 12V 1 5A 12V 1 5A 7 4V Audio LINE OUT 20Hz 20kHz COAXIAL 200mmX164 5mmX38mm Video VIDEO OUTPUT 1 0Vpp 75ohm 882g LCD 7 TFT 1440x234 5 C 45 C...

Page 75: ...1 LCD TFT 2 LCD TFT 3 4 5 IR 6 1 2 3 1...

Page 76: ...1 1 5 2 1 5 3 1 5 x2 x4 x8 x20 4 Brighthness Contrast Color Scaling Reverse AV Mode AV IN Volume 0 50 MAX o 0 50 MAX o 0 50 MAX o 4 3 16 9 o o AV AV IN o 0 15 MAX o 5 MODE 6...

Page 77: ...1 2 Audio 3 Video 4 Coaxial 5 6 7 12V 1 5A 8 5V...

Page 78: ...3 4 5 6 7 8 OSD 9 10 ENTER 11 12 13 14 15 16 17 18 19 20 21 21 23 25 27 29 31 33 34 24 DVD VCD CD 28 DVD 28 35 MODE Bright Color Contrast Scalling Reverse AV Audio Video Volume 36 37 38 39 40 41 B 42...

Page 79: ...B max 30 max 30 5...

Page 80: ...15 C 25 C 300 4 5 9 10...

Page 81: ...DVD Video Output Input Audio Output Input Video VIDEO OUT AV OUTPUT...

Page 82: ...POWER ON 5 PT700 AV INPUT VIDEO OUT IN PLAY PAUSE B B B MP3 JPEG 1 2 MP3 3 JPEG 4 MP3 JPEG ENTER PLAY Audio FM FM SETUP FM OUTPUT 88 1MHz 88 3MHz 88 5MHz 88 7MHz 1 2 0000...

Page 83: ...nu a eza i obiecte cu ap cum ar fi vazele pe acesta n interior exist un voltaj periculos Nu desface i carcasa Apela i doar la ajutorul unui centru de service autorizat Aten ie pentru a preveni electr...

Page 84: ...manualul ce acompaniaz aparatul LASER Acest aparat utilizeaz sistem laser Pentru a asigura buna func ionare a acestui produs citi i cu aten ie acest manual de uti lizare i p stra i l pentru referin e...

Page 85: ...olby Laboratories NU DEPLASA I APARATUL N TIMPUL RED RII n timpul red rii discul se rote te la o vitez ridicat de aceea nu trebuie s ridica i sau s deplasa i aparatul Pute i avaria discul LOCUL INSTAL...

Page 86: ...VERIFICAREA ACCESORIILOR Dup despachetare verifica i dac toate accesoriile de mai jos sunt incluse...

Page 87: ...ii Tip disc DVD Video Video CD CD DA MP3 MP4 JPEG PUTERE Adaptor 230V 12V 1 5A Adaptor 12V 1 5A Baterie optionala 7 4V Ie ire audio Linie iesire 20Hz 20kHz Iesire Casti Iesire audio digital coaxiala D...

Page 88: ...Fereastr recep ie IR 5 Deschidere capac TFTAp sa i acest buton pentru a dechide capacul TFT 6 Partea din spate Suport Scoate i suportul n pozi ia corespunz toare pentru a l sa unitatea pe 1 acesta Bat...

Page 89: ...nainte sau napoi x2 x4 x8 x20 4 Butoane mod butone i Utiliza i butoanele pentru ajust rile urmatoare Luminozitate Nivelul 0 Nivelul 50 Culoare Nivelul 0 Nivelul 50 Contrast Nivelul 0 Nivelul 500 Scala...

Page 90: ...este nc rcat complet LED ul se stinge Atunci c nd adaptorul AC DC este deconectat LED ul se stinge 6 Indicator putere ro u LED ul este aprins Adaptorul AC DC sau bateria sunt conectate i pornite LED u...

Page 91: ...pauz 19 NEXT Trece la piesa capitolul urm tor 20 STOP Opre te redarea discului 21 23 25 27 29 31 33 34 Butoane numerice 24 AUDIO DVD Selectarea limbii audio VCD sau CD Selectarea canalului audio 28 T...

Page 92: ...25 Introduce i bateriile n suport i pune i l la loc Nu sc pa i telecomanda i nu c lca i pe aceasta i nu o supune i ocurilor Se poate nt mpla s nu poat fi utilizat unitatea principal dac exist obstacol...

Page 93: ...n priza ndep rta i bateria din unitatea principal atunci c nd nu este utilizat pentru o perioad ndelungat de timp Instalarea i ndep rtarea bateriei Instala i bateria n felul urm tor Instala i bateria...

Page 94: ...te componente nainte de conectare pri i aparatul i dispozitivele ce vor fi conectate Intrare ie ire audio Intrare ie ire video Negru Galben Alb Ro u Galben Pentru mod video sau TV setati unitatea prin...

Page 95: ...r Ap sa i butonul PLAY PAUSE pentru a opri redarea Ap sa i butonul PLAY PAUSE pentru a relua redarea Repetare In timpul rularii apasati A B pentru a seta punctul de pornire A reapasati pentru a seta p...

Reviews: