background image

8


Eastwood Technical Assistance: 800.343.9353  >>  [email protected]
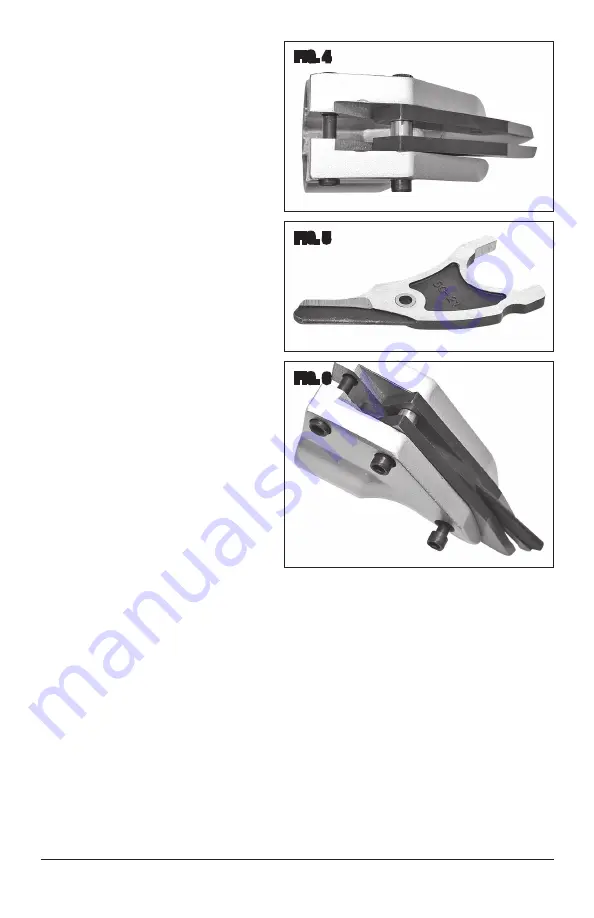
BLADE INSTALLATION

1. 

Set the Cutting Head on a firm sur-
face with the slot facing upward. 

2. 

Set the two Fixed Blades into the 
machined lands of the Cutting Head 

(FIG 4)

.

3. 

Place one of the two Bushing/Spac-
ers between the rearmost holes 
of the blades and insert one of the 
Socket Head Screws through the 
Cutting Head, Left Blade, Spacer/
Bushing and Right Blade 

(FIG 4)

4. 

Partially thread the Socket Head 
Screw into the opposite side of the 
Cutting Head. DO NOT TIGHTEN.

5. 

Set a Bushing/Spacer into the center 
pivot hole of the Center Moving Blade 
making sure it is flush on both sides 

(FIG 5)

.

6. 

Pass the Center Moving Blade 
through the round opening of the 
Cutting Head and set in place with 
the “notch” under the Bushing/
Spacer 

(FIG 6)

.

7. 

Pass the Socket Head Screw  
through the Cutting Head, Left Blade,  
Center Moving Blade and Right Blade  

(FIG 6)

8. 

Partially thread the Socket Head Screw into the opposite side of the Cutting Head.  
DO NOT TIGHTEN.

9. 

Check for proper alignment and Center Blade movement. Add some light machine oil to all 
contact and pivoting points of the Center Blade and also to the Eccentric Bearing at the front  
of the Shears.

10. 

Re-install the Head Assembly to the Main Shears Body.  

NOTE:

 The Body may need to be rotated from side to side to allow the eccentric bearing to 

align within the arms of the Center Blade.

11. 

Tighten all three Socket Head Screws securely.

12. 

The Electric Metal Shears are, once again, ready for use.

FIG. 4

FIG. 5

FIG. 6

Summary of Contents for 13475

Page 1: ...Item 13475 ELECTRIC METAL SHEARS INSTRUCTIONS ...

Page 2: ...ge 0 0625 1 59mm Steel 16 gauge 0 0625 1 59mm Stainless Steel 18 gauge 0 050 1 2mm Strokes Per Minute 0 2 500 variable speed Power Requirements 120V AC 60Hz 4 amps Motor Construction Fan cooled ball needle bearings planetary gearset DANGER indicates a hazardous situation which if not avoided will result in death or serious injury WARNING indicates a hazardous situation which if not avoided could r...

Page 3: ...you to lose control 2 ELECTRICAL SAFETY a Power tool plugs must match the outlet Never modify the plug in any way Do not use any adapter plugs with earthed grounded power tools Unmodified plugs and matching outlets will reduce risk of electric shock b Avoid body contact with earthed or grounded surfaces such as pipes radiators ranges and refrigerators There is an increased risk of electric shock i...

Page 4: ...es can reduce dust related hazards POWER TOOL USE AND CARE a Do not force the power tool Use the correct power tool for your application The correct power tool will do the job better and safer at the rate for which it was designed b Do not use the power tool if the switch does not turn it on and off Any power tool that cannot be controlled with the switch is dangerous and must be repaired c Discon...

Page 5: ... while operating Cutting with this Electric Metal Shears can generate excessive noise Wear appropriate hearing protection while using INJURY HAZARD The Electric Metal Shears can quickly start up when handling while plugged in to electrical supply causing serious personal injury Always unplug the tool from the electrical supply before changing Cutting Blades or performing maintenance Sharp metal ed...

Page 6: ...rews on the Cutting Head adequately to release clamping pressure Rotate the Cutting Head about the axis of the Shears Body to the desired position then re tighten the three screws FIG 1 MAINTENANCE Add several drops of light machine oil occasionally to all pivot points and moving blade contact surfaces Periodically clean any accumulation of metal chips and dust from the blades and motor cooling ve...

Page 7: ... 4 Remove Blades Bushing Spacers FIG 2 Blade replacement requires a high level of dexterity and patience to achieve installation and alignment Refer to photos for positioning FIG 3 Carefully note the posi tion of the Blades and Bushing Spacers for proper position during reassembly Fig 3 INJURY HAZARD The Electric Metal Shears can quickly start up when handling while plugged in to electrical supply...

Page 8: ...s the Center Moving Blade through the round opening of the Cutting Head and set in place with the notch under the Bushing Spacer FIG 6 7 Pass the Socket Head Screw through the Cutting Head Left Blade Center Moving Blade and Right Blade FIG 6 8 Partially thread the Socket Head Screw into the opposite side of the Cutting Head DO NOT TIGHTEN 9 Check for proper alignment and Center Blade movement Add ...

Page 9: ...To order parts and supplies 800 343 9353 eastwood com 9 NOTES ...

Page 10: ...10 Eastwood Technical Assistance 800 343 9353 tech eastwood com NOTES ...

Page 11: ...ord Use only 16 gauge or larger cord Limit length to 25 Excessive Noise and or Vibration Blades may be loose Unplug unit and tighten the Cutting Head Screws Blades may be chipped or broken Unplug unit and replace Blades per procedure described in these instructions Motor Overheats Excessive pressure being applied to Electric Metal Shears Allow Shears blades to cut by reciprocation alone Do Not For...

Page 12: ...ce Department 800 343 9353 email tech eastwood com PDF version of this manual is available at eastwood com The Eastwood Company 263 Shoemaker Road Pottstown PA 19464 USA 800 343 9353 eastwood com ADDITIONAL ITEMS 13474 Electric Metal Shears Replacement Blade Set 21299 Tilman Cut Resistant Gloves 21297 Tilman Trufit Work Gloves 20257 Eastwood Sheetmetal Layout Kit 14752Z CRC Blue Layout Fluid ...

Reviews: