background image


E

N

G

L

IS

H


Getting Started

 — Memory 


Installing a Card 

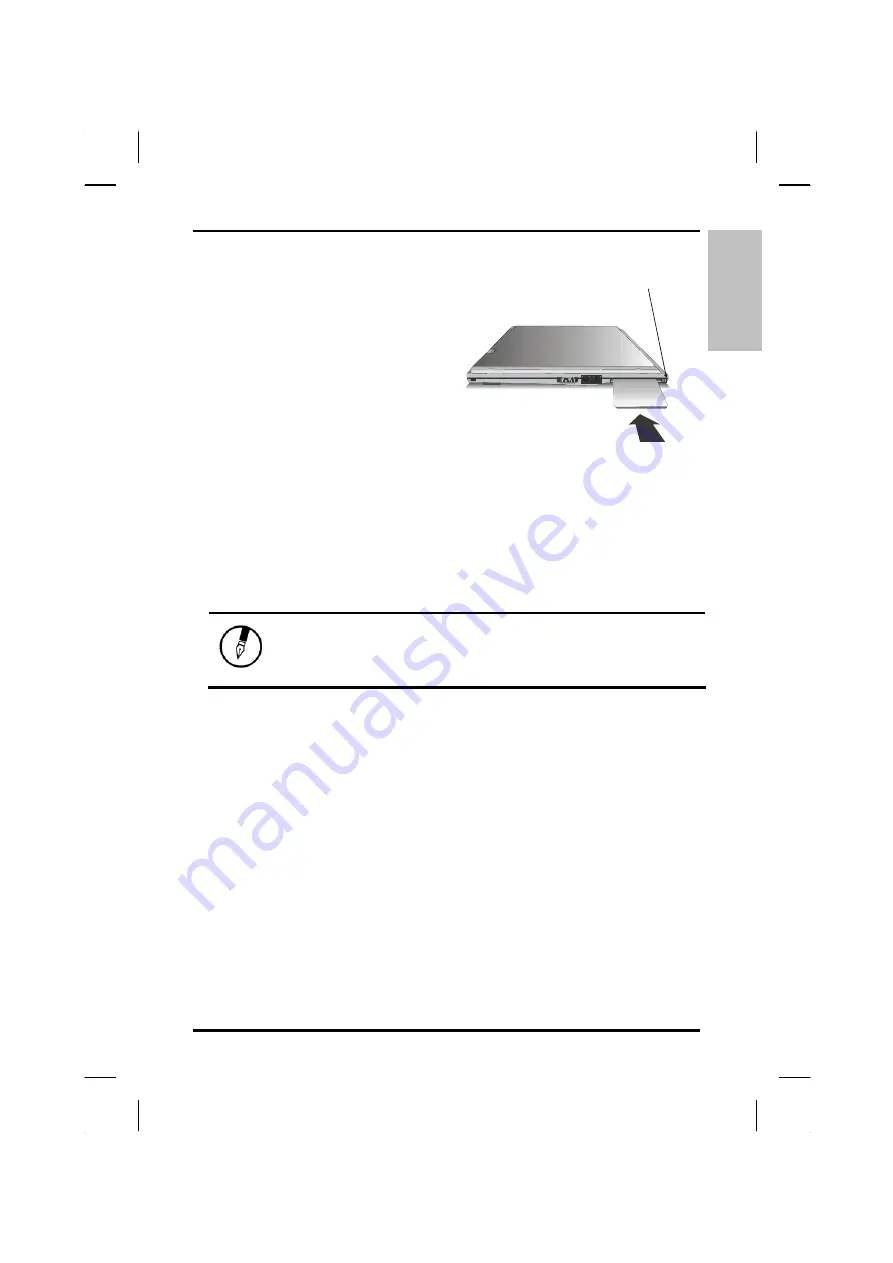
1.  The top side of a PC card is 

usually identified with a label. 
Insert the card into the slot with 
the label side up and the edge 
with pinhole contacts going in 
first. 

2.  Insert the card into the slot. You 

will feel some resistance as the 
card slides into the back of the 
slot. 


3.  PC cards require drivers, or a program that allows the operating 

system to use a specific device. Many drivers are included with 
Windows, but if not, you will be prompted to install the driver 
included with your card. 

4.  The computer will beep twice to indicate successful installation. A 

single beep means that there was a problem recognizing the card. 

Push the button to eject the card. 

Slide the card into the slot. 


Note: 

Please read the instructions included with 

individual PC cards. Some cards may be inserted 
with power on, while others require that the 
computer be turned off.


Removing a Card 

1.  If a card is in use, press the eject button on the card slot to release 

the button.  

2.  Press again to release the card. 


Memory 

Adding memory allows the computer to operate faster, handle more tasks 
simultaneously, and work more smoothly with large files. Users who    
increase memory demands - by adding additional programs, for example - 
may notice a slowdown in operating speed, and wish to increase memory. 
The notebook includes a memory card slot for adding additional memory.  
 

27 

Summary of Contents for eBuddy 6.8

Page 1: ...10262 Battleview Parkway Manassas VA 20109 7033931940 wwwearthwalkcom eBuddy 6 8 6 9 User s Manual ...

Page 2: ...urning off Your Computer 11 Making a Startup Disk 11 Tips for New Owners 12 CHAPTER 2 GETTING STARTED 15 Hardware and Software 16 Front View 17 Left View 18 Right View 19 Bottom View 20 LED Status Indicators 21 Power Indicators 22 Function Keys 22 Numeric Keypad 22 Touchpad 23 The DVD ROM or COMBO Drive 24 Connecting the Printer 26 The PC Card Slot 26 Memory 27 The Graphics System 29 Communication...

Page 3: ...g Tips 51 When to Replace the Battery 52 Heat Considerations 53 CHAPTER 6 USING THE BIOS SETUP UTILITY 55 Using the BIOS Setup Utility 56 Navigating and Entering Information in BIOS 57 The Main Menu 58 Advanced Menu 59 Boot menu 60 Security menu 61 Exit menu 62 Change User Password 63 Change Supervisor Password 63 CMOS Optimal Defaults 63 Exiting and Saving 63 APPENDIX A FREQUENTLY ASKED QUESTIONS...

Page 4: ...ENGLISH iv UL CAUTION 72 Canadian Department of Communications 74 Battery Disposal 75 CAUTION FOR ADAPTER 75 BATTERY CAUTION 75 CLASS 1 LASER PRODUCT 75 ...

Page 5: ...ENGLISH C Ch ha ap pt te er r 1 1 I In nt tr ro od du uc ct ti io on n ...

Page 6: ...al business and personal productivity applications the notebook is an ideal choice for use in the office at home and on the road For maximum expandability without compromising portability the notebook accommodates a number of modules including DVD ROM Combo Drive three USB ports one PCMCIA slot The high capacity hard disk drive provides you with plenty of storage space for multimedia files and app...

Page 7: ...warranty period Update this section when you add new options DATE OF PURCHASE PLACE OF PURCHASE DEALER S NAME DEALER S ADDRESS TELEPHONE E MAIL ADDRESS WWW CONTACT PERSON MODEL NUMBER SERIAL NUMBER BIOS VERSION The serial number is on the label with a bar code on the bottom side of the computer The BIOS revision number will appear briefly on the screen after turning on the computer before the grap...

Page 8: ...age could result from a fall Slots and openings in the system cabinet are for ventilation purposes Do not block or cover these openings or the system could overheat Do not use or store the computer near a source of heat or dust On the base or rear panel of this notebook there is a label with information on the power requirements of this system These requirements must be followed If you are unsure ...

Page 9: ...ear damaged contact your dealer The shipping carton should contain the following STANDARD A notebook computer with a hard disk drive An internal battery A DVD ROM or COMBO drive An AC adapter with power cord User s Manual System software CD OPTIONS The following items are normally optional but some vendors may include them in the standard package Some items may not be available in some countries o...

Page 10: ...stem vendor may be able to recommend reliable brands and models Features High Capacity Hard Disk Drive The computer has a high capacity hard disk drive to store your favorite programs and large multimedia files Built in Modem LAN Capability A built in 56k modem and 10 100 Mbps Ethernet port allows you to access the Internet or a local area network LAN LCD Your computer has an easy to view XGA LCD ...

Page 11: ...ut Your Computer This User s Manual describes the key elements of your computer New users can find a simple step by step orientation in the Quick Start section of this chapter About Windows Windows Online Help found on the Start menu offers extensive Windows assistance Tour Windows XP offers an online orientation for new Windows users Find it in Start Programs Accessories System Tools 7 ...

Page 12: ...r Note The battery is not fully charged Allow your battery to fully charge before using it i e before disconnecting AC power Calibrating the battery before use is also highly recommended Refer to Chapter 5 Power Management for further information Use the touchpad to move the cursor on the screen Move your finger across the pad to control the cursor and press the right and left buttons beneath with...

Page 13: ...e Notebook 1 Type your name and if applicable the name of your company 2 Read the End User s License Agreement Click Next to accept it 3 Enter the product key number You can find this on the Certificate of Authenticity on a sticker attached to the computer Click Finish 4 The Start Wizard will prompt you to set the date and your local time After the Start Wizard updates your system settings the Wel...

Page 14: ...ated below the touchpad Volume control button Alternatively you can adjust the volume with the Windows volume control applet located on the taskbar Adjusting the Brightness Use the following hot key combinations to adjust the LCD panel brightness Fn F6 decreases the brightness Fn F7 increases the brightness 10 ...

Page 15: ...creen and then click OK If you are going to be away from the computer for a short period there are ways of conserving power without shutting down the system See Chapter 5 Power Saving Modes for details Warning Shutting off the computer improperly may result in data loss Making a Startup Disk If you have trouble starting Windows the startup disk can be used to start your computer and fix many probl...

Page 16: ...r belts are safe for computers If you are not sure ask the security staff You should keep a close eye on your computer When you are in a hurry make sure that you walk away with the correct notebook computer Tape your business card to the notebook and accessories In the workplace notebooks and accessories may often look exactly alike leading to equipment mix ups Prevent such mix ups by placing your...

Page 17: ...suitable carrying case Consider using a lock For added security consider purchasing a Kensington lock to put into the Kensington lock hole on the left side of your computer see Chapter 2 Left View Use the Kensington lock to secure the computer to a desk or table Note Using a computer for extended periods of time with a poor workstation setup and incorrect work habits can cause health problems 13 ...

Page 18: ...ENGLISH Chapter 1 Introduction 14 ...

Page 19: ...ENGLISH C Ch ha ap pt te er r 2 2 G Ge et tt ti in ng g S St ta ar rt te ed d ...

Page 20: ...luding the hardware components the software and the audio and video systems Getting Started Before you begin using your computer read this chapter to familiarize yourself with the main components installed in the system Slide the screen latch on the front edge of the cabinet towards the right to release the cover latch and open up the computer 16 ...

Page 21: ... 2 LCD panel 3 Battery 4 Keyboard 5 Speakers 6 Touchpad 7 Touchpad buttons 8 Scrolling button 9 Volume control knob 10 Microphone in jack 11 Audio out jack for external speakers or headphones 12 Power indicators 13 Status indicators 14 Power button 15 WLAN button 17 ...

Page 22: ...GLISH Chapter 2 Getting Started Left View 1 2 3 4 5 6 1 Kensington lock hole 2 VGA port external video display port 3 Fax modem RJ 11 Jack 4 LAN RJ 45 jack 5 PCMCIA card slot 6 PCMCIA card eject button 18 ...

Page 23: ...ENGLISH Getting Started Right View Right View 1 USB ports 2 DVD ROM Combo drive 3 DVD ROM Combo eject button 4 AC adapter port 1 2 3 4 19 ...

Page 24: ...ENGLISH Chapter 2 Getting Started Bottom View 1 Ventilation slots 2 SO DIMM RAM compartment 3 Battery release button 4 Battery 20 ...

Page 25: ...o the built in hard disk Number Lock The keyboard is in Num Lock mode Caps Lock The keyboard is in Caps Lock mode Scroll Lock The keyboard is in Scroll Lock mode Power Indicators The power indicators show which power source the system is using The power indicators remain active and viewable even when the LCD panel is closed Icon Light Description Blue Power is on and the AC adapter is in use Flash...

Page 26: ...ion Fn F3 Toggles display on off Fn F4 Suspend to RAM HDD Fn F5 Toggles between LCD CRT displays Fn F6 Decreases LCD brightness Fn F7 Increases LCD brightness Numeric Keypad The embedded numeric keypad consists of ten keys that make number intensive input more convenient Press NumLock to enable or disable the numeric keypad 22 ...

Page 27: ...ponding direction 3 The touchpad offers another method of making selections in a software program It is called double tapping This function corresponds to double clicking with a mouse Once the cursor has been moved to the object you want to select lightly double tap the pressure sensitive touchpad This double tapping on the touchpad will select the desired item and prompt the software to perform t...

Page 28: ...anded and fine tune the pointer movement and timing of clicks Touchpad Precautions The Touchpad is a pressure sensitive device If not properly cared for it can be easily damaged Please take note of the following precautions Make sure the touchpad does not come into contact with dirt liquids or grease Do not touch the touchpad if your fingers are dirty Do not rest heavy objects on the touchpad or t...

Page 29: ... the disk from the tray Push the tray into the computer until it closes fully Warning When the computer is reading from a DVD ROM COMBO the indicator light for the DVD ROM will flash on Do not attempt to remove a disk while this light is active Precautions for Handling DVD ROM Discs Keep these precautions in mind when handling DVD ROM discs Always hold the disc by the edges avoid touching the surf...

Page 30: ...d on the front panel The CD disk tray should eject immediately This procedure can also be used to remove a CD from the drive when the notebook is powered off Connecting the Printer To connect a printer to your notebook via the USB port use the supplied USB to printer adapter cable Note Before use you must install the driver for the adapter cable The PC Card Slot The PC card slot can be used as an ...

Page 31: ...ul installation A single beep means that there was a problem recognizing the card Push the button to eject the card Slide the card into the slot Note Please read the instructions included with individual PC cards Some cards may be inserted with power on while others require that the computer be turned off Removing a Card 1 If a card is in use press the eject button on the card slot to release the ...

Page 32: ...he RAM compartment cover 3 Gently pull tabbed latched in the direction of the arrows 1 The card will pop up slightly 4 Pull upwards on the card and then slide the card out 2 Inserting a Memory Card 1 Hold the memory card by its edges with the edge connector side towards the slot 2 Hold the card at a shallow angle about 25 degrees and insert the edge connector into the connector slot 3 The gold tee...

Page 33: ...ecure it with the two screws Your notebook computer will automatically detect the change in RAM capacity when it restarts The Graphics System Your computer has a high performance graphics system which can easily handle the demands of today s multimedia computing Screen Controls Brightness Function keys can increase or decrease the brightness of the monitor Fn F6 decreases the LCD panel brightness ...

Page 34: ... external monitor Higher resolution modes may be used as long as the monitor supports them Connecting to an External Monitor The notebook has a VGA monitor port to connect your computer to an external monitor Using the VGA monitor port 1 Locate the 15 pin VGA monitor port on the left side of your notebook and connect the video signal cable from the external monitor or the VGA adapter to the monito...

Page 35: ... Click the Advanced button 5 Click the S3 Display Modes tab The screen shown at the right appears 6 Setting by your demand 7 Then you can cycle the video output by pressing the Fn F5 keys These options are described below Single You can choose which device to apply as the Primary display In Single mode the video display hot key combination is available you can cycle the video output by pressing th...

Page 36: ...se an external monitor change the output in the Display Properties dialog box After successfully switching modes you may use the video function keys Note Light or dark dots may appear on the LCD due to technical limitations of LCD manufacturing This will not effect normal operation of the LCD 32 ...

Page 37: ...be used as a fax When using this function first plug the phone cord into the jack Anti electromagnetic wave clip To eliminate electromagnetic waves it is strongly recommended that you thread the left side USB cable LAN cable phone cord through the clip provided as shown below when using USB peripherals fax modem jack or connecting to a phone line Attention When using the data communications functi...

Page 38: ...ilt in Wireless Local Area Network The built in Wireless Local Area Network WLAN interface card can provide a quick access without using cables for the connection to the network equipments The interface card adopts the IEEE 802 11 protocol and uses the 2 4 GHz ISM electric wave frequency band as the transmission interface to set up the communications between the host computer and other computers T...

Page 39: ...ecommunications laws and regulations The low power frequency electric machinery should be able to tolerate the interference of the electric wave radiation electric machineries and equipments for legal communications or industrial and scientific applications IMPORTANT NOTE CO LOCATION FCC RF Radiation Exposure Statement This equipment complies with FCC RF radiation exposure limits set forth for an ...

Page 40: ...ENGLISH Chapter 2 Getting Started 36 ...

Page 41: ...ENGLISH C Ch ha ap pt te er r 3 3 M Ma ak ki in ng g C Co on nn ne ec ct ti io on ns s ...

Page 42: ...s offering advanced communications technology Left Side Connectors 1 Kensington Lock Your computer includes a Kensington lock hole to be used with a standard Kensington lock You can connect the notebook to a large object with the Kensington lock to prevent theft of your notebook See the documentation that comes with your Kensington lock for more information 2 VGA Out External Video Port The 15 pin...

Page 43: ...found in many offices Digital lines may damage your modem 4 LAN RJ 45 Jack With the built in Ethernet LAN combo you can make LAN connections without installing PC cards Connection speed is 10 100 Mbps Right Side Connectors 1 2 1 USB Universal Serial Bus Ports The Universal Serial Bus USB is the latest standard for attaching monitors input devices scanners and other devices to a PC USB devices can ...

Page 44: ...r 3 Making Connections Front Side Connectors 1 Audio out Jack Connect a stereo headset or external speakers to this jack to listen to multimedia 2 Microphone in Jack Connect a microphone this jack to record audio 40 ...

Page 45: ...ENGLISH C Ch ha ap pt te er r 4 4 S Sy ys st te em m S So of ft tw wa ar re e ...

Page 46: ...s all the software you need to operate the computer Audio and Video Drivers These utility programs and drivers are included for the PC Card drive the sound system and the graphics sub system DVD Player Application The DVD player application will let you watch DVD movies on your notebook for DVD ROM module only 42 ...

Page 47: ...he system software however if you change a new hard disk you must first partition it If you reinstall your operating system all of the data originally on the hard disk will be overwritten Before reinstalling the operating system carefully backup any important data Your system is shipped with Recovery CD ROMs Before reinstalling note the CD ROM labels Caution When you re install operating system by...

Page 48: ... first boot device to CD ROM See Chapter 6 BIOS Settings Put the Windows Recovery CD into the CD ROM drive and reboot the computer NO Follow the instructions in the sections below Partitioning the hard drive Recovering Windows Creating a Suspend to Disk Partition Windows 98SE only Recovering original software YES Follow steps under Recovering Windows Hard disk partitioned 44 ...

Page 49: ... to enable large disk support Y N Select Y On the first screen select Create DOS partition or logical DOS drive On the next screen select Create Primary DOS partition This will create the largest possible partition as the C drive At the A prompt type fdisk and press Enter Note If your computer is set to boot from the CD ROM drive A refers to your CD ROM When the Microsoft Windows startup menu appe...

Page 50: ...el to reboot the computer Enter the BIOS Setup Utility and select Boot priority Reset the boot priority to either A or C When the Microsoft Windows XP Menu appears choose option 1 Recovery CD for Windows XP When prompted insert the Disc 2 It will take approximately fifteen minutes to complete the installation Remove the CD ROM from the drive when the installation is complete While starting Windows...

Page 51: ...ENGLISH C Ch ha ap pt te er r 5 5 P Po ow we er r M Ma an na ag ge em me en nt t ...

Page 52: ...ery learning then press enter Execute Battery Learning function OK Cancel 4 Press OK at the above Battery Auto Calibration dialog to begin the battery calibration Battery Calibration will take from 4 to 8 hours depending on how much power the battery may already contain Note For optimum performance we recommend calibrating the battery again every three months Each time you charge and discharge a b...

Page 53: ...ms How your computer responds to a low battery condition is set under Start Control Panel Power Options Alarms Two different power alarms can be enabled or disabled the Low Battery Alarm and the Critical Battery Alarm Use the slidebar to set the power level at which the alarms are activated Click on the Alarm Action button to choose whether the alarm sounds displays a message or both Warning When ...

Page 54: ...ned off or standby mode a fully discharged battery will take about 3 hours to recharge Note A fully charged battery can run the Notebook for approximately 3 5 hours Celeron M 1 4GHz Power Saving Modes Adjust the default power management settings in the Power Options Advanced dialog box in the Control panel The Power Options Properties dialog box allows you to set different actions to take when the...

Page 55: ... power button can be set to Shutdown or Standby in the Power Management Properties dialog box in the Windows Control Panel However holding the power button down for more than four seconds will force a power off while operating under any situation resulting in the loss of any unsaved information Power Saving Tips Avoid operating the fax modem or audio and video applications when using battery power...

Page 56: ... the computer 2 Close the screen cover and turn the computer over 3 Slide the side battery latch 1 away from the battery Continue to hold it until the battery is removed 4 Push in the latch on the battery 2 while lifting the battery out of the compartment Remove the battery 5 Make sure the replacement battery is properly orientated Slide back the side battery latch 1 then insert the battery into t...

Page 57: ...in a hot environment or working for long periods may raise the temperature Your computer takes the following steps to lower temperature 1 The cooling fan will automatically turn on You may feel air coming from a vent at the left side when this happens 2 If the temperature continues to rise processor activity will be reduced You may notice a slight loss of performance when this happens 53 ...

Page 58: ...ENGLISH 54 ...

Page 59: ...ENGLISH C Ch ha ap pt te er r 6 6 U Us si in ng g t th he e B BI IO OS S S Se et tu up p U Ut ti il li it ty y ...

Page 60: ... computer on the system reads this information to initialize the hardware so that it can operate correctly Use the BIOS setup utility to change your computer s start up configuration For example you can change the security and power management routines of your system Starting the BIOS Setup Utility You can only enter the BIOS setup utility as the computer is booting that is between the time you tu...

Page 61: ...on Tab Select Field F1 General Help F10 Save and Exit ESC Press Esc to exit any section If you wish to exit the BIOS utility without saving changes go to the main menu then press Esc Users are allowed to enter new values to replace the default settings in certain fields and the rest fields are specified by system default parameters and cannot be modified by users Reverse the attribute of the main ...

Page 62: ...r Type Intel Celeron M processor Speed 1400MHz System Memory Size 248MB System Time 19 14 50 System Date Thu 01 01 2004 Use ENTER TAB Or SHIFT TAB to select a field Use or to Configure system Time Select Screen Select Item Change Option Tab Select Field F1 General Help F10 Save and Exit ESC Exit V02 54 Copyright 1985 2003 American Megatrends Inc Figure 6 1 58 ...

Page 63: ...ics Mode Select 32MB Auto DIM function Enabled Legacy USB Support Enabled Battery Learning Enter Start FAN Learning Enter Select the amount of system memory used by the internal graphics device Select Screen Select Item Change Option F1 General Help F10 Save and Exit ESC Exit V02 54 Copyright 1985 2003 American Megatrends Inc Figure 6 2 59 ...

Page 64: ...2 nd Boot Device HDD PM FUJITSU MHT2040AT 3rd Boot Device Network PXE 2 33 Specifies the boot sequence from the available devices A device enclosed in Parenthesis has been disabled in the corresponding type menu Sele ct Screen Select Item Change Option F1 General Help F10 Save and Exit ESC Exit V02 54 Copyright 1985 2003 American Megatrends Inc Figure 6 3 60 ...

Page 65: ...y Exit Security Settings Supervisor Password Not Installed User Password Not Installed Change Supervisor Password Change User Password Install or Change the password Select Screen Select Item Enter Change F1 General Help F10 Save and Exit ESC Exit V02 54 Copyright 1985 2003 American Megatrends Inc Figure 6 4 61 ...

Page 66: ...tions Save Changes and Exit Discard changes and Exit Discard Changes Load Optimal Defaults Exit system setup after saving the changes F10 key can be used for this operation Select Screen Select Item Enter Go To Sub Screen F1 General Help F10 Save and Exit ESC Exit V02 54 Copyright 1985 2003 American Megatrends Inc 62 ...

Page 67: ...o verify it Type in 6 or fewer keystrokes If you make an error press Esc to start over Resetting the CMOS to Default Settings The main page provides the system parameters for you to reset the CMOS to default settings After you enter this page select the Load Optimal Defaults Load Optimal Defaults OK Cancel Select OK to reset the CMOS to default settings Exiting and Saving Save Settings and Exit Se...

Page 68: ...ENGLISH Chapter 6 Using the BIOS Setup Utility 64 ...

Page 69: ...ENGLISH A Ap pp pe en nd di ix x A A F Fr re eq qu ue en nt tl ly y A As sk ke ed d Q Qu ue es st ti io on ns s ...

Page 70: ...ms This maintenance includes deleting unnecessary files and defragmenting which rearranges data into more efficient groupings Windows includes utilities for performing these maintenance tasks Run Disk Cleanup to remove unnecessary files and Disk Defragmenter to defragment the hard drive For more information refer to Windows documentation Q The internal fax modem dial tone sound is too low How can ...

Page 71: ... been used for a long time more than one month the batteries will go into the low voltage protection mode due to data back ups and natural electrical discharge At that point restoring normal voltage will require slow charging over a period of several hours Calibration can be performed after the battery has returned to a normal condition Q My computer alerts CMOS Battery Low what can I do A If you ...

Page 72: ...ENGLISH Appendix A Frequently Asked Questions Save configuration changes and exit setup OK Cancel 68 ...

Page 73: ...ENGLISH A Ap pp pe en nd di ix x B B S St ta at te em me en nt ts s ...

Page 74: ...r is encouraged to try to correct the interference by one or more of the following measures 1 Reorient or relocate the receiving antenna 2 Increase the separation between the equipment and the receiver 3 Connect the equipment into an outlet on a circuit different from that to which the receiver is connected 4 Consult the dealer or an experienced radio TV technician for help Shielded interconnect c...

Page 75: ...hone company will notify you in advance that temporary discontinuance of service may be required However if advance notice isn t practical the telephone company will notify the customer as soon as possible Also you will be advised of your right to file a compliant with the FCC if you believe it necessary The telephone company may mark changes in its facilities equipment operations or procedures th...

Page 76: ...s To program this information refer to the manual of the communication software European Notice Products with the CE Marking comply with both the EMC Directive 89 336 EEC and the Low Voltage Directive 73 23 EEC issued by the Commission of the European Community Compliance with these directives implies conformity to the following European Norms z EN 55022 CISPR 22 Radio Frequency Interference z EN ...

Page 77: ... reduce the risk of fire use only No 26 AWG or larger telecommunication line cord IMPORTANT SAFETY INSTRUCTIONS When using your telephone equipment basic safety precautions should always be followed to reduce the risk of fire electric shock and injury to persons including the following Do not use this product near water for example near a bathtub wash bowl kitchen sink or laundry tub in a wet base...

Page 78: ...ditions may not prevent degradation of service in some situations Repairs to certified equipment should be made by an authorized Canadian maintenance facility designated by the supplier Any repairs or alterations made by the user to this equipment or equipment malfunctions may give the telecommunications company cause to request the user to disconnect the equipment Users should ensure for their ow...

Page 79: ...PLACED REPLACE ONLY WITH THE SAME OR EQUIVALENT TYPE RECOMMENDED BY THE MANUFACTURER DISPOSE OF USED BATTERIES ACCORDING TO THE MANUFACTURER S INSTRUCTIONS CLASS 1 LASER PRODUCT LASERSCHUTZKLASSE 1 PRODUKT TO EN60825 CAUTION THIS APPLIANCE CONTAINS A LASER SYSTEM AND IS CLASSIFIED AS A CLASS 1 LASER PRODUCT TO USE THIS MODEL PROPERLY READ THE INSTRUCTION MANUAL CAREFULLY AND KEEP THIS MANUAL FOR F...

Reviews:

Related manuals for eBuddy 6.8