background image


NOOMi Installation Guide 


© Copyright EarlySense Ltd., 2020.  All rights reserved 


Doc #: TS-101                                                               Page 7 of 10                                                                          Rev: 01 


5.2


Configuring the Network for Monitoring Devices 
 

Note!

 NOOMi

’s 

default network settings use a LAN interface. The default IP is 

10.10.10.20. 
 
Configuring the network: 
 

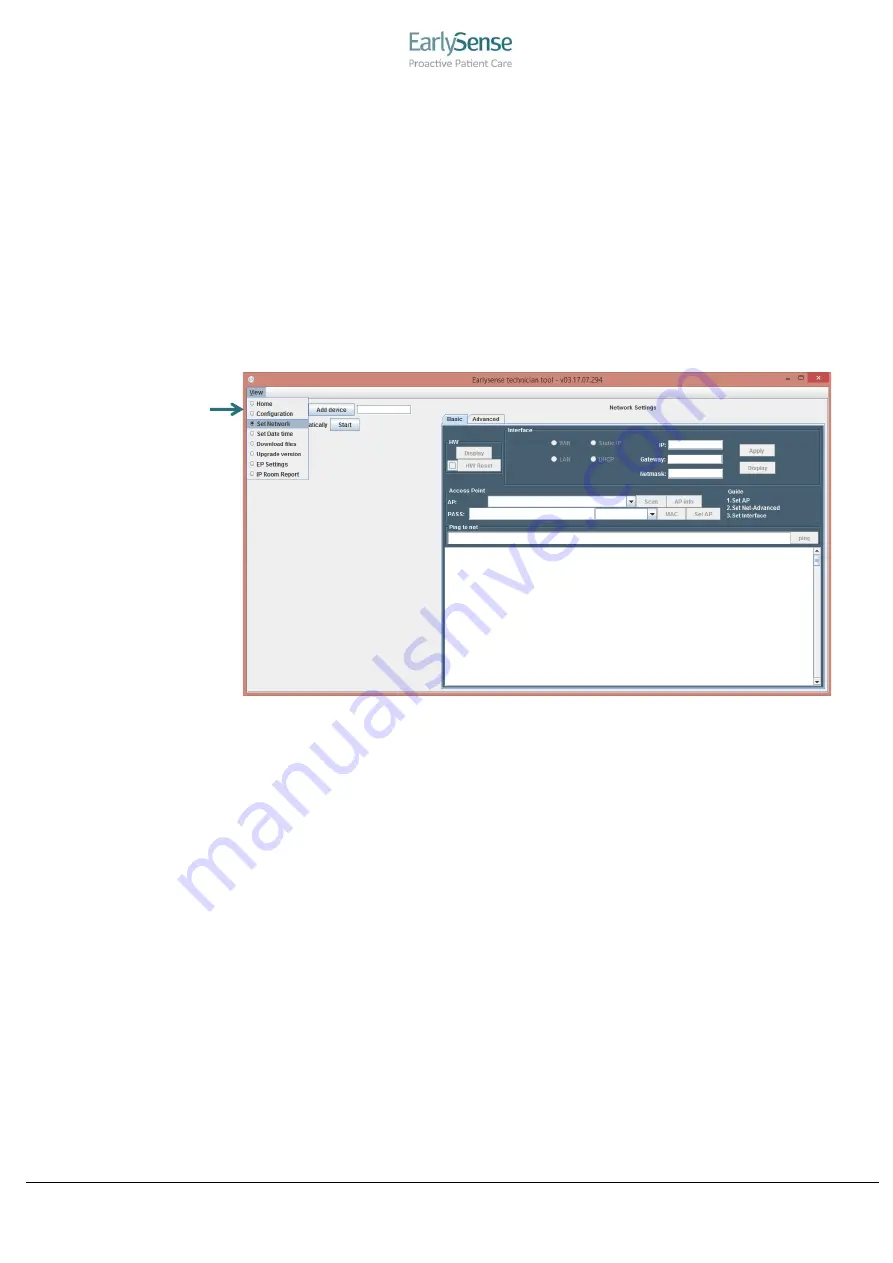
1. Select a connected (green indicator light on) unit in the Devices pane by   
checking the box next to it.  
2. Click 

View

. A menu opens. 

3. Select 

Set Network


Figure 5: Set Network Window


4. Configure the following fields with the relevant options: 
 
Access Point area: 


WIFI Network Name: Click 

Scan

 to search for the relevant Access point. 

Note that the WIFI network may be hidden. You can enter the Access 
Point (AP) name manually (If there are several APs with the same name, 
you can choose the relevant MAC address.)  


Set the password value according to network preferences in the 

PASS


field. 


Click 

Set AP

 to apply the changes. 


Interface area: 


Address Type: Static/Dynamic (Static IP/DHCP). 


IP Address: Set the NOOMi 

unit’s requested IP address.


Network Type: WIFI (LAN is not supported in NOOMi devices). 


Set the Getaway and the Netmask (if needed). 


Click 

Apply

 to apply the changes. 


Summary of Contents for noomi

Page 1: ...FIDENTIALITY NOTICE This document contains valuable trade secrets and confidential information of EarlySense Nothing herein may be copied reproduced or distributed in any form or any medium or disclos...

Page 2: ...he NOOMi device connects via a WIFI network and transmits the collected data to the EarlySense cloud based server for analysis The data is shared with EarlySense partners designated front end applicat...

Page 3: ...will be available 4 1 EarlySense TechTool EarlySense s TechTool can check if the desired network ports are open and if the EarlySense server is accessible from the local network It is highly recommend...

Page 4: ...ork interface 5 1 NOOMi Network Configuration When adding devices to the TechTool ensure that NOOMi device is turned ON Note The NOOMi unit is ON if it is connected to electrical power and the green p...

Page 5: ...IP displays on the main screen Figure 3 Manually Adding a Single Device 5 1 3 Importing a List of Devices Note This option requires that you create a txt file of IP addresses The file should contain...

Page 6: ...the following fields with the relevant options Access Point area WIFI Network Name Click Scan to search for the relevant Access point Note that the WIFI network may be hidden You can enter the Access...

Page 7: ...ble to load the advanced configuration from a selected device by clicking the Load from selected device button on the bottom Using Certificates Place the relevant certificate files in a dedicated fold...

Page 8: ...f maximum connected users Use Earlysense TechTool and check NOOMi s WIFI signal strength Network tab Display Question What should you do if NOOMi connected to the local WIFI network but can t be seen...

Page 9: ...hone 50Mb s per 100 NOOMi units Firewall The following ports should be open outbound for the followings Port 123 UDP for ntp Port 53 TCP UDP protocol for DNS Port 443 TCP for http Port 8883 TCP for NO...

Reviews: