background image

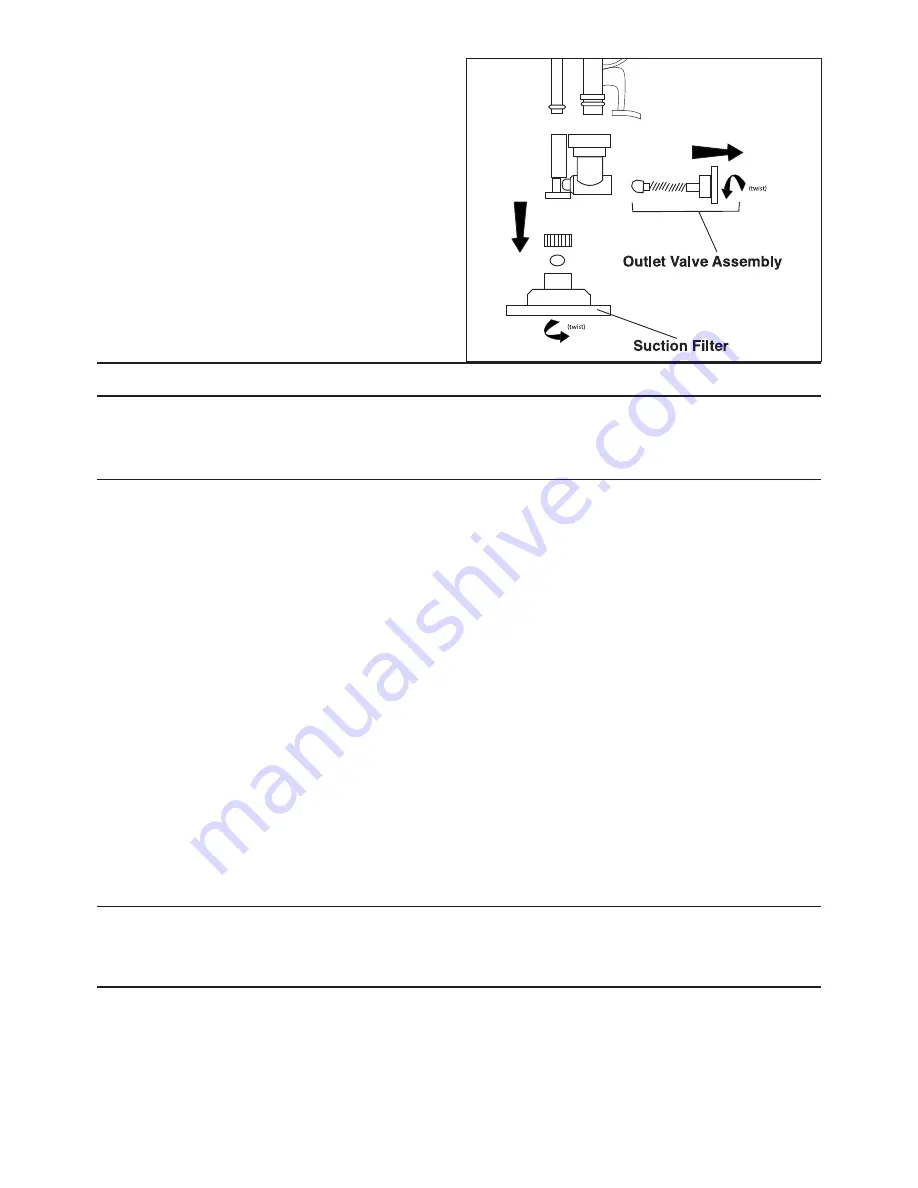
To prevent dried paint from blocking the unit,
unclip the suction filter and outlet valve
assembly. Then remove the suction filter and
outlet valve assembly by first rotating them
approximately 45 degrees anti-clockwise and
then pulling.
The suction filter houses a suction ball which is
held in position by a plastic bridge. To access
the suction ball remove the bridge by using a
pair of long nose pliers, tweezers or similar tool
for pulling. After removing the bridge the
suction ball can now be tapped out for
cleaning. Be careful not to loose the suction
ball. A spare ball is supplied in the spares pack.

TROUBLE SHOOTING
SYMPTOM

REMEDY

Motor does not run:

Check the batteries are the right way round.
Check the batteries are not flat.

No paint is being fed to the roller:

Check that there is sufficient paint in the paint container.
(The container can appear to be full from the outside 
when it is actually empty)
Check that there are no kinks or blockages in the 
delivery tube or roller.
Check that the unit has been thoroughly cleaned after 
last use.
Check that the filter is not blocked with particles of dried 
paint or dirt.
Check that the outlet valve assembly and suction filter 
are fitted.
Check that the suction ball is fitted in the top of the filter.
Check that the suction ball and outlet valve assembly  
are not blocked with dried paint.
Check that the paint has been stirred thoroughly and is 
not too thick.
Check that the unit is set to high speed. It can help to 
pump a small amount of water through the pump and 
delivery tube (not the roller, which should be damp) to 
speed up paint flow.

Unit will not run on High speed:

Check that the batteries are correctly installed.
Check that the batteries are not corroded or damaged.
Check that the batteries are not flat.

SPARES

A spares pack is supplied consisting of:
1 x PR28 Outlet Valve Assembly
1 x PR33 Suction ball
1 x PR112 Roller Seal
1 x PR116 Piston ‘O’ Ring

If you need to replace a part, please refer to
parts explosion diagram for fitting. If you
require assistance or further spare parts
please ring our Customer Service toll free
888-783-2612.

5

Summary of Contents for PR9

Page 1: ...PENDENCIA 1100 OTE TORRE N COAH C P 27000 R F C TSO991022PB6 TELEFONO 01 800 83 29 200 ESPECIFICACIONES ELECTRICAS 6 Vcc UTILIZA 4 BATER AS D DE 1 5 V cc NO INCLUIDAS HECHO EN TAIWAN COMPRESORA INALAM...

Page 2: ...Paint Roller will give long trouble free service We accept no responsibility for damage caused by the use of incorrect or unsuitable substances paint or fluids which have not been thinned correctly o...

Page 3: ...g the paint you will need to remove the filter and clean this thoroughly before the pump will operate correctly FILLING Unclip top motor housing and pour the paint into the container fill to a MAXIMUM...

Page 4: ...r end of the hose over the paint can and push the tap connector onto a tap Turn on the tap gently and gradually increase the water pressure to flush the paint from the hose Do not turn the tap to full...

Page 5: ...ges in the delivery tube or roller Check that the unit has been thoroughly cleaned after last use Check that the filter is not blocked with particles of dried paint or dirt Check that the outlet valve...

Page 6: ...6...

Page 7: ...Battery Contact moulding wiring PR52 Connecting Rod c w Clevis Pin Circlip PR22 Pump Body Moulding V2 PR113 Pump Body Moulding O Ring V2 PR117 Piston Rod V2 PR114 Piston Rod O Ring V2 PR116 Outlet Va...

Page 8: ...e product 2 To make the guarantee valid you just have to show this guarantee and the ticket of purchase 3 Soriana will repair or change the product without charge to the consumer 4 The parts can be pu...

Page 9: ...NOTES 9...

Page 10: ...CI N Y SEGURIDAD TOME NOTA Hemos hecho todo lo posible para asegurar que si se usa correctamente y de acuerdo a las instrucciones la Compresora PR9 dar un servicio sin problema por mucho tiempo No ace...

Page 11: ...la necesitar quitar el filtro y limpiarlo concienzudamente antes de que la bomba opere correctamente LLENADO Quite el clip de la tapa del motor y vac e la pintura en el contenedor Llene con un m ximo...

Page 12: ...la manguera sobre la lata de pintura y empuje el conector en el grifo Abra el grifo lentamente y aumente la presi n para lavar la pintura que qued en la manguera No abra demasiado para aumentar la pr...

Page 13: ...intura en el contenedor El contenedor puede aparecer lleno desde afuera cuando en realidad est vac o Revise que no hay bloqueos en el tubo o en el rodillo Revise que la unidad se haya limpiado desde s...

Page 14: ...14...

Page 15: ...LH PR10 Molde Superior RH PR15 Molde Superior Atornillado 6 del PR21 Mecanismo del Motor con Interruptor Area para bater as y cableado PR52 Barra Conectora con Peron y Clip PR22 Cuerpo de la Bomba PR...

Page 16: ...taci n de esta p liza junto con el producto y su comprobante de pago en el lugar donde fue adquirido o en cualquiera de las sucursales 3 La Empresa se compromete a reparar o cambiar el producto as com...

Reviews: