background image

Copyright 2013 Eagle Tree Systems, LLC                                                           Page 6 


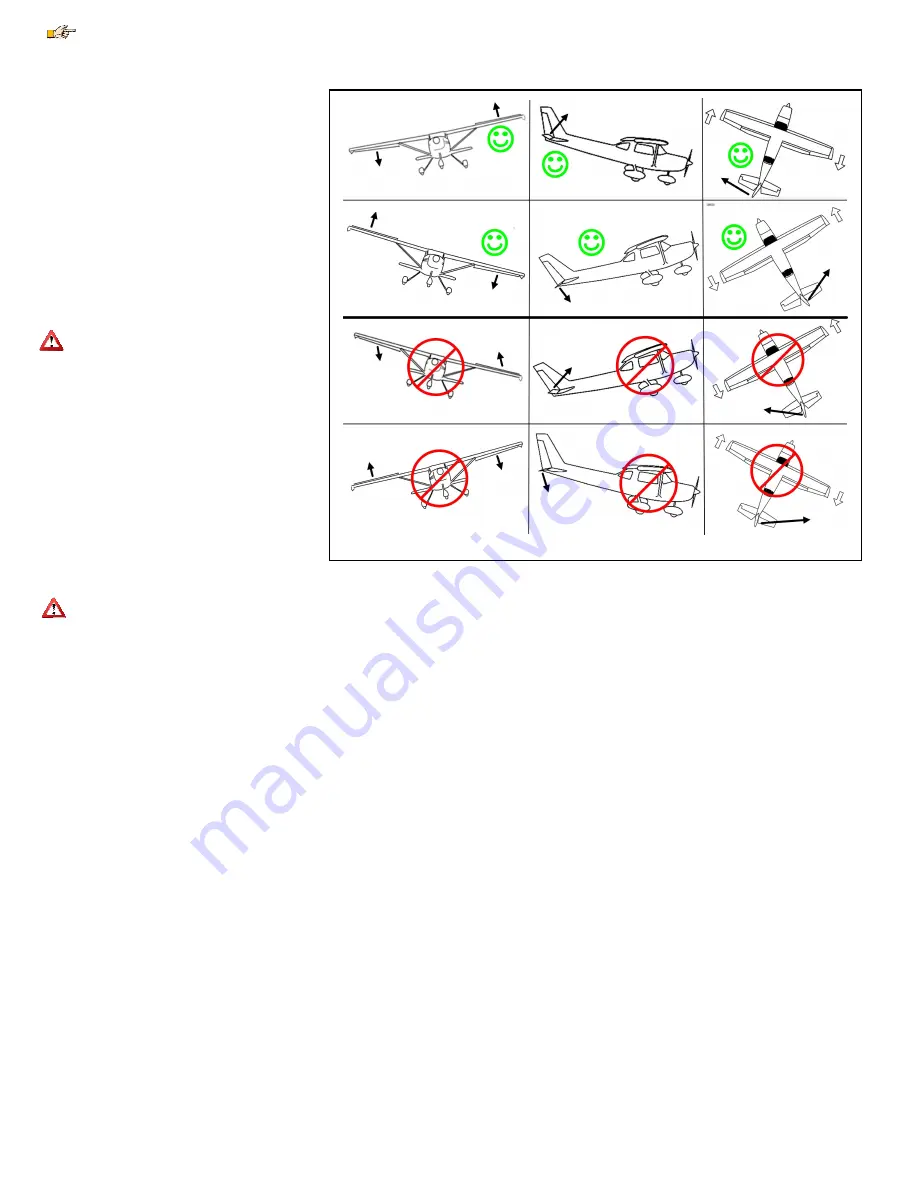
Figure 6 – Correct and Incorrect Control Surface Movement 

If permanently mounting the Guardian, ensure that the USB port is still accessible for PC configuration and firmware update. 

Preflight Checks 

Before every flight, it is strongly recommended that you 
perform the following steps: 


Perform your normal preflight check.  Ensure your 
servos respond correctly to your RC control stick 
commands. 


To test that the Guardian is working, hold the 
airplane level.  Now, pitch, roll and yaw the 
model.  Please see Figure 6.   You should see the 
control surfaces deflecting appropriately to level 
the airplane and keep it on a straight heading.  If 
the control surfaces do not move at all, ensure that 
the Master Gain knob on your transmitter (if used) 
is set so that stabilization will occur, and ensure 
that the Mode/Config switch (if used) is set for 
either 2D or 3D Mode.   
 

If any of your control surfaces are moving the 

wrong direction, you need to reverse the 

direction of the appropriate Guardian Gain Control 
Dial! 

First Flight 

To account for trims and mounting errors of the 
Guardian within your plane, follow the instructions in 
the section titled “Reset Level Flight and Trims.” 

On your first flight, it is recommended that you do an 
unpowered hand-toss of your airplane, if it is capable of 
hand-toss launches.  If the airplane safely glides to the 
ground with little or no input, then your configuration is 
correct.  If the model oscillates or overcompensates 
during the hand-toss, your Gain is too high. 

Once it has been shown that the Guardian has been correctly configured, perform a run-up on the ground with stabilization enabled, while watching your control surfaces for 
drift.  If it appears as if stabilization is working properly with the engine active, then throttle down, perform one last preflight check and take off with power. 

Don’t fly your model if your control surfaces are moving unexpectedly during engine run-up! 

Once in the air and only when safe, release the control stick so it sits at zero deflection with 2D Mode enabled.  Your airplane should fly straight and level.  If not, your 
Guardian may be mounted improperly or you need to re-trim your airframe.  Disable stabilization by flipping the Mode/Config switch to the center position (if available).  
Trim your controller in this mode until the plane achieves level flight.  Land and follow the instructions for “Resetting Trims” on the ground.


Tuning Stabilization Gains 

Stabilization Theory 

The Guardian 2D/3D Stabilizer uses accelerometers and gyroscopes to measure the orientation of your model relative to the local direction of Earth’s gravity.  In addition, it 
interprets Pitch and Roll attitudes commanded by your Elevator and Aileron stick movements, respectively. 

With this information, it is able to determine the error between your requested flight attitude and your plane’s true orientation.  By passing this error through a controller 
algorithm and sending it as servo commands through its Elevator, Aileron and Rudder outputs, the Guardian can help turn your squirrely model into a smooth-flying wing 
on rails!  

Each axis has a separate gain control dial, which is used to adjust gain on that axis.  The Pitch, Roll and Yaw gains are then scaled by the optional Overall “Master Gain” 
control, which can be mapped to a knob (or slider) on your transmitter.   This arrangement allows individual axis gain adjustment while also providing in-flight Overall Gain 
adjustment to compensate for varying conditions and aerodynamic performance.   

In general, the higher the gain, the more responsive and resilient your plane will be to disturbances such as wind, balance and trim issues.  Tuning the gains too high 
however may result in oscillations of the airframe.   It is recommended that the Master Gain control be used to tune the airframe until it barely oscillates and then be turned 
back down.  This will ensure the best performance while preventing future oscillations. 

Components of Stabilization


The Guardian employs two major techniques to stabilize your model: “rate stabilization and “orientation stabilization”.  Sometimes called “derivative” and “proportional” 
stabilization respectively, these two behaviors work together to smooth out bumps in the air while keeping your model in the orientation you want it. 

Rate Stabilization 

This is the reaction of the model to instantaneous motion.  Specifically, it is the movement of your servos to oppose the angular rate of your model.  The faster your model 
is rotating in a given direction, the harder the Guardian will oppose that motion.  This is the effect that smoothes turbulence and makes your model feel more stable.  In 
addition, when you fly in 3D Mode with 3D Heading Hold disabled, this is the only type of stabilization used.   

Orientation Stabilization 

This is the reaction of the model to the error between its current orientation and its commanded orientation.  For instance, in 2D Mode with the sticks centered, the further 
the model is brought from level orientation, the harder the Guardian will fight to bring it back.  This behavior is also used in 3D Mode when 3D Heading Hold is active to 
keep the model pointed in its locked direction. 

Summary of Contents for Guardian 2D/3D Stabilizer

Page 1: ...ething is not clear just ask We d much prefer to take the time to answer your questions rather than having you waste your valuable time struggling with an issue To get help visit the Eagle Tree Guardian support thread at http www rcgroups com forums showthread php t 1596644 Chances are someone has posted a solution to your problem already If not posting your problem there will get a very quick res...

Page 2: ... control stick is moved to turn this heading is reset and subsequently relocked as soon as the stick is centered again Automatic Turn Coordination When enabled Automatic Turn Coordination will cause the Guardian to employ the step on the ball method of actuating your Rudder for you As you enter a banked turn the Guardian will assert a coordinating response on the Rudder automatically This deflecti...

Page 3: ...all stabilization gain if you are using the gain knob o Observe how your servos react as you pitch roll and yaw your plane o Adjust the Guardian Pitch Roll and Yaw axis dials with a screwdriver so the servo for each axis deflects in the correct direction to bring your model back to level A centered dial asserts zero stabilization on that axis Turning it clockwise or counterclockwise increases the ...

Page 4: ...ts Receiver Connection Requirements The number of connections between the Guardian and your receiver depends on type and capabilities of your model the level of Guardian in flight control you require and the number of spare receiver channels you have For very basic models the Guardian is capable of operating with only the Elevator input and Aileron input connected BEC Receiver Battery Power Requir...

Page 5: ...Good and Bad Ways to Mount the Guardian Wing Type Configuration The Guardian is configurable for most common wing types By default it is configured for traditional wing control Please refer to Figure 4 which shows the receiver and servo connections for typical wing types The Guardian requires unmixed control inputs from your receiver even if you have a V Tail or Elevon model If you have a V Tail o...

Page 6: ... Guardian 2D 3D Stabilizer uses accelerometers and gyroscopes to measure the orientation of your model relative to the local direction of Earth s gravity In addition it interprets Pitch and Roll attitudes commanded by your Elevator and Aileron stick movements respectively With this information it is able to determine the error between your requested flight attitude and your plane s true orientatio...

Page 7: ... more information on this Setting Master Gain control to the minimum will lower the overall gain to zero while positions in between will yield proportional gain Lowering the individual gain dials on the Guardian will lower the gain for that axis only and allow fine tuning This might be desirable if for instance oscillation is encountered on one axis but not the others One possible strategy for set...

Page 8: ...e information After this startup blink sequence the LED will display Steady State status as described below LED Indication during Steady State Solid On 3D Mode One repeated blink 2D Mode Solid Off Stabilization Disabled Additional LED Messages 2 repeated blinks Radio Stick Menu is active 3 repeated blinks USB is connected 4 repeated blinks Error condition Error type is indicated by a pause and a n...

Page 9: ...when the servos of your model stop their normal stabilization deflections and instead perform a short twitch followed by no further movement Also the status LED will blink in a two blink sequence when the menu is active Menu Navigation Once in the menu you will start at menu item 1 in the List of Features and Options section below The menu items can be navigated by deflecting the Aileron and Eleva...

Page 10: ...heir airplane can disable this feature for a rate gyro experience 3D Mode Only Enabling Direct Rate 3D Stabilization is strongly recommended if this mode is set to Off Radio Stick Menu Options 1 Off 2 On 8 Derivative Gain Tunes the dampening derivative gain of the airplane Increasing this value will strengthen the rate gyro behavior of the Guardian while leaving the 2D leveling and 3D Heading Hold...

Page 11: ...ounting offsets This step will fail if either the Pitch or Roll is greater than 25 degrees 10 Save Configuration Records your current settings as set on Guardian to a txt file to load later Useful for saving profiles for individual airplanes 11 Load Configuration Recovers the settings from a previously saved configuration file and writes them to the connected Guardian 12 Factory Reset Restores the...

Page 12: ...ng around inappropriately you may need to move the Guardian away from sources of R as a powerful BEC or motor Or you may need to mount the Guardian differently to reduce excess Eagle Tree Systems LLC Page 12 Controls the 2D Heading Hold gain When set above zero this option determines how hard the Guardian will assert a roll to k 2D Heading Hold Gain Controls the Automatic Turn Coordination gain In...

Page 13: ...rkmanship for a period of one 1 year from the date of original purchase This warranty is nontransferable If your unit requires warranty service during this period we will replace or repair it at our option Shipping cost to us is your responsibility To obtain warranty service email support eagletreesystems com for further instructions This limited warranty does not cover The Software See the Softwa...

Reviews: