


WARRANTY
1
For warranty, please
DO
NOT
return your product or parts to the manufacturer without contacting
EAGLE PEAK
Customer Service, the
purchaser must obtain prior authorization from
EAGLE PEAK
Customer Service. Our Customer Service will determine whether a return is
required and may request pictures of the unit in place of a return.
Please read and save the owner’s manual instructions before attempting to use your greenhouse.
1 Year Limited Warranty
Please email
EAGLE PEAK
Customer Service before returning the product to our shop.
Global Shade Corporation
warrants for a
period of 1 year from the original date of purchase, this product against any defect in materials or workmanship. At its discretion,
Global Shade Corporation
may provide replacement parts for defective parts to original purchaser after its own review and
examination. Original receipt or proof of purchase as well as proof of defect is required.
Global Shade Corporation
will not be
responsible for shipping costs incurred outside the continental USA. Warranty is valid for the original purchaser for 1 year from
the date of purchase and is not transferable.
This Warranty Does Not Cover
• This 1 Year Limited Warranty does not cover normal wear and tear, accidental or deliberate damages of the product, abuse or
misuse, or use of this product that does not comply with the product instructions including damages from inclement weather
conditions, such as wind, rain, hail, snow or other forces of nature. In case of inclement weather, take down and store the
greenhouse
,
remove and store valuables, and seek appropriate shelter.
• Certain regions are extreme on greenhouse tops of any type. If you live in altitudes above 3000 feet the warranty period for
your greenhouse top will be limited to 6 months from the date of original purchase.
• This warranty does not cover any product purchased through non authorized dealers and/or online auction websites.
• This warranty shall be void as to any product which has been altered or modified in any manner.
Global Shade Corporation does not warrant against and under no circumstances shall Global Shade
Corporation be liable or responsible for any personal loss, injury, or direct or indirect incidental or
consequential damages resulted from the use of this product.
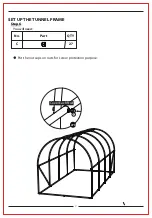
This product is designed and intended for garden usage. Prolonged exposure to UV rays will cause any fabric to fade and
deteriorate and is NOT covered by this 1 Year Limited Warranty. All replacement products or parts will assume the remaining
warranty of the original product. This warranty gives you specific legal rights. You may also have other rights, which vary from
state to state.
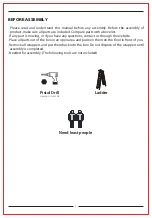
It is your responsibility to read and save these instructions before attempting to set up your greenhouse.
We would also like to suggest that you follow these safety precautions, care and maintenance tips when
using your greenhouse.
1.
Never set up or continue to use in any snow, hail, rain, wind or storm conditions, especially lightning storms. Damage can
occur to your greenhouse and put you and others in potential danger.
2.
We suggest that you take your time in order to avoid bending the frame or pinching your fingers or hands while opening and
closing the frame.
3.
Avoid setting up your greenhouse on steep inclines.
4.
Keep your greenhouse away from heat and flames at all times. Do not barbecue or build fires under your greenhouse.
5.
Hand wash the top using only mild soap and water. Never use harsh detergents, abrasives or bleach. Do not machine wash
fabric components.
6.
Never fold or store your greenhouse when it is wet or damp. Let it dry completely to avoid mildew.
7.
The frame MUST be staked or properly weighted down at all times.
Summary of Contents for GHT91-GRN-AZ
Page 1: ...EAGLEPEAKTunnelGreenhouse13Ftx6 6Ftx6 6Ft INSTRUCTION MANUAL Thank you for choosing Eagle Peak...
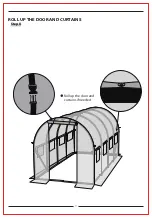
Page 12: ...11 Step 8 ROLL UP THE DOOR AND CURTAINS Roll up the door and curtains if needed...
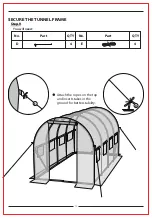
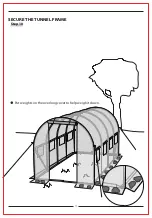
Page 14: ...13 Step 10 SECURE THE TUNNEL FRAME Put weights on the overlong cover to help weigh it down...
Page 15: ......
Page 16: ......


