background image


47

EN

12.1.2 Filling with a Syringe

IMPORTANT: 

When delivered, the instrument is equipped with the pump 

lever without lock function. Replace this pump lever by the pump lever with 
lock function (supplied with the instrument) as described in appendix 15
.

1. Mount the syringe adapter (see section 6.2).
2. Lock the pump lever.

Push the pump lever down and forward simultaneously to minimize the
dead volume in the syringe plunger.

3. Place the filling tube in a suitable waste vessel.
4. Fill the syringe with the sample.
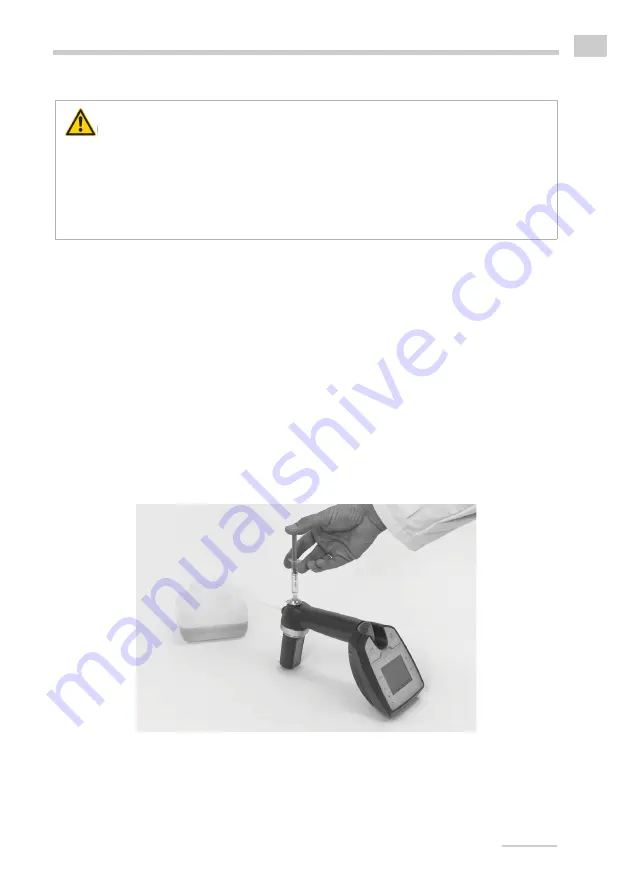
5. Attach the syringe to the syringe adapter and fill the measuring cell (see

fig. 12-2).

Fig. 12-2: Filling sample using a syringe

WARNING

If you remove the pump when filling with a syringe, or remove the syringe 
after filling, the system becomes leaky. Harmful liquids leaking from the 
instrument may cause injuries.
• Do not remove the pump.
• Do not remove the syringe during measurement.

Summary of Contents for SG-Ultra Max

Page 1: ...Instruction Manual SG Ultra Max Portable Density Meter...

Page 2: ...are subject to change without notice All rights reserved including translation No part of this document may be translated reproduced or distributed in any form print photocopy microfilm or any other p...

Page 3: ...Key Functions 22 7 3 Quick Access Area 23 7 4 Menu Navigation 23 7 5 Entering Text or Numbers 24 7 6 Selecting from a List 24 8 Instrument Settings 25 8 1 Setting the Language 25 8 2 Setting Date and...

Page 4: ...47 12 2 Measuring 48 13 Measurement Check Data in the Data Memory 49 13 1 Viewing Data 49 13 2 Printing Data 49 13 3 Exporting Data to a PC 50 13 4 Deleting Data 51 14 Cleaning and Storing 52 14 1 Cle...

Page 5: ...ions 63 A 2 Instrument Data and Operating Conditions 64 A 3 Wetted Parts 64 Appendix B Density g cm3 of Water 0 40 C 32 104 F 65 Appendix C Parameter Overview 66 Appendix D Example Files 71 Appendix E...

Page 6: ...6 EN...

Page 7: ...instruction manual from Eagle Eye these must be treated as part of the instruction manual Conventions for safety messages The following conventions for safety messages are used throughout this instru...

Page 8: ...lity of regulatory limitations We warrant the proper functioning of the instrument only if no modifications are made to mechanics electronics module firmware or instrument software Use the instrument...

Page 9: ...32 F when the measuring cell contains water Freezing water will cause rupture of the measuring cell The instrument is not insulated against high voltages Measuring samples under high voltage e g in e...

Page 10: ...d vapors Provide fire extinguishing equipment Battery Handling Never open the battery compartment in hazardous areas Exchange the batteries only outside of hazardous areas 2 3 Maintenance Service Repa...

Page 11: ...klight of the oscillator at the same time enables you to observe the filling process in detail Samples are filled into the measuring cell using the built in pipette style pump or a syringe You can all...

Page 12: ...sely Concentration measurement In binary mixtures the density of the mixture is a function of its composition Thus with the aid of density concentration tables the density value of a binary mixture ca...

Page 13: ...stions from the transportation or the insurance company 2 To check the delivery for completeness compare the supplied parts to those listed in table 4 1 3 If a part is missing contact your local Eagle...

Page 14: ...bber housing SG Ultra Max measuring cell 1 Instruction manual 1 Filling tube 180 mm 1 Adapter Luer UNF 10 Syringes 2 mL Luer 1 Allen key 3 mm DIN 911 Table 4 1 Supplied parts cont Symbol Pcs Article d...

Page 15: ...p SG Ultra Max Bluetooth USB adapter ABS disc tag 30 mm 5 mm hole R W White PVC sticker disc tag 30 mm R W Black laundry tag 30 mm R W Printer CMP 20BT Bluetooth RS232C Carrying case ISO 17025 calibra...

Page 16: ...ig 5 1 Front view of the instrument 1 Arrow keys 2 Function keys 3 Delete key 4 Filling pump 5 Screw plug 6 Filling tube 7 LCD display 8 Power ON OFF key 9 Arrow keys 10 Data storage key 11 Measuring...

Page 17: ...easurement When the measurement is finished the result is stored automatically in the internal memory Delete key to delete the data of the last measurement Arrow keys to navigate in the quick access a...

Page 18: ...18 EN 5 3 Rear View Fig 5 2 Rear view of the instrument 1 RFID interface and type plate with serial number 2 Screw of battery compartment 1 2...

Page 19: ...e g filling samples of higher viscosity filling via syringe may be more convenient To do so mount the syringe adapter Mounting the syringe adapter 1 Remove the screw plug see fig 5 1 2 Screw in the ad...

Page 20: ...dex of the currently shown data set depending on the active mode and function On the right side of the header the battery charge status and the current time are displayed When activated the symbol for...

Page 21: ...s the status of the instrument or a measurement If applicable a progress bar will show the progress of activities Symbol Description The battery charge status symbol informs you about the battery char...

Page 22: ...try Edit Switches into editing mode allowing you to enter values or change the current selection Enter Enters a character Menu Opens the menu New Initiates entering a new value Next Continues with a p...

Page 23: ...roll bar will show on the right side of the scrollable area Use the arrow keys to scroll through the content Icon Function Status function Use it to check the measurement status The status indicator c...

Page 24: ...able to delete the last character 2 Tap Enter to enter the selected character at the current position Tap Prev if available to move the current position one character to the left The editing line will...

Page 25: ...the date or time 1 Tap Menu and select Setup Date and Time Set Date and Time 2 Select Date or Time and tap Edit 3 Enter the current date or time respectively 4 Tap Back repeatedly to return to the ma...

Page 26: ...our 4 digit PIN 6 Select Confirm new PIN and tap Edit 7 Repeat the PIN that you have entered before 8 Tap Back repeatedly to return to the main screen Every time you tap Menu while PIN protection is a...

Page 27: ...display rotation Furthermore you can set the display brightness as well as the time after which the illumination of the display and the measuring cell will be automatically dimmed Activating deactiva...

Page 28: ...rument beeps whenever a key is tapped 1 Tap Menu and select Setup Sound 2 Tap Edit 3 Select the preferred option on off 4 Tap Back repeatedly to return to the main screen 8 6 Units In this menu you ca...

Page 29: ...e Bluetooth device If you establish a new Bluetooth connection as described above the latest connection will be deleted Setting up the connection to a PC 1 Switch on the PC and check whether it offers...

Page 30: ...Yes to reset to factory settings Tap No to cancel the reset operation 3 Tap Back repeatedly to return to the main screen Setting Factory setting Language English Methods Defined standard methods Acti...

Page 31: ...longer time in case the sample temperature differs greatly from the ambient temperature Measurement mode Fast The result is stored as soon as the measured temperature value stays within 0 4 K for 10 s...

Page 32: ...ment results of parameter 1 lie outside of the margins of your internal quality specification Define limits in the method settings Measurement results outside the thereby defined margins will be highl...

Page 33: ...ut fields on the main screen depends on your choice of parameters to be displayed which you have made with the method settings see section 11 1 1 Fig 9 2 Possible arrangements of output fields P1 P2 f...

Page 34: ...tivate Check function 4 Select Water Check and tap OK 5 Follow the instructions on the screen 6 After the procedure has finished the check results are displayed If the deviations from the target value...

Page 35: ...ore accurate results in this range Performing a custom adjustment 1 Clean the measuring cell as described in section 14 2 Rinse the measuring cell until no more cleaning agent residues are present 3 T...

Page 36: ...t to undo all your adjustments reset the instrument to factory adjustment Resetting the instrument to factory adjustment 1 Tap Menu and select Adjustments Factory Adjustment 2 Tap Yes to reset to fact...

Page 37: ...upper and lower limit for the measurement results The limits are only applied to parameter 1 Temperature coefficient Alpha If applicable for the selected parameter See section 11 1 3 for details on t...

Page 38: ...to return to the main screen Editing methods 1 Tap Menu and select Methods Edit Method 2 Select a method that you want to edit and tap Edit 3 Select a method setting that you want to edit and tap Edit...

Page 39: ...om the list 4 Tap Back to return to the main screen The assigned method is shown in the header 11 1 3 Calculating the Temperature Coefficient Alpha The temperature coefficient Alpha g cm3 K is needed...

Page 40: ...e Importing custom parameters 1 Save the file on a PC e g on the desktop 2 On the PC right click the file and select Send it to Bluetooth 3 On SG Ultra Max tap Menu and select Setup Data Transfer File...

Page 41: ...p New 3 Tap Edit and enter a sample ID Confirm with Done 4 Tap Back repeatedly to return to the main screen Importing sample IDs 1 Save the file on a PC e g on the desktop see appendix D for an exampl...

Page 42: ...ing distance of the RFID receiver integrated in the instrument is about 2 cm 0 8 in The RFID tag must be within this distance for the instrument to be able to successfully read it TIP The larger the d...

Page 43: ...itten to the RFID tag from the list 6 Hold the RFID tag to the RFID interface of the instrument 7 Select Write Tag and tap OK The selected sample ID and method will be written to the RFID tag 8 Repeat...

Page 44: ...instrument 1 Tap RFID 2 Hold the programmed RFID tag to the RFID interface of the instrument After reading the RFID tag information the instrument returns to the main screen The sample ID and method f...

Page 45: ...tric shock Define appropriate testing procedures and safety measures to protect yourself from any electric shock NOTICE Before performing a measurement make sure that the wetted parts are resistant to...

Page 46: ...ling tube or a syringe When filling highly viscous samples we recommend using the syringe 12 1 1 Filling with the Filling Tube 1 Press down the pump lever as far as it will go see fig 12 1 2 Submerge...

Page 47: ...nd forward simultaneously to minimize the dead volume in the syringe plunger 3 Place the filling tube in a suitable waste vessel 4 Fill the syringe with the sample 5 Attach the syringe to the syringe...

Page 48: ...illing with a syringe The instrument shows a continuous reading of the current measuring values 3 Check for bubble free filling and that the measuring cell is fully filled Possible reasons for bubbles...

Page 49: ...displayed data set is shown in the header Measurement data are shown with gray background check data with blue background 3 Tap Back to return to the main screen 13 2 Printing Data You can send the m...

Page 50: ...in screen 5 If you have selected CSV select Table Delimiter and tap Edit 6 Select one of four table delimiters semicolon slash comma TAB 7 Tap OK 8 Select Decimal Separator and tap Edit 9 Select one o...

Page 51: ...rogram and set it up as follows Baud rate 115200 Data bits 8 Parity none Stop bits 1 Handshake none 3 Send data by printing it as described in section 13 2 13 4 Deleting Data Deleting the last stored...

Page 52: ...al strongly depends on the application For some samples a displacement of the previous sample by the next one suffices For other applications a cleaning after each measurement might be necessary NOTIC...

Page 53: ...cell It has to be a good solvent for all sample components NOTICE If you want to dry the measuring cell with compressed air do not apply an overpressure of more than 1 bar WARNING The mixture of conc...

Page 54: ...m ether n nonane cyclohexane Ethanol Battery acid Tap water Ultra pure bi distilled or deionized water Liquid soap detergent shampoo Tap water Ultra pure bi distilled or deionized water Salad dressing...

Page 55: ...be rinsed alternately with organic and aqueous rinsing agents several times Samples containing protein e g beer milk should never be brought into contact with alcohol because this can cause denaturati...

Page 56: ...les e g battery acid clean the filling pump more often Dismounting the pump 1 Push the pump lever upwards with both thumbs 2 Release the pump by a turn counterclockwise see fig 14 1 3 Remove the pump...

Page 57: ...the pump shaft b Pull on the end of the pump shaft Fig 14 2 Releasing a locked pump 2 Insert the pump with the pump lever s top pointing to the left see fig 14 3 3 Turn the pump clockwise until it en...

Page 58: ...the measuring cell and the complete rubber housing Ensure that all parts are completely dry 3 Shift the rubber housing back onto the measuring cell 14 5 Storing the Instrument Before storing the instr...

Page 59: ...e instrument switches itself off Exchanging the batteries 1 With the supplied Allen key unscrew the screw fixing the battery compartment to the rear of the instrument s display and lift the battery co...

Page 60: ...3 Exchange the batteries for new ones 4 Reassemble all parts in reverse order NOTICE Observe the correct polarity when you insert the batteries see the engraving in the battery compartment Only use ba...

Page 61: ...7 1 Save the update file extension afp on a PC e g on the desktop 2 On the PC right click the update file and select Send it to Bluetooth 3 On SG Ultra Max tap Menu and select Setup Data Transfer Fir...

Page 62: ...lass parts are excluded from the warranty 15 5 Returning the Device for Repair In case your instrument needs repair contact your local Eagle Eye representative who will take care of the necessary step...

Page 63: ...a 0 1000 mPa s a Filling at higher temperatures possible Accuracyb b Viscosity 100 mPa s density 2 g cm3 Density Temperature 0 001 g cm3 0 2 C 0 4 F Repeatability s d Density Temperature 0 0005 g cm3...

Page 64: ...he sample must not freeze in the measuring cell 10 C to 50 C 14 C to 122 F Air humidity 5 90 rel humidity non condensing Protection class IP X4 Data memory 1024 measured data sets 250 sample IDs 30 me...

Page 65: ...9876 99874 99872 99870 99869 99867 99865 99863 99861 18 99859 99858 99856 99854 99852 99850 99848 99846 99844 99842 19 99840 99838 99836 99835 99833 99831 99828 99826 99824 99822 20 99820 99818 99816...

Page 66: ...t the selected reference temperature in g cm3 kg m3 or lb gal The temperature influence is compensated by the temperature coefficient Alpha g cm3 K Specific Gravity SG 3 Specific gravity is the densit...

Page 67: ...I SG A 15 C 20 C 29 5 C 60 F 20 22 25 28 Specific gravity for the product group A crude oil referred to the respective reference temperature API SG B 15 C 20 C 29 5 C 60 F 19 23 26 29 Specific gravity...

Page 68: ...Alpha g cm3 K For determining degree Baum there are two different calculation methods depending on whether the density is above or below the density of water Depending on the density of the measured...

Page 69: ...anol in w w Isopr30 100 Concentration of isopropanol in w w Isopr0 30 Concentration of isopropanol in w w H2O2 Concentration of hydrogen peroxide in w w HCl Concentration of hydrochloric acid in w w C...

Page 70: ...ity is displayed Alpha g cm3 K Temperature coefficient see section 11 1 3 Specific Gravity SG Temperature 1 Reference temperature for the density of the sample Temperature 2 Reference temperature for...

Page 71: ...a Offset 0 000000 Parameter2 1 Method Name Density Parameter1 1 Offset 0 000000 Parameter2 3 Temp1 20 Temp2 20 Alpha 0 000300 a see table C 1 for the number of the desired parameter ID 1 ID 2 ID 3 Fir...

Page 72: ...onfigure Export Target Configure Printer Target Configure Printer Configure Data Format File Transfer Export Sample IDs Export Methods Export Custom Parameters Import Sample IDs Import Methods Import...

Page 73: ...p Display Settings Sound Units Reset to Factory Settings Adjustments Water Adjustment Custom Adjustment Factory Adjustment Service System Information Live Raw Data Calibration Modea a for service purp...

Reviews: