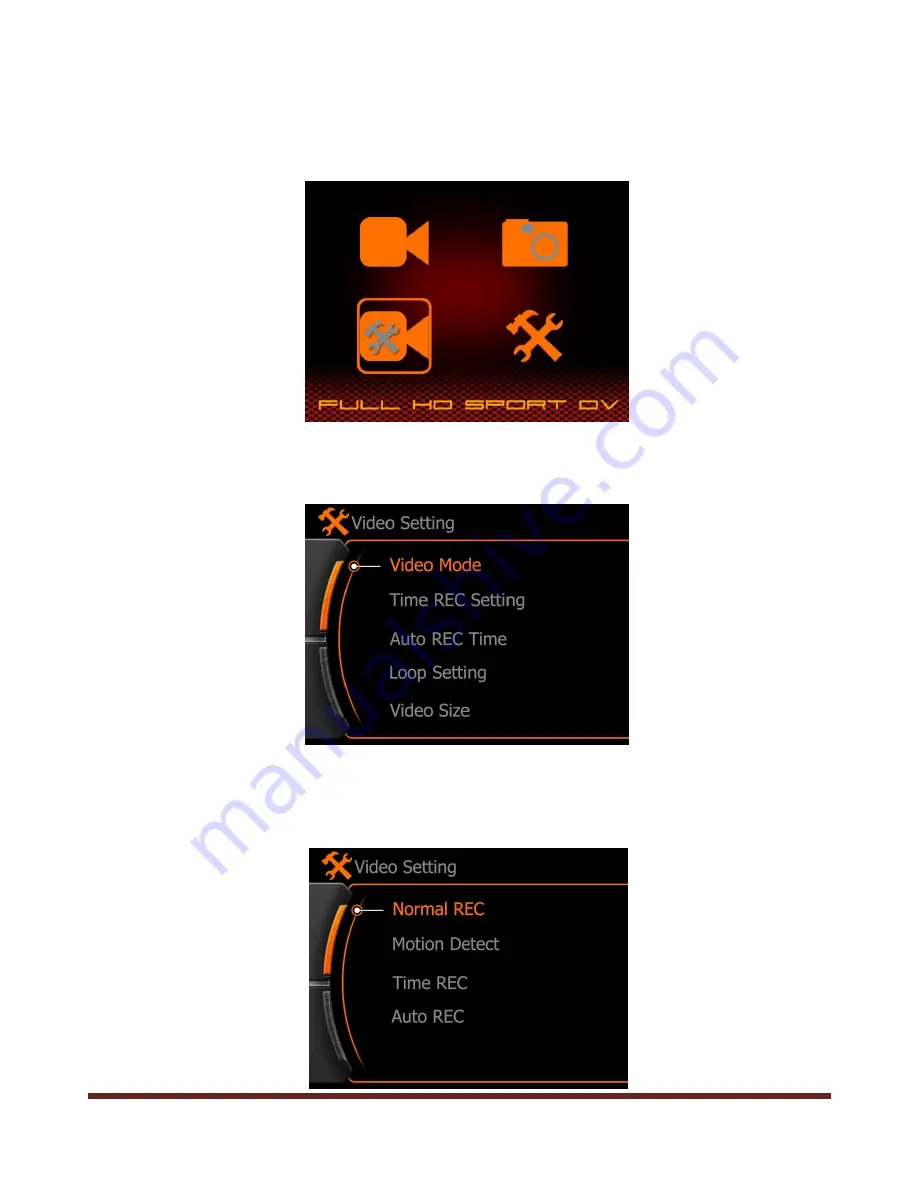
background image

~ 24 ~


Record Setting 

Record Mode 

Press 

MENU

 button enter the main menu, and select the Record setting menu as below, press 

REC

 button 

to enter.  


Video record setting menu will display as below: 


a.


Normal REC :

 Means the camera will start the video record after press the 

REC 

button normally under 

real-time preview state, press 

REC

 button again to stop video record and save the video clip. 


Summary of Contents for Cubicam

Page 1: ...1 User Manual...

Page 2: ...nd Capture 11 Video Playback 12 Browse Pictures 13 Delete files 14 Connect to Television 15 Connect with Computer 17 Battery Power Charge 18 Charge by computer 18 Charge by Wall charger 19 Charge by C...

Page 3: ...ous Shot 33 Self Timer 33 System Setting 34 Language Setting 34 Date Time Setting 35 Image Flip 37 Light Frequency 38 Auto Power OFF 39 Auto Screen OFF 40 Volume 41 Format 42 Reset 44 Firmware Update...

Page 4: ...port Timing Capture Self timer Continuous capture Zoom focus available under 720P video record and Picture capture mode Video resolution option in setting 16 9 Full HD 1920 x 1080P 30FPS 4 3 Full HD 1...

Page 5: ...tor red 2 Power Indicator red Power charge Indicator green 3 MIC 4 Tripod screw hole 5 Audio output 6 TF card slot 7 REC Confirm button 8 UP Zoom 9 Menu button 10 Down Zoom Remote Pair 11 Power ON Pic...

Page 6: ...r OFF state don t loose it then press POWER button to turn ON the camera then immediately press the button on the remote controller after the camera turned ON then loose the button Note Screen will ke...

Page 7: ...7 Install Battery Please install the battery according to the graphic Open the battery cover Install the battery Note label side face up Close back cover...

Page 8: ...ld be checked on the screen Screen won t display the SD card icon if without valid SD card installed correctly Screen will display the SD card icon if valid SD card installed correctly Attention Pleas...

Page 9: ...whead showed in graphic below pull A locker B locker will slack off at same time automatically Put the camera into the waterproof housing as graphic below Close the cover Close the locker B first and...

Page 10: ...o finish the installation according to different use Waterproof Housing buttons instruction Note Waterproof housing max depth is 20 Meters 60 Feet A pot of fog or water globule would glue to the insid...

Page 11: ...on to zoom press REC again to stop the video record and video will be saved at the same time 2 Under power on state press POWER button to take picture the camera icon on the screen flash into red colo...

Page 12: ...video folder the quantity of video clips will display on the corner Press REC button to enter the folder video clip thumbnail will showed like below Press and to choose the video clip press REC to co...

Page 13: ...cture folder picture quantity will display on the corner Press REC button to enter the picture folder picture thumbnail will show like below Press and to select picture for browsing press REC to confi...

Page 14: ...the screen Use and to make setting No cancel current operation and quit Yes confirm current operation and quite ALL confirm delete all files in the folder Press REC button to confirm operation Attenti...

Page 15: ...USB side insert to camera RCA side insert to TV Yellow for Video White for Audio 2 HDMI cable connect with TV output Please insert the A type connector to the TV insert C type connector to camera Note...

Page 16: ...ip or browse pictures a Turn the TV to AV or HDMI input channel power on the camera b Press MENU button to enter main menu press and to select video or picture folder press REC button to enter c Use a...

Page 17: ...r charge and firmware update Power on the camera after connect it with the computer by USB cable and the screen will display USB connected like graphic below means successfully connected Removable dis...

Page 18: ...Install the battery Note label side face up Charge by computer Note Power charge by computer please make sure the camera is POWER OFF state The green charging indicator will turn on indicator will tur...

Page 19: ...19 Charge by Wall charger Charge by Cigar lighter charger Attention Only original power charger that offered in standard accessories available...

Page 20: ...20 d Charge power via the charger...

Page 21: ...0 Minutes 1080P 2 Hours in Power OFF state Battery Icon instruction 75 electric quantity 35 electric quantity 10 electric quantity 10 electric quantity ATTENTION a Please uninstall the battery when ca...

Page 22: ...stuction Icon on Screen 1920x1080 Video resolution Video record 28000M Available rest memory Picture capture 15 33 24 Rest time of video record in memory Continuous capture 2010 09 21 Year Month Date...

Page 23: ...23 Main Menu Video folder Picture folder If here has video clip or picture in the folder on the corner of icon will display the quantity number like graphic below Video setting System setting...

Page 24: ...d setting menu as below press REC button to enter Video record setting menu will display as below a Normal REC Means the camera will start the video record after press the REC button normally under re...

Page 25: ...t in the picture Note The movement detect will start after 10 second only when first time setting did First time default video record time is 1 minute if here also have movement after recorded 30 seco...

Page 26: ...e number press REC button to next option After first line setting finished press move down to set next time 2011 Year 03 Month 28 Date 18 Hour 08 Minute 25 How long time of this record The whole line...

Page 27: ...onds Camera will start video record in 20 Seconds after power ON start the vehicle 1 Minute Camera will start video record in 60 Seconds after power ON start the vehicle Note Auto REC function should...

Page 28: ...ideo clip if memory is not enough Select the Loop Setting and press REC button to enter the time setting OFF Loop record is not activated 1 Minute 1 minute per video clip 5 Minutes 5 minutes per video...

Page 29: ...erent purpose lower resolution will save power and memory for longer time record Resolution Frame Rate Ratio 1920x1080 Full HD 1080P 30FPS 16 9 1440x1080 Full HD1080P 30FPS 4 3 1280x720 HD 720P 60FPS...

Page 30: ...30 Record Content A setting option for Audio and Video video clip with sound or Video video clip without sound only Press REC button to confirm setting and quit...

Page 31: ...31 Time Stamp Date and Time will display on the video clip if Enable this feature...

Page 32: ...32 Photo Size A setting option of the picture resolution when take a picture...

Page 33: ...confirm and choose the quantity of one shot Self Timer Press POWER button to active this feature camera will take pictures in every 10 seconds if no other operation during this Note If will not avail...

Page 34: ...34 System Setting Press MENU to enter the main menu System setting icon showed as below select and press REC button to enter Language Setting Select the language and press REC button to confirm...

Page 35: ...ter date setting press REC to select the option and press REC again to next option 2011 Year option Red color means changeable 10 Month option press REC to select and use or to change 15 Date option p...

Page 36: ...36 2 Time Setting 03 Hour 15 Minute Same operation as date setting...

Page 37: ...37 Image Flip Active this function when you need to install the camera at upside down position to make right video recorded The recorded image will flip 180...

Page 38: ...38 Light Frequency Please choose the correct frequency according to your country or area picture would flash if incorrect frequency set CHINA 50Hz USA 50Hz EU 60Hz...

Page 39: ...en active this function and set a time Press REC button to enter and confirm setting OFF Not actived 5 Mins Camera will power OFF after 5 minutes whatever state 10 Mins Camera will power OFF after 10...

Page 40: ...ff the screen Press REC button to enter and confirm the setting OFF Not actived 1Minute Camera will turn off the screen automatically whatever state 5Minutes Camera will turn off the screen automatica...

Page 41: ...41 Volume Volume option for Button press and speaker...

Page 42: ...42 Format Note Date can not recover after formatted please make copy before this operation...

Page 43: ...43 Memory Info To show the used memory and rest available memory of SD card...

Page 44: ...44 Reset The system will reset to the factory set if do this operation Note If the user updated the firmware would need to reset the system once to make the software work normally...

Page 45: ...the firmware package from official website or local distributers website the package as below After released Copy the firmware EGOHD1080P V1 00 bin to the root directory of SD card Do not modify the f...

Page 46: ...irmware Update Select Start and press REC button to confirm the update operation camera will reboot automatically after finished if here without correct firmware in the SD card system will notice on s...

Page 47: ...47 Version To check the version of current running software Model No Version...

Page 48: ...Built in Output interface HDMI USB RCA speaker Built in PC interface USB USB 2 0 High speed Power Battery 3 7 V 800 mAh Li ion battery DC charger DC 5V 1200mA Main unit spec Main unit dimension 58 6x3...

Page 49: ...20x1080 30FPS FULL HD 1440x1080 30FPS FULL HD1280x720 60FPS FULL HD1280x720 30FPS QVGA 848x480 60FPS Capture Optional 4000 x 3000 12MP 3200 x 2400 8MP 2592 x 1944 5MP Sound record No Play back Slide p...

Page 50: ...50 Wall Charger 1 Battery charger Standard accessory 2 Direct Charger Optional accessory...

Page 51: ...51 3 Optional Adaptor BS EU SAA USA...

Page 52: ...able Battery charger hex wrench Mount Protector Lens Protector Tripod attachment Curved Adhesive Mount Bar Mount Flat Adhesive Mounts Short right angle attachment Short straight attachment Long right...

Page 53: ...53 Chese strap Waterproof housing Grease...

Page 54: ...54 Please Recycle...

Reviews: