


28
29
Initialization and Response Test
The following checklist includes the steps to properly initialize and operate the gyro.
• After connecting the flight battery to the 2-in-1 unit, do not move or sway the helicopter. Allow it to remain
motionless until the red LED on the gyro illuminates solidly, indicating that the gyro has initialized properly and
is ready for use.
Note:
It is extremely important that you do not move or sway the helicopter after powering it on and before the
gyro initializes. The gyro must be allowed adequate time to record the neutral position in order to initialize
for proper operation. If you ever accidentally move the helicopter after powering it on and before the gyro
initializes, power the helicopter off (by disconnecting the flight battery from the 2-in-1 unit) and repeat the
correct process.
• Once the gyro initializes properly, and before making your first flight, confirm that the gyro is responding
properly to the movements of the helicopter and providing proper inputs to the tail rotor in order to
counteract any unwanted changes in yaw.
For added safety during the test, disconnect the main motor from the 2-in-1 control unit.
• Then secure the helicopter and ensure that all objects are free and clear of the tail rotor blades Reconfirming
that the main motor has been disconnected from the 2-in-1 control unit, advance the throttle/collective stick
on the transmitter to approximately 1/4–1/2 travel. Use caution, as the tail motor may begin to spin the tail
rotor blade.
• Now it is necessary to confirm that the tail motor/rotor responds properly to inputs from the gyro. While
holding the helicopter securely and ensuring that all objects are free and clear from the tail motor, quickly
twist the nose of the helicopter to the left. If the tail motor/rotor is responding properly to inputs from the
gyro, the rpm’s will increase to counteract the nose twisting to the left, in order to bring the nose back to the
right. When quickly twisting the nose of the helicopter to right, the rpm’s should decrease or stop entirely.
If the tail motor/rotor is not responding properly, use the reverse switch located on the gyro to reverse the
direction of response.
• After confirming that the tail motor/rotor responds properly to inputs from the gyro, disconnect the
battery from the 2-in-1 control unit. Then, power down the transmitter and reconnect the main motor to
the 2-in-1 unit.
Now that you’ve confirmed the gyro provides proper inputs to the tail motor/rotor, review the following
sections of the manual BEFORE proceeding with the first flight.
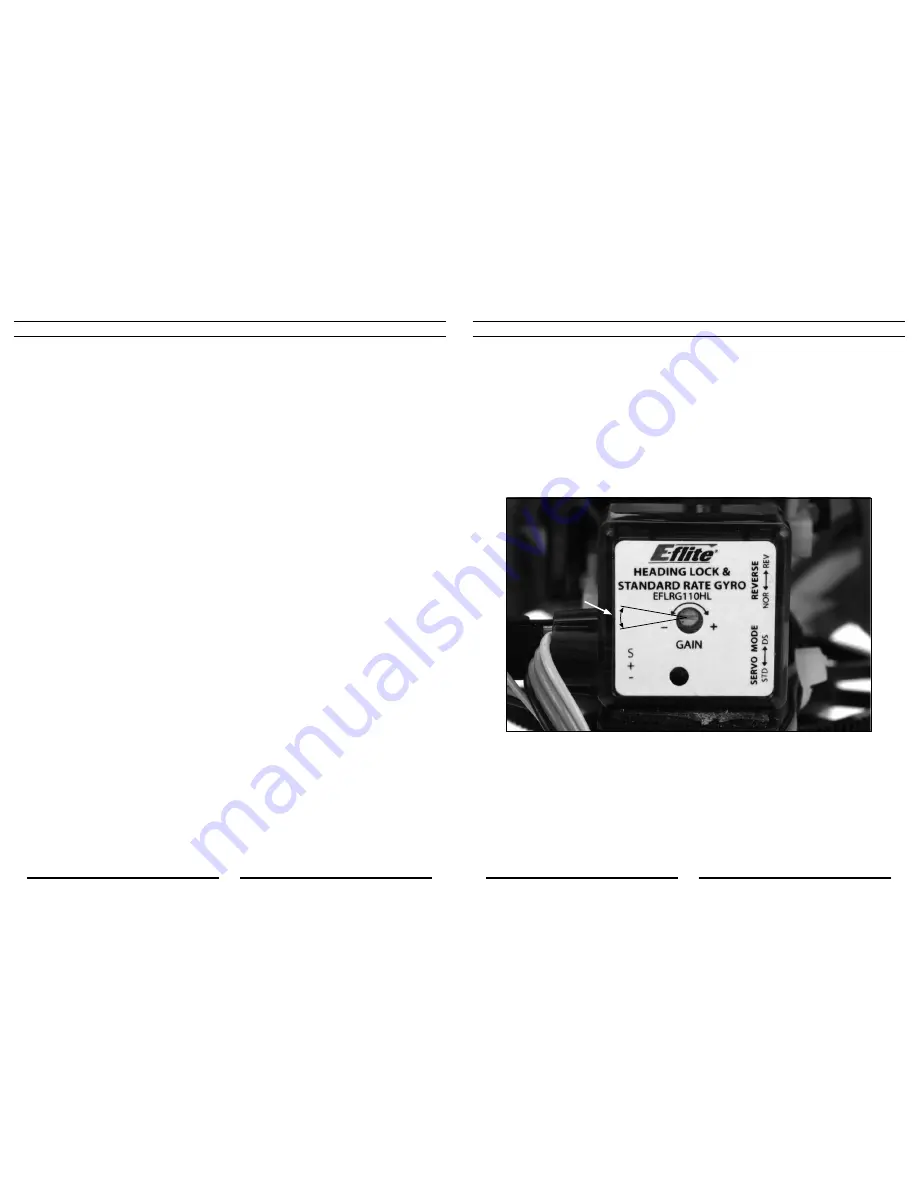
Gain Adjustments
The G110 offers optional-use remote mode selection and gain adjustment features. These features allow the gyro
mode (Standard Rate or Heading Lock) and gain values to be set remotely in the transmitter. However, for simplified
use, while maintaining maximum performance in the Blade SR, these features will not be utilized (they are usually best
utilized when using a programmable computer transmitter).
• Because you will not be utilizing the remote mode selection and gain adjustment features of the gyro, the
gyro’s yellow-colored auxiliary (AUX) lead and connector will not be plugged into the receiver. This is not a
problem as the gyro will always be in the heading lock mode and the gain value can be set using the gain
value adjustment pot located on the gyro itself.
• After making the initial test flight, you may find that it is necessary to adjust the gyro gain setting value prior
to subsequent test flights in order to achieve the best possible performance. The goal, when using a heading
lock type gyro, is to find the highest gain setting value at which the tail/nose of the helicopter does not twitch
quickly (oscillate) from side to side in all areas of flight (including fast forward flight and descents). In the case
of the G110 in the Blade SR, we find that it is typical to have the gain setting adjustment pot set as shown
below, which is only a few degrees off of full counterclockwise.
Optimum Range
• Small, air swooshing noises along with a small amount of movement side to side is normal for a direct-drive
tail system, like that found on the Blade SR. Don’t confuse this for a gain setting that is too high.
Note:
If the tail spins in one direction or the other as you are trying to lift off, please check the gyro gain. It
may be adjusted too high or too low.
Summary of Contents for Blade SR RTF Airframe
Page 38: ...74 75 ...


