background image

8

Operating manual EE23 humidity / temperature sensor

3.3  Electronic Board for Model T5

T5 = remote probe up to 180 °C (356 °F)

1. Display

2. Status LEDs

3. Interface

Fig. 3 

Electronics board model T5

1. Display:

Connectors for the optional display

2. Status LEDs:

Green LED 

flashing --> Supply voltage applied / Microprocessor is active

Red LED 

constantly lit --> Error category 1 = non-critical error, can be solved by the user  

flashing --> Error category 2 = critical error, return the device for service

Blue LED 

constantly lit --> analogue output is set to voltage. 

Orange LED 

constantly lit --> analogue output is set to current.

3. Interface:

USB-Interface for service use

Summary of Contents for EE23 series

Page 1: ...BA_EE23_B2_e v1 0 technical data are subject to change 194768 Operation Manual EE23 Humidity Temperature Sensor...

Page 2: ...equipment has been tested and found to comply with the limits for a Class A digital device pursuant to part 15 of the FCC Rules These limits are designed to provide reasonable protection against harmf...

Page 3: ...4 Intallation 10 4 1 Mounting the Enclosure 10 4 2 Mounting the Sensing Probe 11 4 3 Electrical Connection 12 4 4 Connection Versions 12 5 Calibration Adjustment 14 5 1 Definitions 14 5 2 Adjustment...

Page 4: ...ons The instructions shall be observed in order to reach optimal performance of the device 1 2 Safety Instructions 1 2 1 General Safety Instructions Avoid any unnecessary mechanical stress and inappro...

Page 5: ...mponents of the device must be separated according to local recycling regulations The electronics shall be disposed of correctly as electronics waste 2 Scope of Supply Included in all versions Accordi...

Page 6: ...the optional display 3 Status LEDs D1 red continuously on during the calibration routine one short flash confirms reset to factory calibration D2 green flashes during normal operation continuously on...

Page 7: ...es that the device in calibration adjustment mode 2 indicates measured value above the alarm threshold with alarm module only visual feedback when depressing the S1 push button Fig 1 indicates measure...

Page 8: ...e optional display 2 Status LEDs Green LED flashing Supply voltage applied Microprocessor is active Red LED constantly lit Error category 1 non critical error can be solved by the user flashing Error...

Page 9: ...cription Error code display Error category Recommended action Short circuit on voltage output 11 ERROR 01 1 Check wiring of outputs Short circuit on voltage output 21 Short circuit on both voltage out...

Page 10: ...s pointing downwards or horizontal 3 Wire the terminals inside the back cover according to Fig 10 Connection diagram on Page 12 4 Insert the middle active part into the back cover By this the connecti...

Page 11: ...mportance for accurate mea surement to avoid T gradients along the probe In case of large T difference between the two sides of the wall it is highly recommended to insert the probe completely up to t...

Page 12: ...e 13 0 51 85 3 3 34 1 3 horizontal hanging onto the probe cable stainless steel mounting flange drip water loop drip water protection Fig 9 Mounting the sensing probe 4 3 Electrical Connection Power s...

Page 13: ...2 OUT1 1 plug for 100 240 V metal enclosure front view Description Pins grounding PE 1 phase L1 2 neutral wire N 3 plug for 100 240 V polycarbonate enclosure front view Description Pins phase L1 1 neu...

Page 14: ...54 F The 1 point adjustment should be used only when the RH and or T range of interest is rather narrow The RH resp T adjustment point should be ideally in the middle of the range of interest Example...

Page 15: ...the jumper to CAL T 2 Allow for the probe to stabilize at the desired RH T for min 30 minutes 3 For adjustment point 50 RH in the upper half of the T output scale press BUTTON S1 for min 3 seconds to...

Page 16: ...eeded with an E E original one A polluted filter cap causes longer response time of the device For cleaning of the sensing head please see Cleaning Instructions at www epluse com ee23 7 Troubleshootin...

Page 17: ...T6 D03M EE23 for T5 D05M EE23T5 Display housing cover in polycarbonate for T1 T2 T4 and T6 D03P EE23 for T5 D05P EE23T5 Mounting flange for probe diameter 12 mm HA010201 Mounting flange 5mm for model...

Page 18: ...tage for 0 1 V 0 5 V outputs 10 5 35V DC or 12 28V AC for 0 10 V 0 20 mA 4 20 mA outputs 15 0 35V DC or 15 28V AC 100 240V AC 50 60Hz supply module optional Current consumption for voltage output for...

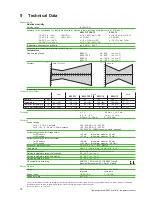
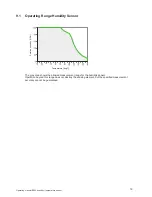
Page 19: ...ing Range Humidity Sensor Relative humidity RH Temperature degC The gray area shows the allowed measurement range for the humidity sensor Operation beyond this range does not destroy the sensing eleme...

Page 20: ...0 6460 Office Stuttgart Tel 49 151 538 37 500 E E Elektronik Italy info epluse it Tel 39 02 2707 86 36 E E Elektronik France info epluse fr Tel 33 4 74 72 35 82 E E Elektronik USA office epluse com Of...

Reviews: