


User Manual EE212
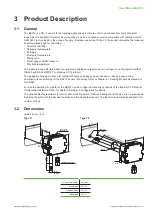
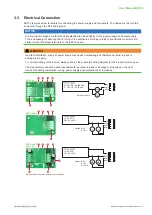
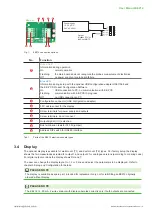
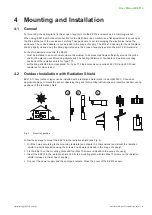
Modular Humidity and Temperature Sensor | 20
Procedure:
1.
Remove the filter cap by turning it counter-clockwise.
2.
Remove the sensing module by pulling it straight out from the probe.
3.
Plug the new EE212M sensing module into the output unit.
4.
Screw the filter cap fingertight onto the probe.
NOTICE
For EE212 sensors using EE212M sensing modules purchased before 31 March 2023, the EE212 supply
must be switched off before connecting or disconnecting the sensing module. After an EE212 sensor was
successfully equipped with a hot-swap capable EE212M module (purchased after 31 March 2023), further
replacement is allowed during operation without switching off the EE212 sensor (hot-swap).
6.2 Filter Cap Exchange
In a dusty, polluted environment it might be necessary to replace the filter cap once in a while. In most of
the cases, a clogged filter shows visible contamination or dirt. Longer response time of the measurement
also indicates a clogged filter cap. In such cases, replace the filter by a new, original one, see datasheet
Procedure:
1.
Turn the filter cap counter-clockwise for removing it.
2.
Install the new filter cap fingertight by turning it clockwise.
6.3 Display Change
Fig. 11 Display and FFC cable connection on the EE212 electronics board
When connecting the display’s FFC cable to the EE212 electronics board, please observe the correct orientation.
The blue cable stiffener needs to be on the left side as shown in Fig. 11.
NOTICE
Disconnecting or connecting the display while the EE212 is powered may cause damages to EE212 and to
the display.
Always switch off the EE212 before exchanging the display
6.4 Repairs
Repairs may be carried out by the manufacturer only. The attempt of unauthorized repair excludes any warranty
claims.