EN
DYON Culina
15
s
2.
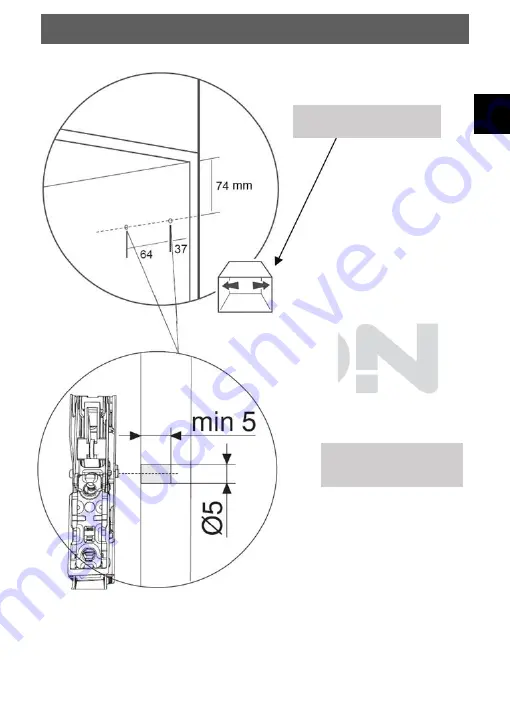
Drill the holes for the
lifting arms on both sides.
The drill-hole size needs to be 5mm in depth and diameter.
Page 1: ...ion for Satellite reception 26 5 TV Operation and First Time Setup 27 6 OSD Settings Main Operations 29 6 1 CHANNEL MENU 29 6 2 PICTURE MENU 34 6 3 SOUND MENU 36 6 4 TIME MENU 37 6 5 LOCK MENU 38 6 6...
Page 2: ...eat registers stoves or other apparatus including amplifiers that produce heat 9 Do not defeat the safety purpose of the polarized plug If the provided plug does not fit into your outlet consult an el...
Page 3: ...ice the disconnect device shall remain readily operable 15 The ventilation should not be impeded by covering the ventilation openings with items such as newspapers table cloth curtains etc 16 No naked...
Page 4: ...When servicing use only identical replacement parts Warning High voltages are used in the operation of this television receiver Do not remove the cabinet back from your set Refer servicing to qualifie...
Page 5: ...n on an unstable cart stand shelf or table Serious injury to an individual and damage to the television may result if it should fall When the television receiver is not used for an extended period of...
Page 6: ...nents or through other procedures of re using outdated equipment you are making an important contribution to protection our environment Please ask you local municipal administration for the location o...
Page 7: ...on our company itself If you have questions or problems please read the FAQs on our website or contact our customer support service support axdia de Manufacturer Axdia International GmbH Formerweg 9 D...
Page 8: ...even personal injuries Moreover it will result in the immediate loss of guarantee The manufacturer does not bear any liability for damages caused due to improper use This device is future proof and r...
Page 9: ...hours without pressing any key Please note that this is NOT a defect The device is designed like this Please use the system settings to turn off this function if necessary Please use the Main Power ke...
Page 10: ...are that this device corresponds to the basic requirements and relevant regulations outlined in guidelines 2014 53 EU 2014 30 EU 2014 35 EU and 2009 125 EG The CE declaration of conformity for this pr...
Page 11: ...ting dismantling 3 1 Wall mounting Fasten your wall bracket to the threads on the back and observe the hole spacing 100mm 100mm Warning If installing your TV includes a complicated cable solution have...
Page 12: ...6 x Screws 4mm x 35mm L Screwdriver 4 x Screws 4mm x 8mm L 5mm Bit HSS 4 x Screws 4mm x 12mm L 2 5mm Bit HSS 2 x lifting arms Pencil 2 x door dampers 2 x lifting arm attachments The drill hole size ne...
Page 13: ...EN DYON Culina 13 Attention The door dampers need to be in direction of the edge of the device 2 Fix the door dampers with the screws on both sides 3...
Page 14: ...EN DYON Culina 14 4 x 8 4 x 8 Fasten the two lifting arm attachments to the device Attention The triangle needs to be in direction of the edge of the device...
Page 15: ...EN DYON Culina 15 s 2 Drill the holes for the lifting arms on both sides The drill hole size needs to be 5mm in depth and diameter...
Page 16: ...EN DYON Culina 16 4 Lift the device onto the provided rails until it clicks 3 Fix the lifting arms with the screws on both sides...
Page 17: ...input source 2 MENU View the system menu 3 CH TV mode channels down down in the menu 4 CH TV mode channels up up in the menu 5 V Volume down Menu to the left 6 V Volume up Menu to the right 7 POWER T...
Page 18: ...EN DYON Culina 18 4 2 Connections Backside top 1 Headset Connection 2 VGA 3 Scart connection 4 PC AUDIO IN 5 Antenna connection Satellite LNB IN 6 Antenna connection DVB T2 C 7 COAXIAL...
Page 19: ...EN DYON Culina 19 Backside left 1 Common Interface CI Slot 4 USB Connection 2 Mini YpbPr 5 HDMI IN 3 Mini AV IN...
Page 20: ...set from power 2 Before inserting the module into the device insure that the smart card has been properly installed into the module Pay close attention to the direction when inserting The printing on...
Page 21: ...ime it is used When necessary the device will check the module every time the device is switched on Pay close attention to the manual of the CI module and smart card Notice to CI Please note that the...
Page 22: ...o switch the aspect ration TV RADIO It is used to switch between digital TV channels and radio stations if existing RED Colour key In menu Menu function as displayed In TV mode Teletext functions BLUE...
Page 23: ...USB mode Stop playback USB mode go to the next file USB mode go to the previous file TEXT TV mode to open teletext if teletext available in the broadcasted stream S PAGE TV Teletext mode To open a sub...
Page 24: ...otes on batteries If the remote control is not used for a long period of time please remove the battery from the compartment Do not heat batteries or dispose of them in fires Do not dismantle deform o...
Page 25: ...ow many DVB T2 channels can be received by this device is strongly depending on the operational place and the DVB T signal strength in this Area DVB T2 radio in particular is very limited and not avai...
Page 26: ...tion for Satellite reception Connect the signal cable to the LNB IN input on the rear panel After the connection switch the device on Press SOURCE select SATELLIT and press the OK button and if necess...
Page 27: ...llation Language English Country Germany Environment On Auto tuning Please use the buttons to select the desired language and country Home Mode Home Mode Adjusted illuminance for the home Exhibition M...
Page 28: ...or antenna DVB C or DVB T confirm by pressing the OK button Now starts a station search in the DTV ATV mode Press the EXIT or MENU button to stop the station search 3b For satellite for this you must...
Page 29: ...Press to select the setting 6 1 CHANNEL MENU The first menu item is the MENU CHANNEL only for TV or DTV sources CHANNEL You can search and edit channels here Auto Tuning ATV Manual Tuning DTV Manual T...
Page 30: ...0 Programme 41 Freq 458 25 MHz TV Please press MENU key to skip Tuning Setup Country UK Tune Type DTV ATV Digital Type DVB C Scan Type Full Network ID Auto Frequency Auto Symbolrate Auto NOTE All sto...
Page 31: ...You can select a DTV channel and then search the channels in this channel To select a channel please press Then press OK to search the channel NOTE Bad bad Normal normal Good good is the signal stren...
Page 32: ...following functions Delete Press the red videotext button The selected program will be deleted Move Press the yellow button then use the button to move the selected channel Press the yellow button aga...
Page 33: ...tton to return to the previous menu Press the EXIT key to exit the menu 6 CI Information Use the buttons to select the menu item CI Information To get CI information press OK to confirm Press the Menu...
Page 34: ...s etc just if in picture mode personal has been selected Press to select the setting press to change the setting Press TV MENU to step back to the previous menu Picture Mode Standard Contrast 50 Brigh...
Page 35: ...Noise Reduction HDMI Mode auto Note Tint is available in NTSC system only There are three colours temperature modes can be selected cold normal and warm Contrast Brightness Color Tint Sharpness can o...
Page 36: ...etting press to change the setting Press TV MENU to step back to the previous menu Description of the individual menu items Sound Mode Standard Trebble 50 Basse 50 COAXIAL Mode PCM AD Switch Off Sound...
Page 37: ...ss the MENU button to return to the previous menu Description of the individual menu items Clock 23 Jun 13 31 Time Zone GMT 1 Sleep Timer AUS Auto Standby 2 H OSD Timer 30s Clock Automatically by time...
Page 38: ...ge the setting Press TV MENU to step back to the previous menu LOCK Description of the individual menu items System Lock Off Set Password ndern Channel Lock Parental Guidance Off Key Lock Off Hotel Mo...
Page 39: ...ogram station press the green teletext key to lock the program If you want to release the program please go to the main menu enter the password then press the green button again Parental Guidelines Pr...
Page 40: ...e press to change the setting Press TV MENU to step back to the previous menu NOTE Resetting to the delivery state deletes all programs and passwords SETUP Language English TT Language West Audio Lang...
Page 41: ...ect Subtitle Language Hearing Impaired On Off Aspect Ratio Select aspect ratio between Automatic 4 3 and 16 9 these 2 settings are not supported on all channels Blue Screen On Off First Time Installat...
Page 42: ...buttons up down to select the desired menu item and confirm with the arrow right then use the buttons to change the setting and press the OK button To confirm To return to the menu selection point pr...
Page 43: ...etc Default Source Off or signal source such as satellite HDMI etc Default Prog Set channel at system start Default volume 20 Volume at system start Max Volume 100 Maximum adjustable volume Import da...
Page 44: ...6 04 The Big Bang Theory 4 RTL Television 16 04 16 31 The Big Bang Theory 5 SAT 1 16 31 16 59 How I meet your mother 6 Kabel eins 16 59 17 59 Taff 7 RTL2 17 59 18 09 Newstime Record Remind Prev Day Ne...
Page 45: ...Yellow button to return to the previous day Green Remind button Press the green button to select a channel right column marked and set a reminder the TV will automatically switch to the desired progr...
Page 46: ...otorcycle fluorescent light Normal Picture Mute Volume check if mute is activated or if the audio system connections are not correct No picture Mute Power cord is not inserted Power switch is not open...
Page 47: ...rn off the TV Now just unplug the module If a Module is set in some more options are available at the CI Information page of the OSD 1 Press the MENU key to open the system settings 2 Us the arrow key...
Page 48: ...e and smart card are compatible with each other The device can be operated with CI capable modules Which channels and contents are enabled depends on the CAM module and smart card used Note that not a...
Page 49: ...nnel selected does not broadcast teletext the indication 100 will be displayed and the screen will remain blank in this case exit teletext and select another channel SELECTING A Enter the number of th...
Page 50: ...on The indication appears top left HOLD To freeze the page REVEAL To display or hide the concealed information games solutions LIST The user can set four favorite pages to be directly linked to the fo...
Page 51: ...ted and selected using the SOURCE button on the TV or on the remote control Press SOURCE to enter the input source menu the following screen appears Navigation buttons and OK In the input source menu...
Page 52: ...xceeding 25 cm Press SOURCE then direction buttons to select USB mode then press the OK button to confirm Please make sure that the USB device have plugged in the slot There are four type media item c...
Page 53: ...at the bottom of the remote control to display the photo in full screen mode When the media file photo music movie is played press the OK or DISPLAY button to display the control bar Press to select...
Page 54: ...lay button at the bottom of the remote control to play the music file When the media file photo music movie is played press the OK or DISPLAY button to display the control bar Press to select the icon...
Page 55: ...guarantee that all files will be played back even if the actual file format is supported Video and audio format within the file may differ from the standard and lead to incompatibility with the device...
Page 56: ...sound track Try another sound track Only sound no image on the screen No or incorrect connection with AV cable Connect the audio cable correctly The program is a radio program Press TV RADIO key to s...
Page 57: ...of the television operating 4 hours per day for 365 days The actual energy consumption will depend on how the television is used Specifications are subject to change without further notice This symbol...
Page 58: ...control for turning off sound OSD On screen display Menu control displayed on the screen PID Identification number of a received data stream The PIDs ensure that a channel is received completely Recei...
Page 59: ...the product that is sent in cannot be repaired within a reasonable time or at reasonable cost The product can also be exchanged for a different model of the same value Requests cannot be made for rep...
Page 60: ...and clearly legible 3 You must enclose a copy of the sales slip as proof of purchase 4 Once AXDIA has received the product it will meet its warranty obligations in accordance with the warranty conditi...