background image

20

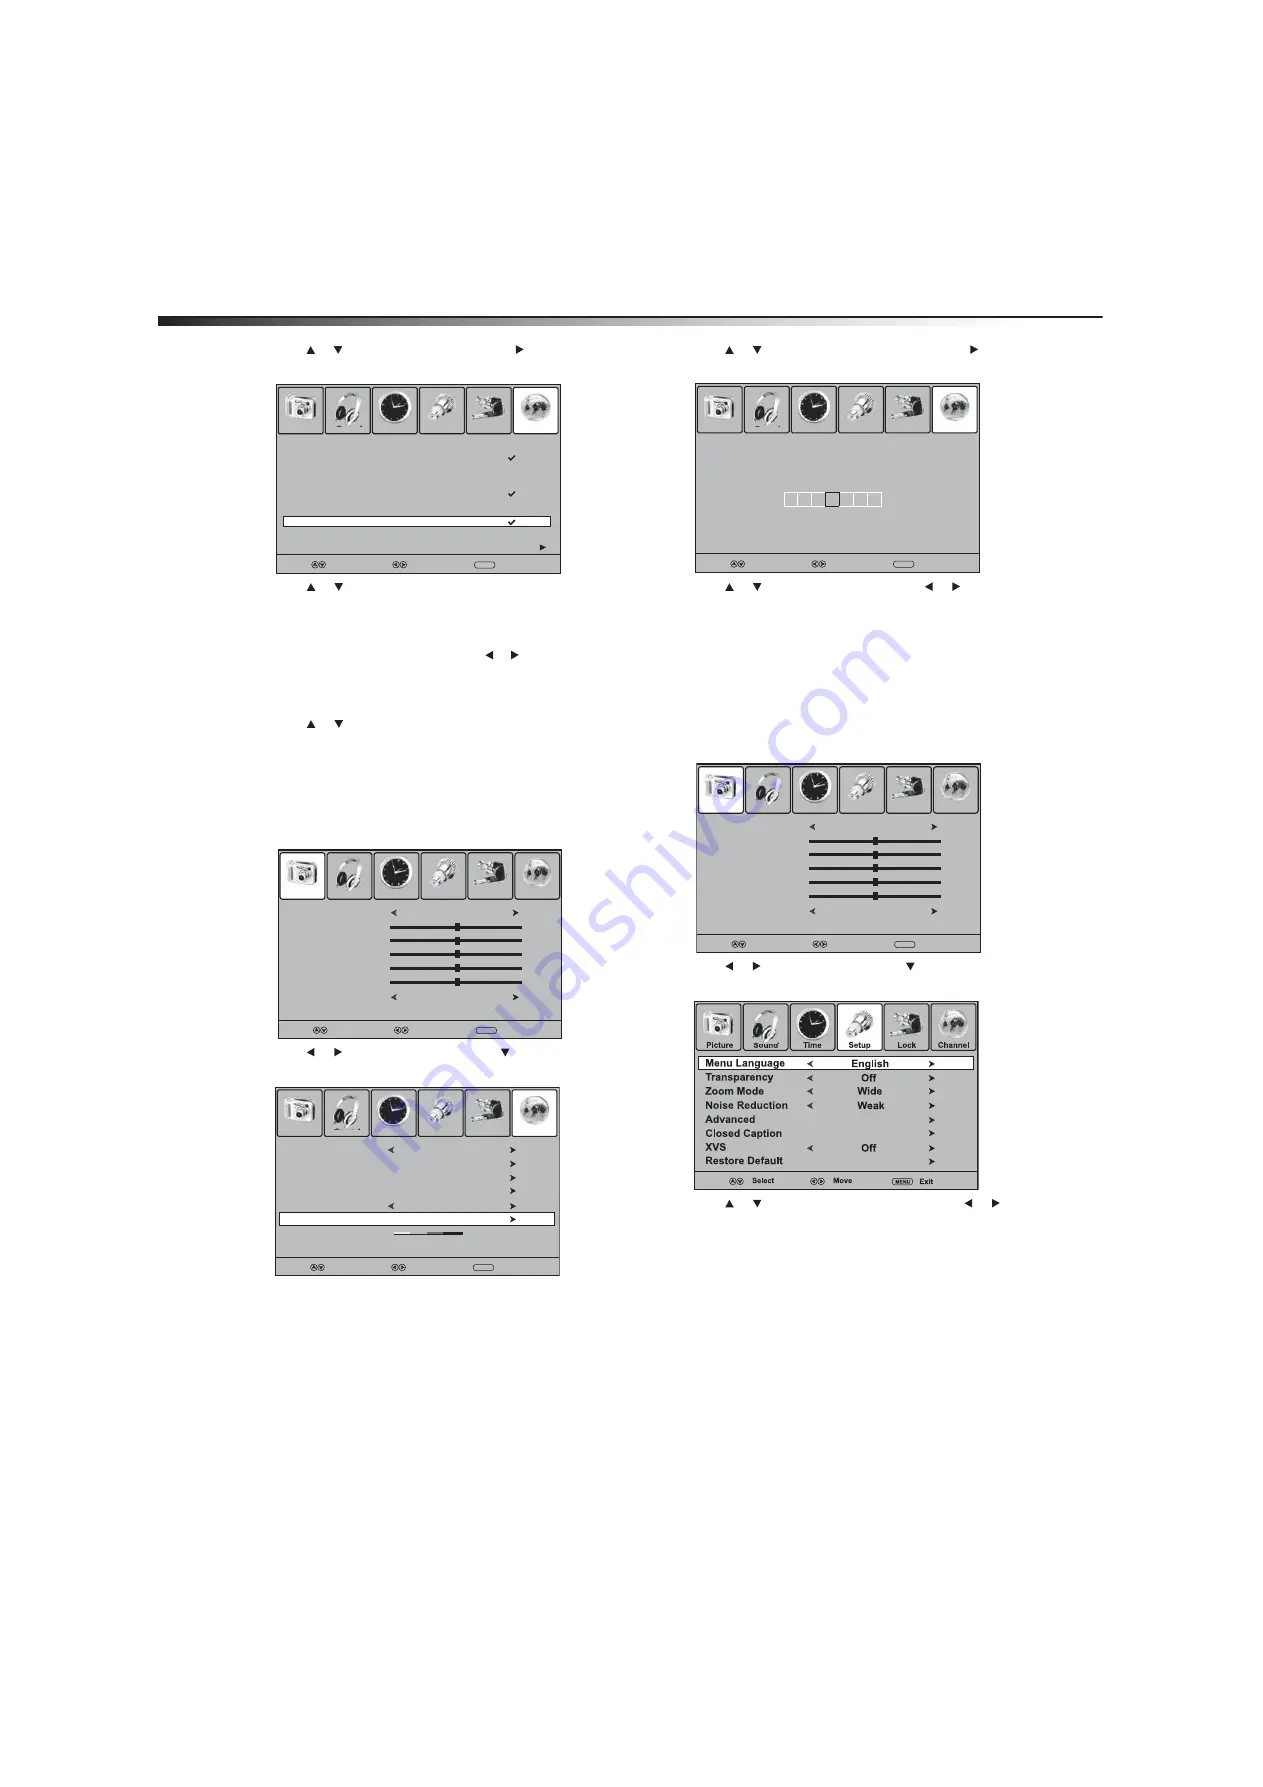
Using your TV

3

Press   or   to highlight 

Favorite

, then press   or 

ENTER

. The 

favorite channel list opens.

4

Press   or   to highlight the channel you want to add to the 
favorite list, then press 

ENTER

 to mark the channel. A check mark 

appears if the channel is added to the list. The check mark 
disappears if you delete the channel from the list.

Note:

 If the list has more than one page, press 

or   to scroll through 

the pages.

5

Press 

EXIT

 to close the menu.

6

To select a channel in the favorite channel list, press 

FAVORITE

press   or   to highlight the channel, then press 

ENTER

Labeling channels

You can add a label to a channel to make it easier to identify.

To label a channel:

1

Tune to the channel you want to label.

2

Press 

MENU

. The on-screen menu opens.

3

Press   or   to select 

Channel

, then press  . The 

Channel


menu opens.

4

Press  

or  

to 

highlight 

Channel Label

, then press   or 

ENTER

. The channel label screen opens.

5

Press   or   to enter a character, then press   or   to move to 
the next character. Repeat this step to add more characters.

6

Press 

ENTER

 to add the label.

7

Press 

EXIT

 to close the menu.

Note:

 If a channel label is provided with the TV signal, your TV displays 

the channel label you added.

Selecting the on-screen menu language

To select the on-screen menu language:

1

Press 

MENU

. The on-screen menu opens.

2

Press  

or  

to 

select 

Setup

, then press  . The 

Setup

 menu 

opens.

3

Press  

or  

to 

select 

Menu Language

, then press   or   to 

select the menu language you want.

4

Press 

EXIT

 to close the menu.

Displaying the information banner

Your TV has an information banner that displays status information, 
such as the channel number or video input source. In DTV mode, 
additional information may appear, such as the channel name and 
signal resolution.

To display the information banner:

• Press 

DISPLAY

. The information banner opens. To close the 

banner, press this button again or wait a few seconds.


Good

Select

Move

MENU

WGBH-SD

 2-1

:

Picture

Sound

Time

Setup

Lock

Channel

Select

Move

MENU

Exit

No.             Program Name                 Favorite

1-2               Sencore

2-0

2-1               WGBH-SD

2-2               PBS-HD

2-10             WGBH-Dx

6-0

7-0

12-0

14-0

Next 

11-1             MBC DTV

Picture Mode
Contrast
Brightness

Tint

Color

Color Mode

Picture

Sound

Time

Setup

Lock

Channel

Standard

50
50

0

50

Cool

Select

Move

MENU

Exit

Sharpness

50

Favorite
Show/Hide
Channel No.
Channel Label

DTV Signal

Picture

Sound

Time

Setup

Lock

Channel

Good

Select

Move

MENU

Exit

WGBH-SD

 2-1

:

Air/Cable

Air

Auto Scan

Picture

Sound

Time

Setup

Lock

Channel

Select

Move

MENU

Exit

A B C


Picture Mode
Contrast
Brightness

Tint

Color

Color Mode

Picture

Sound

Time

Setup

Lock

Channel

Standard

50
50

0

50

Cool

Select

Move

MENU

Exit

Sharpness

50

Summary of Contents for DX-LCD42HD-09

Page 1: ...USER GUIDE GUÍA DEL USUARIO 42 HD LCD TV Televisor LCD de alta definición de 42 DX LCD42HD 09 ...

Page 2: ...5 Adjusting the volume 15 Adjusting the picture 15 Reducing video noise snow 16 Optimizing the picture 16 Adjusting the sound 16 Selecting the audio mode 17 Setting the clock 17 Setting the sleep timer 17 Selecting the aspect ratio 17 Turning closed captioning on or off 18 Selecting the closed captioning mode 18 Customizing DTV closed captioning styles 19 Setting up the favorite channel list 19 La...

Page 3: ...e watching a program especially on a larger than life TV Make sure that you place or install the TV where it cannot be pushed pulled over or knocked down Make sure that you route all cords and cables so that they cannot be pulled or grabbed by curious children Wall mounting If you decide to wall mount your TV always One size of wall mount does not fit all Use only a wall mount rated for the weight...

Page 4: ...ay cause hazards Stand DonotplaceyourTV onanunstablecart stand tripod bracket or table Your TV may fall causing serious personal injury and serious damage to your TV Use only with a cart stand tripod bracket or table recommended by the manufacturer or sold with your TV If you mount your TV to the wall follow the manufacturer s instructions and use a mounting accessory recommended by the manufactur...

Page 5: ...n film transistors which provide exceptionallysharp videoquality Occasionally a fewnonactive pixels may appear on the screen as a fixed blue green or red point Thesenon activepixels donot adverselyaffectthe performanceofyour TV and are not considered defects After Image If you display a fixed image on the screen for an extended amount of time a permanent after image may be burned into the screen T...

Page 6: ...ensor Receives signals from the remote control Do not block Component Description 1 CH CH Press to go to the next or previous channel in the channel list 2 VOL VOL Press to increase or decrease the volume 3 MENU Press to open the on screen menu 4 INPUT Press to select the video input source 5 Power button Press to turn on your TV Press again to put your TV in standby mode ...

Page 7: ... more information see Connecting an S Video device on page 10 6 AV VIDEO IN Connect an AV device to this jack then connect an audio cable to the AV IN AUDIO L and AUDIO R jacks For more information see Connecting a camcorder or game on page 11 7 AV IN AUDIO L AUDIO R Connect the audio for an S Video or AV device to these jacks For more information see Connecting an S Video device on page 10 or Con...

Page 8: ...o mode For analog channels you can select STEREO SAP secondary audio program or MONO For digital channels you can select the audio track if more than one track is available For more information see Selecting the audio mode on page 17 16 CCD Press to turn closed captioning on or off For more information see Turning closed captioning on or off on page 18 or Selecting the closed captioning mode on pa...

Page 9: ...he other end of the cable to the RF jack on the back of your TV Notes Usea 75 ohm cable toeliminateinterference andnoisefromradiowaves Donotbundle the 75ohmcablewith thepower cordorothercables Iftheantennaisnotinstalledcorrectly contactqualifiedservicepersonnel tocorrecttheproblem Connecting an HDMI device To connect an HDMI device 1 Make sure that your TV s power cord is unplugged and the HDMI de...

Page 10: ...o the correct output mode See the component video device s user guide for more information Connecting an S Video device To connect an S Video device 1 Make sure that your TV s power cord is unplugged and the S Video device is turned off 2 Connect an S Video cable to the S VIDEO OUT jack on the S Video device 3 Connect the other end of the cable to the S VIDEO jack on the back of your TV 4 Connect ...

Page 11: ... jack 4 Connect an audio cable to the AV AUDIO OUTjacks on the VCR 5 Connect the other end of the cable to the AV IN AUDIO Land AUDIO R jacks on the back of your TV To play from the VCR 1 Turn on your TV then press INPUT The INPUT SOURCE menu opens 2 Press or to select AV orS Video then press ENTER Note You canalsopressVIDEOonce forAVortwicefor S Video 3 Turn on the VCR insert a videotape then pre...

Page 12: ...Press or to select VGA then press ENTER 3 Turn on the computer then adjust the display properties if necessary Connecting a digital sound system To connect a digital sound system 1 Make sure that your TV s powercord isunplugged and the digital sound system is turned off 2 Connecta digitaloptical audiocabletothe S PDIF INjack onthe digital sound system 3 ConnecttheotherendofthecabletotheS PDIFjacko...

Page 13: ...etoselectComponent1 Presstwicetoselect Component2 HDMI Press once to select HDMI1 Press twice toselect HDMI2 VIDEO Press once to select AV Press twice to select S Video TV Press to select TV Selecting the TV signal source The first time you turn on your TV you must select the TV signal source Your TV stores this information You do not need to change the TV signal source unless it changes For examp...

Page 14: ...NTER to start the scan Your TV scans for analog and digital cable channels and stores the channel information in the channel list Note Ifyouwanttostop the scan pressMENU Deleting channels You can delete a channel from the channellist so your TV skips the channel when you press CH orCH You can still tune to the channel using the number buttons To delete a channel 1 Press MENU The on screen menu ope...

Page 15: ...hen press ENTER Adjusting the volume To adjust the volume Press VOL orVOL to increase or decrease the volume Press MUTE to turn off the sound Press this button again to turn the sound back on Adjusting the picture To adjust the picture 1 Press MENU The on screen menu opens 2 Press or to select Picture then press The Picture menu opens 3 Press or toselectanoption thenpress or toadjustthe option You...

Page 16: ...UDIO one or more times to select the sound mode Bass Adjusts the low sounds Treble Adjusts the high sounds Balance Adjusts the balance between the left and right audio channels Surround Turns the surround sound effect on or off AVC Auto volume control Equalizes the overall volume levels for all channels Picture Mode Contrast Brightness Tint Color Color Mode Picture Sound Time Setup Lock Channel St...

Page 17: ...observesDaylight Saving time press or to highlight Daylight Saving Time then press or to select On The current time appears at the bottom of the option list 5 Press EXIT to close the menu Setting the sleep timer You can specify the amount of time you want your TV to wait before it automatically turns off To set the sleep timer 1 Press MENU The on screen menu opens 2 Press or to select Time then pr...

Page 18: ...sed captioning mode 1 Press MENU The on screen menu opens 2 Press or to select Setup then press The Setup menu opens 3 Press or to highlight Closed Caption then press or ENTER The closed caption menu opens Menu Language Transparency Zoom Mode Noise Reduction Advanced Closed Caption Restore Default Picture Sound Time Setup Lock Channel English Select Move MENU Exit Off Wide Weak XVS Off Picture Mod...

Page 19: ...y Selects the opacity level for the words BG Opacity Selects the opacity level for the background 7 Press MENU to return to the previous menu or press EXIT to close the menu Setting up the favorite channel list You cancreate a favorite channellist soyou can quickly browse through your favorite channels by pressing FAVORITE then selecting a channel from the favorite channel list To set up the favor...

Page 20: ...uage To select the on screen menu language 1 Press MENU The on screen menu opens 2 Press or to select Setup then press The Setup menu opens 3 Press or to select Menu Language then press or to select the menu language you want 4 Press EXIT to close the menu Displaying the information banner Your TV has an information banner that displays status information such as the channelnumber or video input s...

Page 21: ...umber buttons to enter the four digit password The default password is 0000 You should change the password to a number you can remember The Lock menu opens 4 Press or to select Change Password then press or ENTER The password entry screen opens 5 Press the number buttons to enter the new password then enter the new password again The Lock menu reopens Note Ifyou forgetyourpassword enter1397 6 Pres...

Page 22: ...ols 5 Press or to highlight TV then press or ENTER The U S TV RATING screen opens 6 Press or to select the rating you want to block then press ENTER A lock symbolappears when a rating is blocked 7 Press EXIT to close the menu Enter Password Picture Sound Time Setup Lock Channel Select Move MENU Exit US Canada RRT Setting Reset RRT Picture Sound Time Setup Lock Channel Select Move MENU Exit Change ...

Page 23: ...ntal guidance suggested 14 Parental guidance strongly suggested MA Mature audiences only FV Fantasy violence V Violence S Sexual situations L Strong language D Suggestive dialog G General audiences PG Parental guidance suggested PG 13 Suitable for children 13 and older R Parental guidance suggested for children under 17 NC 17 Not suitable for children under 17 X Adults only N A Movie is not rated ...

Page 24: ...press or toadjustthe option You can adjust H Pos Moves the image right or left V Pos Moves the image up or down Clock Adjusts the sample frequency Phase Adjusts the focus of stable images Auto Automatically adjusts the advanced options 6 Press MENU to return to the previous menu or press EXIT to close the menu Adjusting the menu transparency To adjust the menu transparency 1 Press MENU The on scre...

Page 25: ... power outlet Press power on your TV or the remote control Try another channel The problem could be with the TV station Dark poor or no picture the screen is lit but sound is good Select the correct picture mode For more information see Adjusting the picture on page 15 Adjust the brightness For more information see Adjusting the picture on page 15 Make sure that the antenna or cable TV is connecte...

Page 26: ...nformation see Setting parental controls on page 22 or Turning the parental lock on or off on page 21 The channel may have been deleted from the channel list You can tune to the channel by pressing the number buttons or you can add the channel back to the channel list For more information see Deleting channels on page 14 Password is lost On the Lock menu enter 1397 for the password then set a new ...

Page 27: ...n25inchesorlarger call 1 888 BESTBUY Call agents will diagnose and correct the issue over the phone orwill have an Dynex approved repair person dispatched to your home Where is the warranty valid This warranty is validonlytothe original purchaser of the Product in the United States and Canada What does the warranty not cover This warranty does not cover Customer instruction Installation Set up adj...

Page 28: ...28 Legal notices ...

Page 29: ...te de la imagen 43 Reducción del ruido de video nieve 44 Optimización de la imagen 44 Ajuste del sonido 44 Selección del modo de audio 45 Configuración del reloj 45 Ajuste del temporizador de apagado automático 45 Selección de la relación de aspecto 46 Activando o desactivando la función de subtítulos optativos 46 Selección del modo de subtítulos optativos 47 Personalización del estilo de los subt...

Page 30: ... muebles que se pueden usar como escalón tal como una cómoda Recuerde que los niños pueden emocionarse cuando ven un programa especialmente con un televisor con pantalla grande Asegúrese de colocar o instalar el televisor en un lugar donde no se puede empujarlo jalarlo o hacerlo caer Asegúrese de encaminar todos los cables de manera que no se puedan jalar o agarrar por niños curiosos Montaje en pa...

Page 31: ...a o conector de tierra se proporcionan para su seguridad Si el enchufe no entra solicite a un electricista que cambie el tomacorriente obsoleto Protección del cable de alimentación Los cables de alimentación deben colocarse de manera que no se pisen niselos aplaste conartículos colocados sobre ellos ocontraellos Preste atención especial a los cables en los enchufes en los receptáculos auxiliares y...

Page 32: ... un lugarcaliente o frío No instale su televisoren un lugar que esté expuesto a la luz del sol directa o cerca de un calefactor Elmueblesepuede doblaryla pantallapuedefuncionarmal Temperatura de almacenamiento 32 F a 122 F 0 C a 50 C Temperatura de operación 41 F a 104 F 5 C a 40 C Píxeles inactivos El panel de LCD contiene casi 3 millones de transistores de película fina que proporcionan una cali...

Page 33: ...suspensión 2 Sensor del control remoto Recibe las señales del control remoto No se debe obstruir Componente Descripción 1 CH CH Permite ir al siguiente canal o al anterior en la lista de canales 2 VOL VOL Permiten subir o bajar el volumen 3 MENÚ Permite acceder al menú de pantalla 4 ENTRADA Permite seleccionar la fuente de entrada de video 5 Botón de encendido Permite encender su televisor Presion...

Page 34: ...o en la página 38 6 ENTRADA DE VIDEO DE AV Conecte un equipo de AV a esta toma y conecte un cable de audio a las tomas de entrada de audio izq de AV AV IN AUDIO L y entrada de audio der de AV AUDIO R Para obtener más información refiérase a Conexión de una videocámara o una consola de videojuegos en la página 38 7 ENTRADA DE AUDIO IZQ DER DE AV Conecte el audio de un equipo con S Video o AV a esta...

Page 35: ...ONENT2 5 HDMI Presione el botón una vez para seleccionar el equipo conectado a la toma HDMI1 Presione el botón dos veces para seleccionar el equipo conectado a la toma HDMI2 6 Números Permite ingresar números de canal o la contraseña de control de los padres 7 REGRESAR Permite ir al último canal visto 8 VOL VOL Permiten subir o bajar el volumen 9 SILENCIAR Permite desactivar el sonido Presione el ...

Page 36: ...ción refiérase a Selección del modo de audio en la página 45 16 SUBTÍTULOS OPTATIVOS Presione para activar o desactivar los subtítulos optativos Para obtener más información refiérase a Activando o desactivando la función de subtítulos optativos en la página 46 o Selección del modo de subtítulos optativos en la página 47 17 LISTA DE CANALES Permite mostrar la lista de canales Para obtener más info...

Page 37: ...e su televisor está desconectado y el equipo con video de componentes está apagado 2 Conecte un cable de video de componentes a las tomas de salida de componentes COMPONENT OUT en el equipo con video de componentes 3 Conecte el otro extremo del cable de video de componentes a las tomas de COMPONENT1 oCOMPONENT2 en la parte posterior de su televisor 4 Conecte un cable de audio a la toma de salida d...

Page 38: ...obtener más información Conexión de una videocámara o una consola de videojuegos Para conectar una videocámara o una consola de videojuegos 1 Asegúrese de que el cable de alimentación del televisor está desconectado y que la videocámara o consola de videojuegos está apagada 2 Conecte un cable de AV a las tomas de salida de video de AV AV OUT VIDEO audio izquierdo AUDIO L y audio derecho AUDIO R en...

Page 39: ...ón de entrar ENTER Nota TambiénpuedepresionarVIDEOunavezparaseleccionarAVodos veces para seleccionarS Video 3 Encienda el VCR inserte una cinta de video y presione PLAY Reproducir en el VCR Conexión de un VCR para grabar Para conectar un VCR para grabar 1 Asegúrese de que el cable de alimentación del televisor está desconectado y que el VCR está apagado 2 Conecte un cable de AV a la toma de entrad...

Page 40: ...eleccionar VGA y presione elbotón de entrar ENTER 3 Encienda la computadora y ajuste las propiedades de pantalla si es necesario Conexión a un sistema de sonido digital Para conectar un sistema de sonido digital 1 Asegúrese de que el cable de alimentación de su televisor está desconectado y que el sistema de sonido digital está apagado 2 Conecte un cable óptico de audio digital a la toma de entrad...

Page 41: ...sione o para seleccionar la fuente de video y presione el botón de entrar ENTER Se puede seleccionar TV AV S Video Component1 Componentes 1 Component2 Componentes 2 HDMI1 HDMI2 VGA También puede seleccionar la fuente de entrada usando los siguientes botones del control remoto COMP Presione el botón una vez para seleccionar Component1 Presiónelo dos veces para seleccionar Component2 HDMI Presione e...

Page 42: ...l de TV Para obtenermásinformación refiérasea Seleccióndelafuentedela señal de TV en la página 41 2 Presione el botón de menú MENU Se abrirá el menú de pantalla 3 Presione o para seleccionar Channel Canales y presione Se abre el menú de canales Channel 4 Presione o para resaltar Auto Scan Escan automático y presione o el botón de entrar ENTER 5 Presione o para resaltar Cable System Sistema de cabl...

Page 43: ...s botones numéricos delcanal principal presione y presione el botón numéricodelsubcanal Porejemplo parasintonizarelsubcanal 3 del canal principal 8 presione 8 presione y presione 3 Tiene dos segundos para presionar cada botón Presione RECALL Regresar para sintonizar elúltimo canal visualizado Presione CH LIST Lista de canales para abrir la lista de canales presione o para resaltar un canal y presi...

Page 44: ...a reducción de ruido seleccione Off Desactivado 4 Presione el botón de menú MENU para regresar al menú anterior o presione el menú de salir EXIT para cerrar el menú Optimización de la imagen Para optimizar la imagen 1 Presione el botón de menú MENU Se abrirá el menú de pantalla 2 Presione o para seleccionar Setup Configuración y presione Se muestra el menú Setup Configuración 3 Presione o para res...

Page 45: ...ccione esta opción para escuchar un programa de audio secundario si está disponible Nota Monoseselecciona automáticamentesielprograma está transmitidoconsonidomonofónico Para seleccionar una pista de audio para un canal digital Presione MTS SAP Si una pista de audio está disponible se reproducirá Configuración del reloj Su televisor ajusta la hora basado en la información de la hora de un canal di...

Page 46: ...enú de pantalla 2 Presione o para seleccionar Setup Configuración y presione Se muestra el menú Setup Configuración 3 Presione o para resaltar Closed Caption Subtítulos optativos y presione o el botón de entrar ENTER Se abre el menú de subtítulos optativos 4 Presione o para resaltar CC MODE Modo de subtítulos optativos y presione o para seleccionar el modo de CC Se puedeseleccionarOn Activado acti...

Page 47: ... muestra el menú de configuración Setup 3 Presione o para resaltar Closed Caption Subtítulos optativos y presione o el botón de entrar ENTER Se abre el menú de subtítulos optativos 4 Presione o para resaltar Option Opción y presione o el botóndeentrar ENTER Seabreelmenúdeestilosdesubtítulos optativos de DTV Picture Mode Contrast Brightness Tint Color Color Mode Picture Sound Time Setup Lock Channe...

Page 48: ...NTER Se muestra la lista de canales favoritos 4 Presione o pararesaltarelcanal quedesea agregaralalista de favoritosypresioneelbotóndeentrar ENTER para marcarel canal Una marca de verificación aparecesielcanalse agrega ala lista La marca de verificacióndesaparece si elimina elcanalde la lista Nota Silalistacuentaconmásde unapágina presione o para desplazarseporlas páginas 5 Presione el botón de sa...

Page 49: ...ramación de DTV En el modo de DTV su televisor puede mostrar una guía de programación si está disponible La guía puede mostrar una lista de programas disponibles horas de programación y resúmenes de programación La información mostrada se provee por elcanal de DTV Para mostrar la guía de programación de DTV Presione elbotón de guía GUIDE Se muestra la guía de programación Si hay información adicio...

Page 50: ...ingresar la contraseña nueva Se vuelve a abrir el menú de bloqueo Lock Nota Siolvidasu contraseña ingrese 1397 6 Presione el botón de salir EXIT para cerrar el menú Activación y desactivación del bloqueo de los padres Para activar o desactivar el bloqueo de los padres 1 Presione el botón de menú MENU Se abrirá el menú de pantalla 2 Presione o para seleccionar Lock Bloqueo y presione Se abre la pan...

Page 51: ...ontroles deTV canadiense 5 Presione o para resaltar TV y presione o elbotón de entrar ENTER Se abre la pantalla de clasificación de TV de EE UU U S TVRATING 6 Presione o para seleccionar la clasificación que desea bloquear y presione el botón de entrar ENTER Cuando se bloquea una clasificación aparece un símbolo de candado 7 Presione elbotón de salir EXIT para cerrar el menú Clasificaciones de TV ...

Page 52: ...formacióndeclasificaciónes transmitida porotro programa su televisordescargará la nueva informaciónde clasificación FV Violencia de fantasía V Violencia S Situaciones sexuales L Lenguaje fuerte D Diálogo provocativo G Audiencias generales PG Se recomienda la orientación de los padres PG 13 Adecuado para niños de 13 años y mayores R Guía de los padres recomendada para niños menores de 17 años NC 17...

Page 53: ...zado y presione o elbotón de entrar ENTER Se abre el menú avanzado 5 Presione o para resaltar una opción y presione o para ajustar la opción Se puede ajustar H Pos Posición H Mueve la imagen hacia la derecha o izquierda V Pos Posición V Mueve la imagen hacia arriba o abajo Clock Reloj Ajusta la frecuencia de muestreo Phase Fase Ajusta el foco de imágenes estables Auto Ajusta automáticamente las op...

Page 54: ...o en un tomacorriente Presione encendido en su televisor o en el control remoto Intente con otro canal El problema puede ser la estación de TV Imagen oscura insatisfactoria o sin imagen la pantalla está iluminada pero el sonido está bien Seleccione el modo de imagen correcto Para obtener más información refiérase a Ajuste de la imagen en la página 43 Ajuste el brillo Para obtener más información r...

Page 55: ...n de los controles de los padres on page 51 o Activación y desactivación del bloqueo de los padres en la página 50 El canal puede haber sido borrado de la lista de canales Puede sintonizar el canal al presionar los botones numéricos o puede volver a agregar el canal a la lista de canales Para obtener más información refiérase a Eliminación de canales en la página 43 Ha perdido la contraseña En el ...

Page 56: ...56 Avisos legales ...

Page 57: ...egirá el problema porteléfono o enviará un técnico certificado por Insignia a su casa En dónde es válida la garantía Esta garantía sólo es válida al comprador original del Producto en losEstados Unidos y en Canadá Qué es lo que no cubre la garantía Esta garantía no cubre Capacitación del cliente Instalación Ajuste de configuración Daños cosméticos Daños debido a actos de la naturaleza tal como ray...

Page 58: ...58 Avisos legales ...

Page 59: ...Avisos legales 59 ...

Page 60: ... Registered in some countries All other products and brand names are trademarks of their respective owners Distribuido por Best Buy Purchasing LLC 7601 Penn Ave South Richfield MN 55423 U S A 2008 Best Buy Enterprise Services Inc Todos los derechos reservados DYNEX es una marca de Best Buy Enterprise Services Inc Registrada en ciertos países Todos los demás productos y marcas son marcas comerciale...

Reviews: