


2
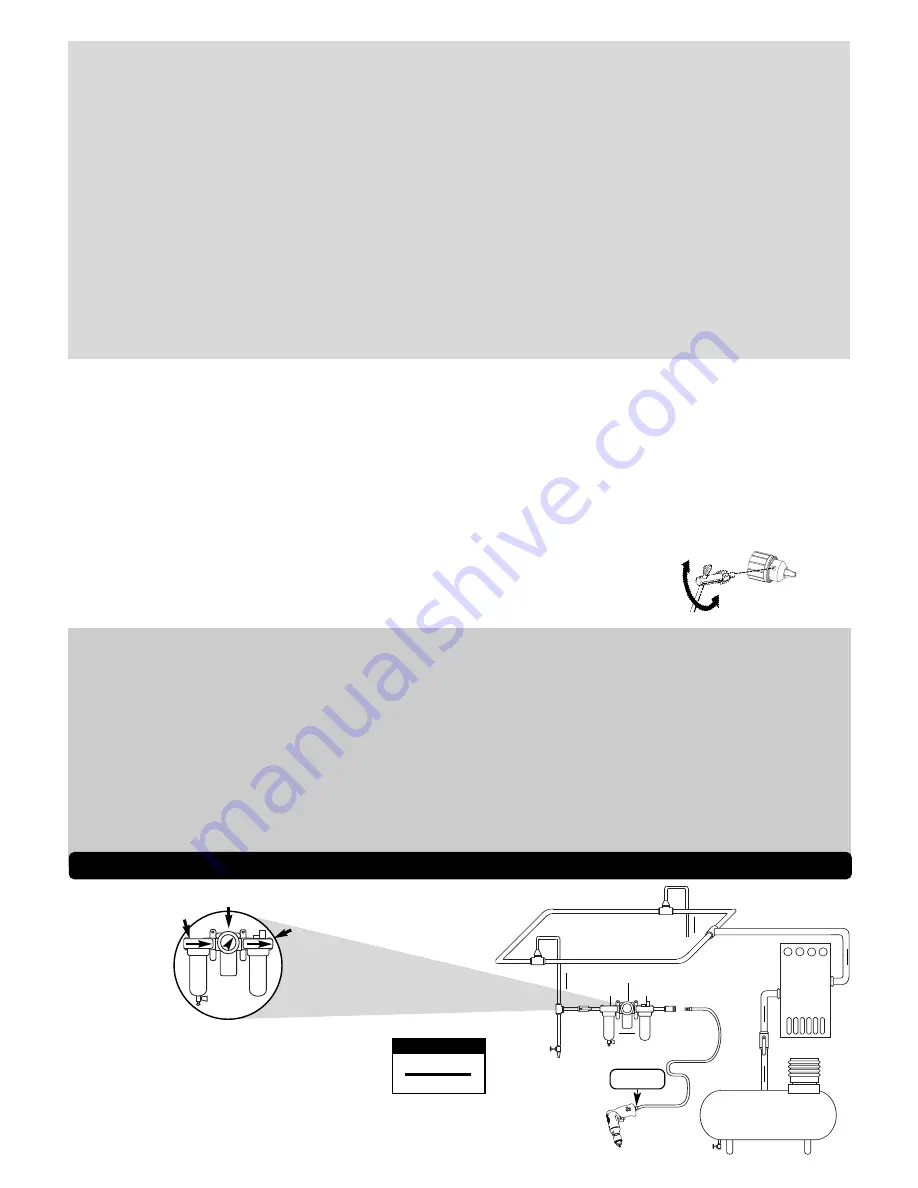
Filter
Regulator
Lubricator
90 PSIG
(6.2 Bar)
To Tool Station
Closed Loop Pipe System
(Sloped in the direction of air flow)
Ball
Valve
Ball
Valve
Filter
Regulator
Lubricator
Air Flow
Drain
Valve
Drain
Valve
Air Tool
Air Compressor
and Receiver
Drain Valve
Air Hose
90 PSIG MAX
(6.2 Bar)
Air Flow
Refrigerated
Air Dryer
1
DROP/MIN.
20
SCFM
LUBRICATOR SETTING
•
Dynabrade Air Power Tools are designed to operate at 90
PSIG (6.2 Bar/620 kPa) maximum air pressure at the tool
inlet, when the tool is running. Use recommended regulator
to control air pressure.
•
Ideally the air supply should be free from moisture. To
facilitate removing moisture from air supply, the installation
of a refrigerated air dryer after the compressor and the
use of drain valves at each tool station is recommended.
➤
➤
➤
➤
➤
➤
Caution
: If the bit binds, the drill will suddenly react in the opposite direction of the rotation of the bit. The operator should prepare for a sudden reaction by holding the tool securely.
• Use proper speed for the size of bit. larger bits should be run at the lower speed. Driving larger bits at the high speeds will increase the chance of reaction.
• Avoid drilling warped, wet, knotty, and pitchy materials if possible.
• When removing the bit from the tool avoid contact with the skin and use proper protective glove when grasping the bit or accessory. Accessories may be hot after prolonged use.
• Make sure that work area is uncluttered, and visitors are at a safe range from the tools and debris.
• A moving drill accessory that snags or catches within work piece may cause tool to stop unexpectedly or move erratically, which may cause injury.
Warning:
Air tools are not intended for use in explosive atmospheres and are not insulated for contact with electric power sources.
• Use a vise or clamping device to hold work piece firmly in place. Do not apply excessive force on tool or apply “rough” treatment to it.
Warning:
Always work with a firm footing, posture and proper lighting.
• Ensure that sparks and debris resulting from work do not create a hazard.
• This tool is rear exhaust. Exhaust may contain lubricants, vane material, bearing grease, and other materials flushed through the tool.
Warning:
Drilling certain materials can create explosive dust. It is the employer's responsibility to notify the user of acceptable dust levels.
• Some material contains chemicals which may be toxic. Take caution to prevent dust inhalation and skin contact. Follow material supplier safety data.
• Certain materials can cause sparks which can cause fires or explosions. It is the user's responsibility to make sure the work is done on spark free materials.
Report to your supervisor any condition of the tool, accessories, or operation you consider unsafe.
SAFETY INSTRUCTIONS CONTINUED
Accessory Selection:
• Abrasive/accessory RPM (speed) rating MUST be approved for AT LEAST the tool RPM rating.
• Before mounting an accessory, visually inspect for defects. Do not use defective accessories.
• Use only recommended accessories. See back page of manual and Dynabrade catalog.
• Follow tool specifications before choosing size and type of accessory.
• Only use recommended fittings and air line sizes. Air supply hoses and air hose assemblies must have a minimum working pressure rating of 150 PSIG (10 Bars, g) or 150
percent of the maximum pressure produced in the system, whichever is higher. (See tool Machine Specifications table.)
OPERATING INSTRUCTIONS
Warning:
Always wear eye protection. Operator of tool is responsible for following: accepted eye, face, respiratory, hearing and body protection.
Caution:
Hand, wrist and arm injury may result from repetitive work, motion and overexposure to vibration.
• Tool RPM must never exceed abrasive/accessory RPM rating. Check accessory manufacturer for details on maximum operating speed or special mounting instructions.
Warning:
Keep hand and clothing away from working end of the air tool.
Warning:
Unexpected tool movement or breakage of inserted tool may cause injury.
Caution:
Release throttle in case of an interruption of the energy supply.
Caution:
Use only recommended lubricants.
Warning:
Be sure that any loose clothing, hair and all jewelry is properly restrained.
• Secure inlet bushing on air tool with a wrench before attempting to install the air fitting to avoid damaging housing assembly.
• BEFORE MOUNTING AN ACCESSORY, after all tool repairs and whenever a drill is issued for use, check tool RPM (speed) with tachometer with air pressure set at 90
PSIG while the tool is running. If tool is operating at a higher speed than the RPM marked on the tool housing, or operating improperly, the tool must be serviced and
corrected before use.
DRILL ACCESSORY MOUNTING INSTRUCTIONS
Warning
: Disconnect power source before removing inserted tool.
• Loosen locking knob and remove vacuum shroud/base.
• Open chuck jaws wide enough to install bit. Be sure the bit shank and chuck jaws are clean. Dirt particles may prevent the bit from lining up properly.
• Insert the bit into the chuck. Center the bit in the chuck jaws and lift it about 1/16" off the bottom. Tighten the chuck jaws by the hand to align the bit.
• Place the chuck key in each of the three holes in the chuck, turning it clockwise. Tighten securely.
Caution
: Remove adjusting keys or wrenches before turning the tool on. A wrench or a key is left attached to a rotating part of the tool may result in personal injury.
• Reinstall vacuum shroud/base and tighten locking knob.
• Optimal vacuum is accomplished when the tip of the drill bit is flush with the end of the shroud. When the bit extends beyond shroud some vacuum capture is lost. When the
bit is too short alignment may be difficult. The shroud position may be adjusted by loosening the clamp and sliding the shroud along the base and then retightening clamp.
• Connect air tool to power source. Be careful NOT to depress throttle in the process. Do not expose air tool to inlet pressure above 90 PSIG or (6.2 Bars).
Caution
: After installing the accessory, before testing or use and/or after assembling tool, the Pistol Grip Drill must be started at a reduced speed to check for good balance.
Gradually increase tool speed. DO NOT USE if tool vibration is excessive. Correct cause, and retest to insure safe operation.
• To remove the bit, insert the chuck key into the holes in the chuck and turn counterclockwise.
Bit Selection:
• Vacuum is most effective using drill bits ranging from 4-6 inches.
• Use sharp bits. Sharp bits are less likely to bind when drilling. Use the proper bit for the job.
• Check the information on the bit's packaging for proper usage. Do not use bits larger than the rated capacity of the drill.
Air System