Dymo Rhino Pro 5000 User Manual Download Page 8

8

Printing Fixed Length Labels 

Normally, the length of the label is determined by 
the length of the text entered. However, you may 
wish to make a label for a specific purpose that is a 
fixed length regardless of the length of the text.
You can specify a fixed length for a label in 0.250” 
(6 mm) increments between 0.500” (20 mm) and 
40.000” (999.9 mm). The preset fixed length is 1.5” 
(25 mm). Any change you make to the fixed length 
setting remains in effect until you change it.

The amount of text that will print on the label 

determines the minimum length of a label, 
regardless of the fixed length you set manually. For 
example, setting a fixed length of 0.50” for a label 
with 20 characters would have no effect on the 
label length.

To set the label length

1. Press .
2. Press 


to increase the length.

3. Press   to decrease the length.
4. Press .

Printing Patch Panel Labels 

Patch panel mode allows you to label a row of ports 
on a patch panel. You select the distance between 
ports, enter the desired text, serialize, and print. 
The result is a long label with multiple, evenly 
spaced text for each port. See Figure 14.

Figure 14  

To print a patch panel label

1. Enter the text for the first position on the label.
2. Press .

3. Enter the distance between each label and 

press

. The default is 0.5” (12 mm) and the 

value can be set in increments of 0.5” (12 mm) 
up to 20” (480 mm).

4. Follow the directions in 

Serializing Your Labels


on page 9 to serialize the text that will print on 
the label.

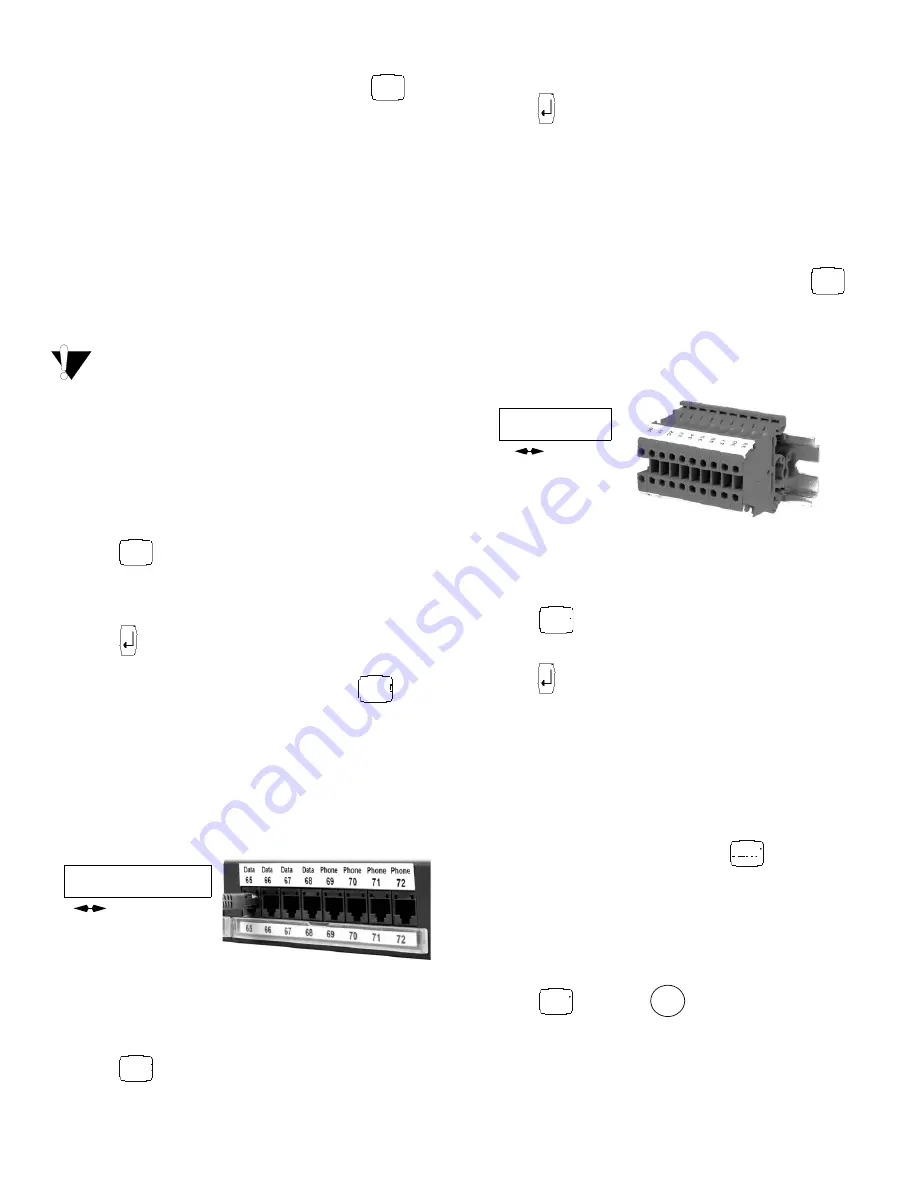
Printing Terminal Block Labels 

Terminal block labels are very similar to patch 
panel labels; however, the text is printed vertically. 
See Figure 15.

Figure 15  

To print a terminal block label

1. Enter the text for the first position on the label.
2. Press .
3. Enter the distance between each label and 

press

. The default is 0.5” (12 mm) and the 

value can be set in increments of 0.05” (1 mm) 
up to 20” (480 mm).

4. Follow the directions in 

Serializing Your Labels


on page 9 to serialize the desired number or 
letter that will print on the label.

Printing Vertical Labels 

Single-line labels can be printed with the text 
running vertically. 

To print vertically

1. Enter the text for your label.
2. Press 

 and then 

.

FIXED

FIXED

PPANEL

01 02 03 04 05 06

PPANEL

TBLOCK

01

02

03

04

TBLOCK

VERT

VERT

Print

Summary of Contents for Rhino Pro 5000

Page 1: ...Electronic Labelmaker User Guide Imprimante Electronique Guide D Utilisation Page 3 Page 13 US CAN...

Page 2: ...Shift Enter OK Space Bar Symbol Key Function Keys Alpha Keys Numeric Keys Backspace Clear All Power Button Escape Backlight Tape Exit AC Power Connector LCD Display Symbol Keys Hot Keys Thumb Latch fo...

Page 3: ...y The printer can operate on AC or battery power To save power the printer will automatically turn off after five minutes of inactivity Inserting the Batteries The printer uses six AA batteries To ins...

Page 4: ...between the print head and pinch roller See Figure 4 Figure 4 5 Press firmly until cassette clicks into place Make sure tape and ribbon are positioned correctly 6 Close the tape cassette door and pre...

Page 5: ...re is selected See Figure 6 Figure 6 Backlighting When the printer is used in a low light environment the display may become difficult to read The backlighting feature will light the display Press to...

Page 6: ...for the first line and press 2 Type the text for the next line 3 Repeat these steps for each additional line Adding Symbols The printer supports the extended symbol set as shown in Figure 8 Figure 8 T...

Page 7: ...label from memory 1 Press The memory locations are displayed 2 Use the arrow keys to move to the memory location that contains the label you want 3 Press and then press to clear the memory location Us...

Page 8: ...t is a long label with multiple evenly spaced text for each port See Figure 14 Figure 14 To print a patch panel label 1 Enter the text for the first position on the label 2 Press 3 Enter the distance...

Page 9: ...n printing between each label for more complex formats When printing is finished the number of copies to print returns to 2 Advancing the Label Tape The default leader space for all labels is approxim...

Page 10: ...ring very little maintenance Clean your printer from time to time to keep it working properly Clean the cutter blade each time you replace the tape cassette To clean the cutter blade 1 Remove the tape...

Page 11: ...chnical question please contact Customer Support Problem Error Message Solution No display Ensure the printer is turned on Replace discharged batteries Poor Print Quality Replace discharged batteries...

Page 12: ...12...

Page 13: ...structions de cette section pour imprimer votre premi re tiquette Alimentation L imprimante peut tre aliment e par c a ou par piles Pour conomiser l nergie l imprimante s teint automatiquement si elle...

Page 14: ...la bobine dans le sens des aiguilles d une montre pour tendre le ruban 4 Ins rez la cassette de sorte que la bande et le ruban soient plac s entre la t te d impression et le galet presseur Voir Figure...

Page 15: ...est utilis e pendant 5 minutes l imprimante s teint automatiquement cran LCD L cran LCD de l imprimante affiche normalement une rang e de quatorze caract res Vous pouvez toutefois entrer jusqu 99 cara...

Page 16: ...rmi un certain nombre d options de formatage pour mettre en valeur l apparence de vos tiquettes Changement de la taille de la police Vous pouvez imprimer le texte de votre tiquette en cinq tailles de...

Page 17: ...quette Vous pouvez enregistrer jusqu huit tiquettes en m moire Pour enregistrer une tiquette 1 Tapez le texte de votre tiquette 2 Appuyez sur pour afficher les emplacements de la m moire Chaque emplac...

Page 18: ...Entrez le texte de l tiquette 2 Appuyez sur 3 Appuyez sur Impression des tiquettes de longueur fixe Normalement la longueur de l tiquette est d termin e par la longueur du texte entr Vous pouvez n an...

Page 19: ...texte est imprim verticalement Voir Figure 16 Figure 16 Pour imprimer une tiquette pour bornier 1 Entrez le texte pour la premi re position sur l tiquette 2 Appuyez sur 3 Entrez la distance entre les...

Page 20: ...min e le nombre de copies imprimer revient 2 Avance du ruban d tiquettes La longueur de l amorce par d faut pour toutes les tiquettes est de 5 16 10 mm environ Pour ajouter un espace blanc suppl menta...

Page 21: ...e pour vous procurer un service durable et sans probl me tout en n cessitant une maintenance minimale Nettoyez votre imprimante de temps en temps pour qu elle continue fonctionner normalement Nettoyez...

Page 22: ...ique veuillez contacter le support technique Probl me Message d erreur Solution Pas d affichage V rifiez que l imprimante est allum e Remplacez les piles usag es Mauvaise qualit d impression Remplacez...

Page 23: ...3 80 France 01 69 32 49 32 31 20 581 93 80 Germany 069 66 56 85 29 31 20 581 93 80 Hong Kong 852 2527 1928 Hungary 1 424 6600 1 424 6601 Ireland 35 3 14118934 Italy 02 45 28 13 08 31 20 581 93 80 Mexi...

Page 24: ...50 UL 1950 Compatibilit CEM EN 61000 3 2 3 EN 61000 4 2 3 4 5 6 8 11 ENV 50204 UE Immunit EN 55024 addenda A1 A2 Compatibilit lectromagn tique CEM quipement relatif la technologie de l information et...

Reviews: