background image

H-1266

PAGE 6 OF 10

0808 IH-1266

5

4. Loading Labels

The LabelWriter Twin Turbo printer holds two label rolls, so you can print two 
types of labels without having to change the label roll. For example, load address 
labels on the left side and postage labels on the right side.

To load a label roll

1

Press the form-feed button to eject the labels that 
protected the printer during shipment.

2

Open the top cover and remove any packing 
material inside the label compartment.

3

Remove the label spool from inside the cover. 

4

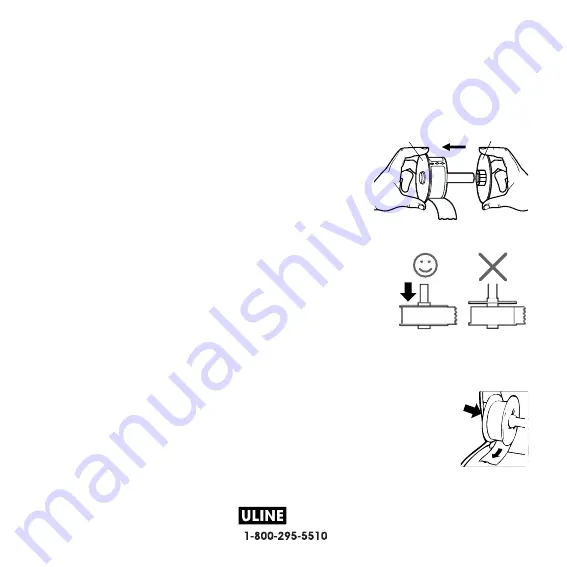
Hold the spool spindle in your left hand and place the 
label roll on the spindle so that the labels feed from 
underneath and the left edge of the label roll is flush 
against the side of the spool. See Figure 8.

5

Place the spool guide onto the right side of the spool 
and press the guide tightly against the side of the 
label roll, 

leaving no gap 

between the roll and the spool. See Figure 8.

NOTE  

The label roll must fit snugly against both sides of the label 

spool, with no gaps, to avoid drifting as the labels feed through the 
printer. See Figure 8.

6

Insert the label spool into the slot in the printer cover with the 
labels extending from underneath the roll. See Figure 9.

Figure 7

Spool

spindle

Spool

guide

Figure 8

Figure 9

Summary of Contents for LabelWriter Twin Turbo H-1266

Page 1: ...H 1266 PAGE 1 OF 10 0808 IH 1266 Quick Start Guide...

Page 2: ...the printer into your computer until asked to do so during the software installation 1 Unpack your printer and save the packing materials 2 Make sure you have all the items shown in Figure 1 Labels in...

Page 3: ...l ever need to buy The form feed button on the front of the printer advances a single label The label eject button is used to remove labels from the printer when changing rolls The LED status light vi...

Page 4: ...taskbar The Run dialog box appears b Enter D install exe where D is the letter assigned to the CD ROM drive and click OK 2 Click Install and follow the instructions in the installer To install the so...

Page 5: ...the printer See Figure 5 3 Plug the other end of the power cord into a power outlet 4 Plug the USB cable into the USB port on the bottom of the printer See Figure 5 5 Insert the power and USB cables...

Page 6: ...d the spool spindle in your left hand and place the label roll on the spindle so that the labels feed from underneath and the left edge of the label roll is flush against the side of the spool See Fig...

Page 7: ...are now ready to print address or postage labels on demand 5 Printing your First Address Label To print your first address label 1 Start DYMO Label Software by doing one of the following For Windows...

Page 8: ...refer to the DYMO Label Software User Guide located on the DYMO Label Software CD ROM and the online Help Insert text addresses pictures rectangles lines barcodes dates or counters Insert text you ve...

Page 9: ...with Endicia Go to www endicia com dymostamps 2 At the end of the sign up process download and install the DYMO Stamps software DYMO Stamps software is available for both Windows and Mac OS X NOTE Yo...

Page 10: ...DYMO Stamps labels in the right side of the printer select Right Roll as the Label Roll and click OK 7 Click Test Print to print a voided postage label You are now ready to start printing actual post...

Reviews: