background image

3

About Your New Labelmaker

With your new DYMO LabelPoint

 350 labelmaker, you 

can create a wide variety of high-quality, self-adhesive 
labels. You can choose to print your labels in many 
different sizes and styles. The labelmaker uses DYMO 
D1 label cassettes in widths of 6 mm (1/4”), 9 mm 
(3/8”), 12 mm (1/2”), or 19 mm (3/4”). Label cassettes 
are also available in a wide range of colors.

Visit 

www.dymo.com

 for information on obtaining 

labels and accessories for your labelmaker.

Warranty Registration

Please complete the warranty registration card and 
return it to the appropriate Customer Support address 
within seven days. Visit 

www.dymo.com

 for details.

Getting Started

Follow these instructions to print your first label.

Connecting the Power

The labelmaker is powered by standard batteries, an 
optional, rechargeable battery pack, or an AC power 
adapter. To save power, the labelmaker will 
automatically turn off after two minutes of inactivity.

Inserting the Batteries

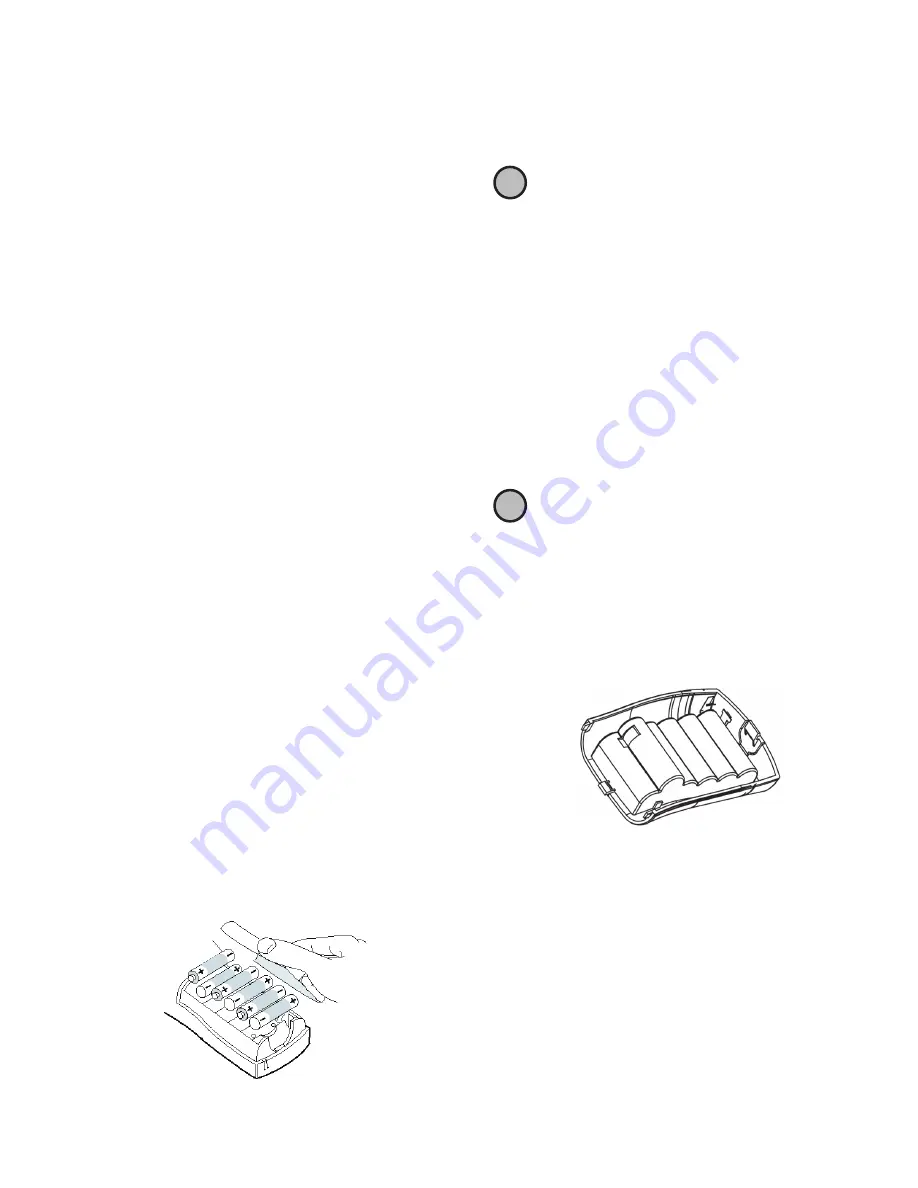
The labelmaker uses six AA alkaline batteries.

To insert the batteries

1. Remove the battery compartment cover. See Figure 1.

Figure 1  

2. Insert the batteries following the polarity markings 

(+ and –).

3. Replace the battery compartment cover.

Remove the batteries if the labelmaker will not 

be used for a long period of time.

Using the Battery Pack

An optional, rechargeable battery pack can be used to 
power the labelmaker. The battery pack can be 
purchased through your local DYMO reseller.

The labelmaker must be connected to external power 
through the AC adapter to charge the battery pack. 
When the battery pack is completely discharged, allow 
four to five hours to fully charge the battery.

When connected to external power, the battery 

charging indicator may continue to display even 
though the battery pack is fully charged.

To use the battery pack

1. Open the battery compartment door. 
2. Insert the battery pack. See Figure 2.

Figure 2  

3. To charge the battery pack, connect the AC adapter 

as described in the next section.

Connecting the Power Adapter

An optional AC power adapter can also be used to 
power the labelmaker. Connecting the AC adapter to 
the labelmaker disconnects the batteries as a power 
source.

!

!

Summary of Contents for LabelPOINT 350

Page 1: ...LabelPoint 350 www dymo com UserGuide ...

Page 2: ... Preview Insert 1 2 N Print Incremental Print Navigation OK Currency Enter Alpha Keys CAPS Backspace Clear Power Label Exit Power Connector LCD Display Numeric Keys Cutter Space Bar Shift Language Memory Settings Symbols Align Box Underline Preview Insert Cancel Tab Font Fixed Length Style USB Connector ...

Page 3: ... AA alkaline batteries To insert the batteries 1 Removethebatterycompartmentcover SeeFigure1 Figure 1 2 Insert the batteries following the polarity markings and 3 Replace the battery compartment cover Remove the batteries if the labelmaker will not be used for a long period of time Using the Battery Pack An optional rechargeable battery pack can be used to power the labelmaker The battery pack can...

Page 4: ... labelmaker remove theprotectivecardboardinsertfrombetweentheprint head and pinch roller See Figure 4 Figure 4 2 Set the cassette switch for the size of the label cassette that you are inserting See Figure 4 Anotchinthecassettefitsovertheswitchwhenthe cassette is in the correct position 3 Make sure the label and ribbon are taut across the mouth of the cassette and that the label passes betweentheg...

Page 5: ...following sections describe each feature in detail Become familiar with the location of the feature and function keys on your labelmaker See Figure 1 on the inside front cover Power The Abutton turns the power on and off After two minutes of no activity the power is switched off automatically The last label created is remembered and displayed when the power is turned back on The previously selecte...

Page 6: ...textand formatting Cancel The key allows you to exit from a menu without making a selection or to cancel an action Navigation Keys You can review and edit your label using the left and right arrows on the Navigation key You can navigate throughmenuselectionsusingtheupanddownarrow keys and then press to make a selection ConnectingtoYourComputer Your labelmaker can be used as a standalone label prin...

Page 7: ...tBreakandpress Anew section character is displayed at the end of the first section but will not print on the label 4 Continue entering and formatting text for the next section of the label Adding Font Styles You can choose from thirteen different font styles to apply to your text See Figure 9 Figure 9 When you select a style that style applies to all charactersonalabel Ifyouwanttousemorethanone st...

Page 8: ...ayedattheendofthefirst line but will not print on the label 2 Type the text for the second line The display shows the line on which you are currently entering text The example below indicates that the second line is the current line on the label Use the arrow keys to move between lines Using Tabs You can add tabs to a label to align text on multi line labels Tabs are left justified and the default...

Page 9: ...Latin character set using RACE technology Similar to using a mobile phone keypad if you type a letter multiple times within a very short time you will scroll through variations on that letter For example if French is selected as the language and you repeatedly press the letter a you will see a à â æ and so on through all the variations available The character variations and the order in which the ...

Page 10: ...c purpose that is a fixed length regardless of the length of the text Youcanspecifyafixedlengthforalabelin2 mm 0 1 increments between 40 mm 1 5 and 400 mm 15 0 The preset fixed length is 100 mm 4 0 Any change you make to the fixed length setting remains in effect until you change it To set the label length 1 Press 2 Select ON to turn on Fixed Length 3 Press the up arrow to increase the length 4 Pr...

Page 11: ... are aligned left center and right relative to each other To align the text 1 Press 2 Select the desired alignment using the arrows keys and press 3 Press to turn off the alignment setting Adjusting the Print Contrast You can adjust the print contrast to fine tune the print quality of your label To set the contrast 1 Press 2 Select Print Contrast and press 3 Select a contrast setting and press Usi...

Page 12: ...mats You can easily recall labels and formats stored in memory to use at a later time To recall labels or formats 1 Press 2 Select Recall and then Label Format or Last Printed The first memory location is displayed similar to storing a label or format 3 Select a label or format to recall and press CaringforYourLabelmaker Your labelmaker is designed to give you long and trouble free service while r...

Page 13: ... characters in buffer Delete some or all of the buffer text Too many lines Exceeded maximum number of lines allowed Select another format Insert Label Cassette Label cassette missing or empty Insert a new label cassette Battery low Batteries almost discharged Replace batteries or connect AC power adapter Label Jam Motor is stalled due to label jam Remove jammed label and replace label cassette Cle...

Page 14: ...mentation dymo com Please keep in mind that this email address is only for documentation feedback If you have a technical question please contact Customer Support This product is CE marked in accordance with the EMC directive and the low voltage directive and is designed to conform with the following international standards US FCC Class B Compatibility Safety EN 60950 IEC 950 UL 1950 EMC Compatibi...

Page 15: ...ported into Canada by Importé au Canada par Sanford Canada LP Oakville ON L6H 5R6 En México importado y distribuido por Berol S de R L de C V Vía Dr Gustavo Baz 309 311 Col La Loma C P 54060 Tlanepantla Edo de México Sanford Australia 1 11 Keysborough Avenue Keysborough VIC 3173 Australia Sanford New Zealand 1 Verisimo Drive Mangere Auckland 1730 New Zealand ...

Reviews: