background image

6

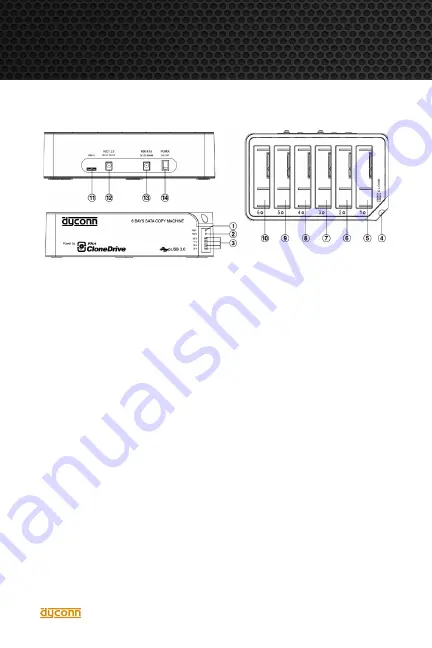
PRODUCT Diagram

Product Diagram:

1. Power Indicator 1

2. Power Indicator 2

3. Clone/Compare Processing % Indicator

4. Clone/Compare Button

5. Bay 1

6. Bay 2

7. Bay 3

8. Bay 4

9. Bay 5

10. Bay 6

11. USB 3.0 Input

12. DC-12V Input (HDD 1.2.3)

13. DC-12V Input (HDD 4.5.6)

14. Power Switch (ON/OFF)

Summary of Contents for Dubbler Dock Pro+ 6-Bay

Page 1: ......

Page 2: ......

Page 3: ...ing 7 Offline Cloning with Dubbler Dock Pro 7 How to Perform the Offline Cloning Process 8 Offline Compare Mode 9 How to Perform the Offline Compare Process 9 Online Cloning 10 Online Cloning with Dubbler Dock Pro 10 CloneDrive Software Installation 10 FlashCopy Operation 14 Using the FlashCopy Software 14 DiscErase Operation 17 Using the DiscErase Software 17 Erase Method Chart 20 Dyconn Limited ...

Page 4: ...immediate access to up to 6 HDDs at one time With the Dubbler Dock CloneDrive software performing a computer system backup or upgrade has never been easier CloneDrive effortlessly shrinks the size of a partition on the Source HDD and clones the partition to a smaller HDD SSD CloneDrive technology allows the Target drive HDD SSD to be able to boot and perform as the Source drive Product Features Tu...

Page 5: ... rain humidity and all forms of liquid and condensation that contain minerals that may corrode electronic circuitry 2 Do not use or store the device in environments of extreme heat or low temperature High temperature can shorten the life span of electronic devices 3 Do not use or store the device in dusty and wet environments that will destroy its moving parts and electronic components 4 Do not dr...

Page 6: ...Power Indicator 1 2 Power Indicator 2 3 Clone Compare Processing Indicator 4 Clone Compare Button 5 Bay 1 6 Bay 2 7 Bay 3 8 Bay 4 9 Bay 5 10 Bay 6 11 USB 3 0 Input 12 DC 12V Input HDD 1 2 3 13 DC 12V Input HDD 4 5 6 14 Power Switch ON OFF ...

Page 7: ... 6 Target HDD 3 Target HDDs capacity must be larger than or equal to the Source HDD otherwise the Cloning process cannot be initiated 4 Before the Cloning process is initiated make sure the information on the Target HDD has been backed up as once the Cloning process is initiated all information from the Source HDD will be transfered to the Target HDD 5 Once the Dubbler Dock Pro is connected via US...

Page 8: ...D indicator lights will commence to flash in sequence pursuant to the progression of the cloning process 6 Once the cloning process is finished all progress blue LED indicator lights will illuminate 7 Turn the power Off to the Dubbler Dock Pro and carefully remove each HDD 8 Please note that after the cloning operation if the Target and Source HDDs are simultaneously connected to a PC only one HDD...

Page 9: ... Clone button for 6 seconds until the indicator LED light is blinking orange Press the button once more for compare confirmation while all LED lights are still blinking orange 5 Offline compare operation is now initiated and is underway The 25 LED light will begin blinking to represent the start of the compare process The 50 75 and 100 LED indicator lights will commence to flash in sequence pursua...

Page 10: ... uncompress the download file and run the CloneDrivePlus_Setup exe to install the CloneDrivePlus You can acquire the WinRar software from the official download website at http www rarlab com download htm 3 Please follow the instructions to complete software installation 4 After the CloneDrive software is installed you will find the icon in the lower right corner of the Window OS task bar Double cl...

Page 11: ...Securely place the Source HDD into Bay 1 followed by the placement of the Target HDDs into Bay 2 6 Connect the Dubbler Dock Pro to the computer via USB cable Turn On the power to the Dubbler Dock Pro 7 The CloneDrive will show the HDD information of each bay ...

Page 12: ...12 ONLINE cloning Online Cloning with Dubbler Dock Pro 8 Choose Clone the External Disk which makes the HDD in Bay 1 the Source HDD and the HDDs in the 2 6 bays as Target HDDs ...

Page 13: ...0 Click the Start icon located on the lower right side of the software program Important Note With the CloneDrive software as long as the content in the source HDD is smaller than the target HDDs the cloning operation will be performed The software will resize the partition if the target HDDs are smaller than the source HDD The empty space will not be copied to save operation time ...

Page 14: ...d run Flash Copy_Setup exe to install the FlashCopy You can acquire WinRar from the official website at http www rarlab com download htm 3 Follow the instructions to complete the software installation process 4 Next securely insert both Source HDD and Target HDDs into the Dubbler Dock Pro Connect the Dubbler Dock Pro to PC via USB cable 5 Turn on the power to the Dubbler Dock Pro You will see the ...

Page 15: ...tart click on the Target drive s to which data will be copied Select the folder s to be copied by clicking and dragging the file s folder s from the Source HDD left to the Target HDDs right 8 After completing the folder file selection process press the Start button to initiate the transferring process ...

Page 16: ...16 FLASHCOPY OPERATION Using the FlashCopy Software 9 A status window will show detail information on the transferring process 10 After the FlashCopy operation finishes a report window will show ...

Page 17: ...DiskErase exe to install the DiscErase You can acquire WinRar from the official website at http www rarlab com download htm 3 Follow the instructions to complete the software installation process 4 Next securely insert both Source HDD and Target HDDs into the Dubbler Dock Pro Connect the Dubbler Dock Pro to PC via USB cable 5 Turn On the power to the Dubbler Dock Pro You will see the DiscErase ico...

Page 18: ...c ERASE OPERATION Using the DiscErase Software 7 The DiscErase software will start and display the mounted HDDs in the Dubbler Dock Pro 8 Check boxes 1 6 or any single box to choose which HDDs will be erased ...

Page 19: ...Sc ERASE OPERATION Using the DiscErase Software 9 Choose a desired erase method by clicking on the Erase Method button For information on the available erasing methods refer to the chart on page 20 Click Ok ...

Page 20: ...h research before choosing an appropriate erasing method One Pass Zeros 1 pass One Pass Random 1 Pass US DoD 5220 22 M 3 Pass US DoD 5220 22 M ECE 7 Pass Canadian OPS II German VSITR Russian GOST p50739 95 US Army AR380 19 US Air Force 5020 HMG IS5 Baseline HMG IS5 Enhanced Navso P 5329 26 RL Navso P 5329 26 MFM NCSC TG 025 Gutmann 35 times Schneier s 7 pass 7 times NSA 130 2 Bruce Schneier ...

Page 21: ...s click the Start button When prompted enter the auto generated verification code and click Ok The erasing process will commence 11 A status bar will show the progression of the erasing process Once the erasing process finishes the software will revert back to the original display screen ...

Page 22: ...WARRANTIES EXPRESS OR IMPLIED INCLUDING ALL WARRANTIES OF MERCHANTABILITY AND OR FITNESS FOR A PARTICULAR PURPOSE TO THE EXTENT THAT ANY IMPLIED WARRANTIES MAY NONETHELESS EXIST BY OPERATION OF LAW ANY SUCH WARRANTIES ARE LIMITED TO THE DURATION OF THIS WARRANTY SOME STATES PROVINCES DO NOT ALLOW LIMITATIONS ON HOW LONG AN IMPLIED WARRANTY LASTS SO THE ABOVE LIMITATIONS MAY NOT APPLY TO YOU LIMITA...

Page 23: ......

Page 24: ......

Reviews: