background image

Customer Service 1-888-707-1880  


Dyaco Canada Inc. 2018 

Email: [email protected] 

20

RESET SWITCH RESETTING 

  If your treadmill loses power or will not start, check the reset switch located on the front 

of the motor cover. 

  If the white tab of the reset switch is not showing, then the reset switch has not been 

tripped. 

  If the white tab of the reset switch is showing, the reset switch has tripped. 


To reset the reset switch: 

  Remove the safety clip on console. 

  Press white tab of the reset switch in until it snaps back into place. 


If the reset switch continues to trip - see tread-belt adjustment and tread-belt lubrication


Summary of Contents for 16004801500

Page 1: ...understand this owner s manual before operating unit Keep this manual for future reference Serial number Write the serial number in the space above for reference Serial number can be found at the front bottom section of the Treadmill PLEASE CAREFULLY READ THIS ENTIRE MANUAL BEFORE OPERATING YOUR NEW TREADMILL ...

Page 2: ...ding Transport Instructions 10 Operation of Your Treadmill 14 Preset Program Profiles 16 General Maintenance 17 Service Checklist Diagnosis Guide 21 Exploded View Diagram 22 Parts List 23 Training Guidelines 26 Manufacturer s Limited Warranty 32 ATTENTION THIS TREADMILL IS INTENDED FOR RESIDENTIAL USE ONLY AND IS WARRANTED FOR THE APPLICATION ANY OTHER APPLICATION VOIDS THIS WARRANTY IN ITS ENTIRE...

Page 3: ...and familiarize yourself with the parts that are labeled Read this manual carefully before using the XTERRA TR150 Treadmill Although Dyaco Canada Inc constructs its products with the finest materials and uses the highest standards of manufacturing and quality control there can sometimes be missing parts or incorrectly sized parts If you have any questions or problems with the parts included with y...

Page 4: ...nsure that all users of this treadmill are adequately informed of all warnings and precautions 3 The use of an extension cord with this product is not recommended If an extension cord is needed use a short less than 10 feet heavy gauge 14 gauge or better extension cord with a three prong grounded plug and receptacle 4 Never leave the treadmill unattended when plugged in Remove the safety key and u...

Page 5: ...9 Never allow more than one person on the treadmill at once 20 Warm up 5 to 10 minutes before each workout and cool down 5 to 10 minutes afterward This allows your heart rate to gradually increase and decrease and will help prevent straining muscles 21 Never hold your breath while exercising Breathing should remain at a normal rate in conjunction with the level of exercise being performed If dizzi...

Page 6: ...bt as to whether the product is properly grounded Do not modify the plug provided with the product if it will not fit the outlet have a proper outlet installed by a qualified electrician NEVER operate this treadmill without reading and completely understanding the results of any operational change you request from the computer Understand that changes in speed and incline do not occur immediately S...

Page 7: ...tioned flat on the ground in the orientation it would be in if you were using the treadmill Do not turn the treadmill up on its side while removing the shipping strap This could cause the treadmill s folding mechanism to spring open If the end of the Velcro strap that you need to grab to remove it happens to be under the treadmill deck reach under the deck to grab it but do not tilt the treadmill ...

Page 8: ... customerservice dyaco ca 7 Assembly Pack Check List 104 Combination M5 Allen Wrench Phillips Head Screwdriver 1pc 88 Ø8 Ø23 1 5T Curved Washer 6pcs 40 Safety Key 1pc 105 Lubricant 1pc 79 Ø8 Ø18 1 5m m Flat Washer 6pcs 87 5 16 1 2 Button Head Socket Bolt 12pcs ...

Page 9: ...mputer Cable Middle 38 with the Computer Cable Lower 39 Step3 Insert the Uprights L R 3 4 into the Frame Base 2 with the 6pcs of 5 16 1 2 Button Head Socket Bolts 87 4pcs of Ø8 Ø18 1 5T Flat Washers 79 and 2pcs of Ø8 Ø23 1 5T Curved Washers 88 by using the Combination M5 Allen Wrench Phillips Head Screwdriver 104 Please install the screw without tightening it Assembly Instructions ...

Page 10: ...ep5 Install the Console Support 5 into the Uprights L R 3 4 with the 6pcs of 5 16 1 2 Button Head Socket Bolts 87 2pcs of Ø8 Ø18 1 5T Flat Washers 79 and 4pcs of Ø8 Ø23 1 5T Curved Washers 88 by using the Combination M5 Allen Wrench Phillips Head Screwdriver 104 87 87 87 87 88 88 88 88 87 79 87 79 5 104 3 4 NOTE Please tighten all screws after the assembly is complete ...

Page 11: ...ntil reaching a fixed position then pull the knob outward to let the shaft into the L Plate at the side of the deck to secure the deck Unfolding Step Hold the deck with one hand and pull the knob outward with the other to free the shaft out of the deck and bring the deck down slowly to the floor FOLDING INSTRUCTIONS ...

Page 12: ...Customer Service 1 888 707 1880 Dyaco Canada Inc 2018 Email customerservice dyaco ca 11 Relocation Lean the treadmill backward so that the transport wheels touch the floor to move the treadmill ...

Page 13: ...Step 1 Lift the deck up so that the Adjustment Foot Pad leaves the ground Step 2 Remove the Step Up Frame Pop Pin Step 3 Select the Adjustment Foot Pad hole insert the Step Up Frame Pop Pin For the left and right Adjustment Foot Pad make sure to use the same holes Manual incline operation ...

Page 14: ...duct is properly grounded Do not modify the plug provided with the product if it will not fit the outlet have a proper outlet installed by a qualified electrician The use of an extension cord with this product is not recommended If an extension cord is needed use a short less than 10 feet heavy gauge 14 gauge or better extension cord with a three prong grounded plug and receptacle IMPORTANT If the...

Page 15: ... then enter idle mode which is the starting point for operation QUICK START OPERATION 1 Attach the Safety key to enable the display if not already on 2 Press the Start key to begin belt movement Adjust to the desired speed using the Speed and keys You may also use the Speed keys 1 through 9 to adjust the speed then press ENTER key confirm 3 To slow tread belt press and hold the Speed key to the de...

Page 16: ...t and return to the idle mode start up screen CALORIE DISPLAY Displays the cumulative calories burned at any given time during your workout Note This is only a rough guide used for comparison of different exercise sessions which cannot be used for medical purposes TO TURN TREADMILL OFF 1 Display will automatically turn off go to sleep after 10 minutes no key operations The treadmill will draw very...

Page 17: ...osition single press Stop to enter into resetting state Press Program to choose desired program P1 P2 P12 then press and release Start to begin the program with default values 2 Each program will continue 30 minutes This is the preset value After every one minute during the program the Speed will be adjusted automatically The Speed setting can also be adjusted manually at any time during the progr...

Page 18: ...O NOT OVERTIGHTEN Over tightening will cause belt damage and premature bearing failure TREADBELT TRACKING ADJUSTMENT The performance of your treadmill is dependent on the frame running on a reasonably level surface If the frame is not level the front and back roller cannot run parallel and constant belt adjustment may be necessary The treadmill is designed to keep the tread belt reasonably centere...

Page 19: ...he 6 mm allen wrench supplied loosen the two rear roller adjustment bolts located in the rear end caps enough to get your hand under the belt 5 10 turns Make sure to loosen both bolts the same amount of turns and also remember how many turns because when finished you will need to tighten the bolts back to the point they were before Once the belt is loose wipe the deck with a clean lint free cloth ...

Page 20: ...shed by using a soft cotton or terry cloth rag with a light application of car wax Do not use aerosol sprays or pump bottles as they may deposit wax upon the walking or computer surface Under no circumstances are you to use ammonia oils silicones or any other compounds on the rubberized walking surface The use of such materials may cause serious injury to the body and or deteriorate the performanc...

Page 21: ...the motor cover If the white tab of the reset switch is not showing then the reset switch has not been tripped If the white tab of the reset switch is showing the reset switch has tripped To reset the reset switch Remove the safety clip on console Press white tab of the reset switch in until it snaps back into place If the reset switch continues to trip see tread belt adjustment and tread belt lub...

Page 22: ...r connection Console Showing E0 Safety Switch Malfunction 1 If safety key switch is placed properly 2 Is safety harness to the console connected properly Any connector damaged 3 Is safety switch defective Console Showing E2 Over Current Protection Treadmill over loaded controller protection is activated 1 Check for proper walking belt alignment Make sure to lubricate belt periodically to minimize ...

Page 23: ...Customer Service 1 888 707 1880 Dyaco Canada Inc 2018 Email customerservice dyaco ca 22 EXPLODED VIEW DIAGRAM ...

Page 24: ... Cover 1 8015020 2 Console Top Cover 1 8015020 3 Square Magnet Stop Plate 2 8015020 4 400m m_Safety Switch Module W Cable 1 8015020 5 Console Display Board 1 8015020 7 Ø3 10m m_Sheet Metal Screw 2 8015020 8 Ø2 3 6m m_Sheet Metal Screw 21 8015020 9 Ø3 5 12m m_Sheet Metal Screw 8 8015020 10 Key Board 1 8015020 11 Key Board 1 8015021 Motor Top Cover 1 8015022 Rear Adjustment Base L 1 8015023 Rear Adj...

Page 25: ... 4 _Hex Head Bolt 1 8015056 3 8 7T_Nut 1 8015057 Wire Protective Rubber 1 8015059 Ø12 7 Ø26 2 0T_Flat Washer 2 8015060 1 4 80m m_Socket Head Cap Bolt 2 8015061 1 4 2 1 4 _Hex Head Bolt 1 8015062 3 8 3 4 _Hex Head Bolt 4 8015063 3 8 7T_Nyloc Nut 2 8015064 Ø10 2 0T_Split Washer 4 8015065 5 16 7T_Nyloc Nut 2 8015066 M8 12m m_Hex Head Bolt 2 8015067 Ø8 1 5T_Split Washer 2 8015068 Step Up Frame Pop Pin...

Page 26: ...y per unit 8015086 Ø5 25m m_Tapping Screw 1 8015087 5 16 1 2 _Button Head Socket Bolt 12 8015088 Ø8 Ø23 1 5T_Curved Washer 8 8015089 Ø4 45m m_Sheet Metal Screw 2 8015091 Ø3 10m m_Sheet Metal Screw 2 8015092 Ø10 Ø25 2 0T_Flat Washer 4 80150104 Combination M5 Allen Wrench Phillips Head Screw Driver 1 80150105 Lubricant 1 ...

Page 27: ...volves the stretching of muscles and tendons to maintain or increase suppleness and provides increased resistance to muscle injury or soreness Cardio Respiratory Endurance is the most essential component of physical fitness It is the efficient functioning of the heart and lungs Aerobic Fitness The largest amount of oxygen that you can use per minute during exercise is called your maximum oxygen up...

Page 28: ...be included in both your warm up and cool down and should be performed after 3 5 minutes of low intensity aerobic activity or callisthenic type exercise Warm Down or Cool Down This involves a gradual decrease in the intensity of the exercise session Following exercise a large supply of blood remains in the working muscles If it is not returned promptly o the central circulation pooling of blood ma...

Page 29: ...target is a guide not a rule a little above or below is just fine Two final comments 1 don t be concerned with day to day variations in your pulse rate being under pressure or not enough sleep can affect it 2 your pulse rate is a guide don t become a slave to it Endurance Circuit Training Cardiovascular endurance muscle strength flexibility and coordination are all necessary for maximum fitness Th...

Page 30: ...to cool Excessive clothing that causes you to perspire more than you normally would while exercising gives you no advantage The extra weight you lose is body fluid and will be replaced with the next glass of water you drink It is advisable to wear a pair of gym or running shoes or sneakers Breathing during Exercise Do not hold your breath while exercising Breathe normally as much as possible Remem...

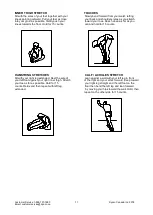
Page 31: ... right shoulder up toward your ear the stretch up the left side of your neck Next rotate for one count Then lift your left shoulder your head back for one count stretching your chin to up for one count as you lower your right the ceiling and letting your mouth open Rotate your shoulder head to the left for one count and finally drop your head to your chest for one count SIDE STRETCHES QUADRICEPS S...

Page 32: ... you knees towards the floor Hold for 15 counts can and hold for 15 counts HAMSTRING STRETCHES CALF ACHILLES STRETCH Sit with your right leg extended Rest the sole of Lean against a wall with your left leg in front your left foot against your right inner thigh Stretch of the right and your arms forward Keep toward your toe as far as possible Hold for 15 your right leg straight and the left foot on...

Page 33: ...ersons other than authorized Dyaco Canada Inc service companies use of parts other than original Dyaco Canada Inc parts or external causes such as corrosion discoloration of paint or plastic alterations modifications abuse misuse accident improper maintenance inadequate power supply or acts of God 4 Products with original serial numbers that have been removed or altered 5 Products that have been s...

Page 34: ...ation about our other brands and products manufactured and distributed by Dyaco Canada Inc www spiritfitnesscanada ca www dyaco ca www spiritfitnesscanada ca www dyaco ca www solefitness ca www dyaco ca www trainorsports ca www dyaco ca www xterrafitness ca www dyaco ca www dyaco ca www dyaco ca www dyaco ca www dyaco ca ...

Reviews: