background image


5


2


Getting Started 

Read this section to learn how to start using the camera. This 
section covers basic functions such as switching on, installing SD 
card, and charging the battery. See later chapters for advanced 
functions. 

2.1


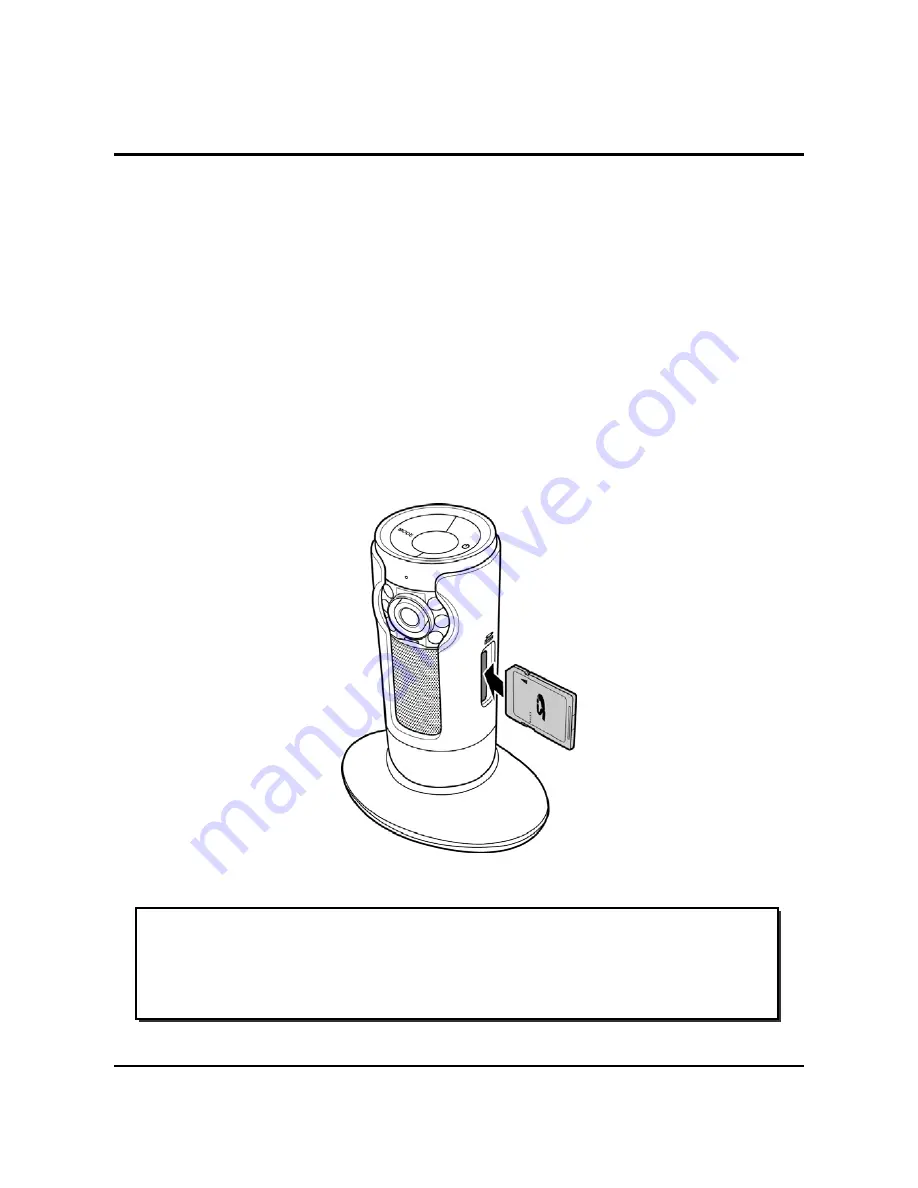
Installing the SD Card 

An SD card is required to capture photos and videos. The camera 
supports SDHC cards up to 32GB. 

1.


Insert the SD card into the card slot. Then, push the SD 
card until it clicks into place.   


z


Warning:


Do not remove the SD card while data is being recorded. 
Doing so may corrupt the saved data and damage the card.


Summary of Contents for See.ing SmartCam

Page 1: ...User s Manual SmartCam Video Monitoring ...

Page 2: ...or 4 1 3 3 Button Functions 4 2 Getting Started 5 2 1 Installing the SD Card 5 2 1 1 Removing the SD card 6 2 2 Connecting to Power 6 2 3 Preparing Devices 7 2 3 1 Configuring Your Network Connection 7 2 3 2 Installing SeeingCloud Application 7 2 3 3 Creating an Account 8 2 3 4 Registering the Camera 8 3 Using SeeingCloud App 11 3 1 Preview Videos 11 3 2 Adding New Camera 14 3 3 Viewing the Record...

Page 3: ...ii 3 4 Configuring Settings 16 3 4 1 General Settings 16 3 4 2 Camera Settings 18 Appendix 20 Specifications 20 FCC Statement 21 ...

Page 4: ...o guarantee is made regarding the accuracy of the contents The manufacturer reserves the right to change the contents technology and specifications without notice Copyright Copyright 2013 All rights reserved No part of this publication may be reproduced transmitted transcribed stored in a retrieval system or translated into any language or computer language in any form or by any means electronic m...

Page 5: ...airs High voltage internal components create the risk of electric shock when exposed Do not drop or knock the product Rough handling may damage the internal components Do not use harsh chemicals cleaning solvents or strong detergents to clean the product Wipe the product with a slightly damp soft cloth Do not remove the memory card while a video is being recorded Doing so will not only make storag...

Page 6: ...r tablet PC with the following specifications for remote preview and settings Internet access An internet connection WiFi 3G or 4G LTE is required to connect the application and camera and save the recorded files from the cameras to the cloud Android phones Operating system 4 0 or above CPU 1GHz Dual core iPhones iPod Touch Operating system iOS 5 x 6 x or above Models iPhone 4 4S 5 or above iPod T...

Page 7: ...npacking the SmartCam The following items should be present in the package If any item is missing or appears damaged contact your dealer immediately SmartCam USB Cable User Manual AC Adapter Quick Start Guide ...

Page 8: ...llowing illustrations to familiarize yourself with the buttons and controls of this camera 1 3 1 Camera Views Power Button Lens Mode Button IR LED slot Microphone UB Sticker Power Status LED Restart Button SD Card slot Speaker USB port DC IN ...

Page 9: ...is powering on Red Blinking Camera is at Setup mode Green Wi Fi is connected successfully Status LED Green Blinking Wi Fi is connecting 1 3 3 Button Functions Mode Button Press to switch to Setup mode to re configure camera s Wi Fi setting Press and hold for 5 seconds to reset the camera Power Button Press and hold for one second to turn the camera on or off ...

Page 10: ...ery See later chapters for advanced functions 2 1 Installing the SD Card An SD card is required to capture photos and videos The camera supports SDHC cards up to 32GB 1 Insert the SD card into the card slot Then push the SD card until it clicks into place z Warning Do not remove the SD card while data is being recorded Doing so may corrupt the saved data and damage the card ...

Page 11: ...2 Connecting to Power You can directly supply the power using the mini USB cable that came with the camera 1 Connect one end of the mini USB connector to the USB port of your camera 2 Connect the other end of the mini USB cable to the AC adapter 3 Plug the AC adapter to a wall outlet 4 The red LED turns on indicating the system is ready ...

Page 12: ...each other make sure your network connection is ready and your mobile device is connected to the Internet Turn on Wi Fi of your mobile device and connect to your local Wi Fi router 2 3 2 Installing SeeingCloud Application With SeeingCloud app you can use your mobile device to view the real time video and change the settings on the device Download and install SeeingCloud app from Play Store App Sto...

Page 13: ...g ID tap Sign up to create a new ID To create an account do the following 1 Launch SeeingCloud app 2 Tap Sign up 3 Enter your e mail address and password 4 Tap Sign up to complete the account registration 2 3 4 Registering the Camera To view the real time video you need to add a camera 1 Launch SeeingCloud app 2 Enter your e mail account and password 3 Tap Log in ...

Page 14: ...LED is On indicating the system is powered On and Wi Fi initialization is in progress Wait for 30 seconds until the red LED starts blinking indicating the Wi Fi connection is established and the SSID can be found on the list of network on your portable device 6 Select the camera from the list and tap Connect to network SEEING XXXXXXXX ...

Page 15: ...m the camera on your device 8 Tap Next again to choose another AP access point or router which your camera can access the Internet 9 Enter the password and tap Connect 10 Tap Next to continue 11 Tap Done Once the camera is successfully connected to Internet via a valid router you can monitor your home or office from anywhere at anytime ...

Page 16: ...Cloud App 3 1 Preview Videos After you have completed all cameras registration the Live screen appears The thumbnails will be refreshed every 10 seconds Camera name Live view Tap to add camera or access camera settings ...

Page 17: ... camera connection status Thumbnail Display Description Live view from the camera This camera is currently used by another mobile device Loading the live image from the camera This camera is currently not connected to the network or not powered on ...

Page 18: ...ull screen mode hold your mobile device sideways for better viewing On most Android phones press both Power and Volume Down buttons to capture a screenshot of the current screen On iPhones press both Power and Home buttons to capture a screenshot of the current screen ...

Page 19: ...14 3 2 Adding New Camera If have already have camera s under your account tap Add new camera to add a new camera Follow the on screen instruction to configure the new camera ...

Page 20: ...eli com do the following 1 Tap any thumbnail to view the live view in full screen 2 Tap Recorded files 3 Do the following To play a video tap the desired thumbnail To delete a video press and hold the thumbnail and tap Delete to delete the selected video Display recorded videos in Calendar view ...

Page 21: ... to configure your account settings recording mode and other general settings 3 4 1 General Settings 1 On the Main page tap Settings to enter the General Settings menu 2 Tap a menu option to open the respective menu 3 Modify the necessary settings ...

Page 22: ...n https www closeli com Change password Change the account password Receive Notification Check the box to receive a push notification when motion is detected Welcome Display a Help tutorial About Display the app version number Log out Log out of the current SeeingCloud account and return the log in page ...

Page 23: ... 4 2 Camera Settings 1 Tap any thumbnail to view the live view in full screen 2 Tap Settings to enter the Camera Settings menu 3 Tap a menu option to open the respective menu 4 Modify the necessary settings ...

Page 24: ...cation Change Wi Fi network Select your preferred network Wi Fi router for better internet connection Record to Select the recording destination Motion detection Check the box to allow the device to automatically record the video once motion is detected The system will upload the recorded video directly to https www closeli com Remove Camera Remove the camera from the camera list ...

Page 25: ...nsor sensitivity ISO Auto Lens F number 2 5 f 2 36mm View angle 128 Focus range 0 5m infinity Video resolution Video recording 720p 30fps Video streaming WVGA IR Night Vision Effective Range 3m Mode Auto White Balance Auto Wireless IEEE 802 11 b g n Dimensions 105 8 W x 138 7 H x 71 6 D mm Weight Approx 208 10g ...

Page 26: ...tes and can radiate radio frequency energy and if not installed and used in accordance with the instructions may cause harmful interference to radio or television reception which can be determined by turning the equipment on and off The user is encouraged to try to correct the interference by one or more of the following measures Reorient or relocate the receiving antenna Increase the separation b...

Page 27: ...Trademarks and licenses SDHC Logo is a trademark of SD 3C L ...

Reviews: