


16
English
•
Make a kerf in the blank, but do not cut it (the proce-
dure is described below).
• Turn on the kerf indicating laser (using on / off
switch
31
) - the laser beam should accurately point at
the kerf, otherwise - align the laser.
•
Loosen screws
49
.
• Move the body of kerf indicating laser
3
to theright and
left until the laser beam points accurately at the kerf.
•
Tighten screws
49
.
Initial operating
of the power tool
Always use the correct supply voltage: the power sup
-
ply voltage must match the information quoted on the
power tool identification plate.
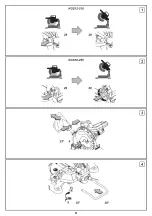
Switching the power
tool on / off
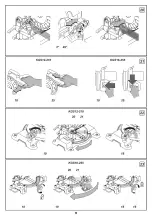
[KGS12-210]
Switching on:
Press blocking lever
10
with thumb of the right hand
(see fig. 21) - this will enable you to pull the power tool
body down. Press on / off switch
25
.
Switching off:
Release on / off switch
25
.
[KGS16-255]
Switching on:
Press blocking level
10
to the left with your right hand
(see fig. 21) - this will enable you to press on / off
switch
25
easily and pull the power tool body down.
Press on / off switch
25
.
Switching off:
Release on / off switch
25
.
Dust suction during
the power tool operation
Dust suction allows reducing dust concen-
tration in the air and prevents its accumula
-
tion at the workplace.While operating the
power tool, always use dust
bag
33
or a vacuum cleaner suitable for collecting pro
-
cess-generated dust. A special adapter is used to join
the vacuum cleaner to coupler
4
.
Recommendations
on the power tool operation
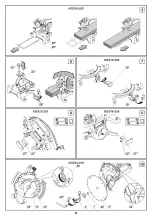
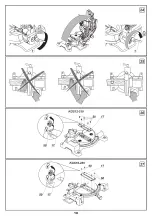
Alignment of the horizontal cutting angle (see
fig. 22-23)
[KGS12-210]
•
Loosen lock
19
(see fig. 22).
•
Set the cutting angle by turning the powertool body.
Indicator
20
shows the set cuttingangle on scale
21
.
•
Tighten lock
19
.
[KGS16-255]
•
Loosen lock
19
and press fixing lever
18
(see fig. 23).
• While pressing lever
18
, set the cutting angle by
turning table
16
by lock
19
. Indicator
20
shows the set
cutting angle on scale
21
.
• Release fixing lever
18
and tighten lock
19
.
You can preset the most frequent
angles (45°, 22.5°, 0°, etc.).
•
Loosen lock
19
and press fixing lever
18
.
• While pressing lever
18
, set the cutting angle by
turning table
16
by lock
19
. As soon as indicator
20
shows one of the frequent angles (45°, 22.5°, 0°, etc.)
on scale
21
- release fixing lever
18
, and the chosen
angle will be properly fixed, you do not have to tighten
lock
19
in this case.
Alignment of the vertical cutting angle (see
fig. 24)
• Loosen lock lever
1
.
•
Set the cutting angle by tilting the power tool body.
Indicator
48
shows the set cutting angle on scale
2
.
• Tighten lock lever
1
.
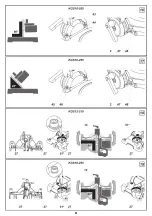
Cutting (see fig. 25)
•
Place the power tool on the worktable and prefer-
ably fix it with bolts or cramps.
• If the power tool is equipped with extension
brackets
26
, adjust their length depending on the
length of the processed blank.
• Set the desired cutting angles as described above.
Caution: if you are going to do the cut-ing with
body tilt and turn at the same time, first set the tilt
angle and then the turn angle.
•
Turn on the indicating laser, If your power tool is
equipped with a kerf indicating laser.
• Set the blank and fix it using cramp
22
.
•
Turn on the power tool, allow saw blade
5
to reach
the full rotation speed.
•
Smoothly pull the body down and make the cut.
While cutting, do not cross your hands and keep them
at a safe distance from saw blade
5
(see fig. 25).
•
Turn off the power tool and wait until saw blade
5
stops completely.
•
Lift the power tool body up smoothly.
Power tool maintenance /
preventive measures
Before carrying out any works on the power tool it
must be disconnected from the mains.
Replacement of the insert (see fig. 26-27)
•
Replace the worn or damaged insert
17
in due time.
•
Turn off screws
50
(see fig. 26-27).
•
Replace the worn insert
17
.
•
Tighten screws
50
.
Cleaning of the power tool
An indispensable condition for a safe long-term
exploitation of the power tool is to keep it clean.
Regularly flush the power tool with compressed air
thought the ventilation slots
23
.
After-sales Service and Application Service
Our after-sales service responds to your questions
concerning maintenance and repair of your product as
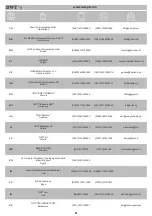
Summary of Contents for KGS12-210
Page 1: ......
Page 4: ...4 ...
Page 5: ...5 ...
Page 6: ...6 ...
Page 7: ...7 ...
Page 8: ...8 ...
Page 9: ...9 ...
Page 10: ...10 ...
Page 48: ...48 ...
Page 49: ...49 ...
Page 50: ...50 ...
Page 51: ...51 ...
Page 52: ...52 ...
Page 53: ...53 ...
Page 54: ...54 ...
Page 55: ...55 ...
Page 56: ...56 ...
Page 57: ...57 ...
Page 73: ...73 ...
Page 74: ...74 ...
Page 75: ......
Page 76: ...76 ...
Page 77: ...77 ...
Page 78: ...78 ...
Page 79: ...79 ...
Page 80: ......


