


21
English
•
Align the cutting edge of blade
23
along the lug of
blade alignment fixture
14
� Press the vertical part of
adjusting plate
21
to the vertical surface of blade align-
ment fixture
14
as shown in figure 8.2. Match the holes
in adjusting plate
21
with the holes in blade
23
mov-
ing adjusting plate
21
along blade alignment fixture
14
�
Tighten screws
22
�
If the length of blade 23 is not
sufficient for alignment due to multiple resharpen-
ing both blades 23 must be replaced.
•
Place blade
23
assembled with adjusting plate
21
on
drum
24
as shown in figure 8.3.
•
Place cover
20
and tighten bolts
19
using box
wrench
15
(see fig. 9).
•
Repeat the above operations for the second
blade
23
�
Sharpening of the resharpenable blades (see
fig. 8)
Always sharpen both blades 23 at the
same time and only using blade sharpen-
ing device 13, as this will ensure the right
sharpening angle.
•
Dismantle both blades
23
as described above�
•
Loosen winged nuts
29
and place both blades
23
into blade sharpening device
13
(see fig. 8.1). The
back parts of blades
23
must rest on stops of tem-
plate
26
�
•
Tighten winged nuts
29
� Heads of clamping bolts
25
and plate
27
shall securely fix both blades
23
pressing
them against template
26
to prevent their movement�
Cutting edges of blades
23
shall be located in same
plane (see fig. 8.1).
•
Sharpen both blades
23
at the wet hard-grained
grinding stone�
•
Finish both blades
23
at the wet fine-grained finish
-
ing grinding stone� It is also recommended to polish
cutting edge surfaces of blades
23
as this will ensure
best operational results�
•
Install both blades
23
as described above�
Replacement of driving belt (see fig. 10)
•
Unscrew housing screws
31
of protective casing
8
and remove it (see fig. 10).
•
Remove the worn driving belt
30
�
•
Clean the belt pulleys with a brush�
•
Place a new driving belt
30
onto the driving pulley
(smaller diameter) and than pull in on the driven pulley
(larger diameter) rotating drum�
•
Place protective casing
8
back and tighten
screws
31
�
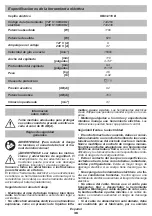
Cleaning of the power tool
An indispensable condition for a safe long-term exploi-
tation of the power tool is to keep it clean� Regularly
flush the power tool with compressed air thought the
ventilation slots
10
�
After-sales service and application service
Our after-sales service responds to your questions
concerning maintenance and repair of your product as
well as spare parts� Information about service centers,
parts diagrams and information about spare parts can
also be found under:
www.dwt-pt.com
�
•
Transportation
of the power tools
Categorically not to drop any mechanical impact on
the packaging during transport�
•
When unloading / loading is not allowed to use any
kind of technology that works on the principle of clamp-
ing packaging�
Environmental
protection
Recycle raw materials instead of dispos-
ing as waste.
Power tool, accessories and packaging
should be sorted for environment-friendly
recycling�
The plastic components are labelled for categorized
recycling�
These instructions are printed on recycled paper man-
ufactured without chlorine�
The manufacturer reserves the possibility to introduce changes.
Summary of Contents for HB03-110 B
Page 1: ......
Page 5: ...5 ...
Page 6: ...6 ...
Page 7: ...7 ...
Page 8: ...8 ...
Page 121: ...121 ...
Page 122: ...122 ...
Page 123: ...123 ...
Page 124: ...124 ...
Page 125: ...125 ...
Page 126: ...126 ...
Page 127: ...127 ...
Page 128: ......


