17
English
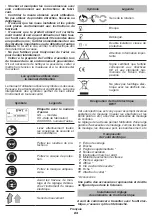
Symbol
Meaning
Movement direction�
Rotation direction�
Locked�
Unlocked�
Double insulation / protec-
tion class�
Attention� Important�
A sign certifying that the
product complies with es-
sential requirements of the
EU directives and harmo-
nized EU standards�
Do not dispose of the power
tool in a domestic waste
container�
DWT
power tool designation
This power tool is designed for conducting various
grinding operations (removal of burrs and sharp edges,
etc�) with corundum grinding attachments�
Speed adjustment enables use of a wide range of
grinding attachments, like grinding discs, polishing
discs, emery tapes, etc� Using additional attachments
and appliances widens the power tool application
area�
1
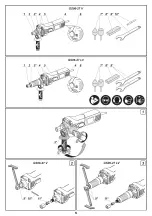
Power tool
components
Lock nut
2
Spindle
3
Auxiliary handle *
4
Ventilation slots
5
On / off switch
6
Speed selector thumbwheel
7
Grinding stone *
8
Honing stick *
9
Open spanner *
10
Pin *
11
Collet chuck *
* Optional extra
Not all of the accessories illustrated or described
are included as standard delivery.
Installation and regulation
of power tool elements
Before carrying out any works on the power tool it
must be disconnected from the mains.
Additional handle (see fig. 1)
Always use the additional handle
3
when operating�
Additional handle
3
may be positioned as deemed
comfortable by the user�
•
Loose additional handle
3
as shown in fig. 1.
•
Place additional handle
3
in desired position�
•
Tighten additional handle
3
as shown in fig. 1.
Mounting of the collet chuck (see fig. 2-3)
[GS06-27 V]
• After fixing spindle
2
with pin
10
(pin
10
is inserted
in a radial hole of spindle
2
), unscrew fixing nut
1
with
open spanner
9
(see fig. 2).
•
Insert collet clamp
11
into the hole of the power tool
spindle
2
�
• After fixing spindle
2
with pin
10
, tighten fixing nut
1
by hand without using open spanner
9
�
[GS06-27 LV]
•
While holding spindle
2
with open spanner
9
, un-
screw fixing nut
1
with another open spanner
9
(see
fig. 3).
•
Insert collet clamp
11
into the hole of the power tool
spindle
2
�
•
While holding spindle
2
with spanner
9
, tighten fixing
nut
1
by hand using no second open spanner
9
�
Grinding attachment installation / removal
Make sure the grinding attachment
shank diameter corresponds to the inner
diameter of collet clamp 11.
[GS06-27 V]
• After fixing spindle
2
with pin
10
(pin
10
is inserted
in a radial hole of spindle
2
), slacken fixing nut
1
with
open spanner
9
�
•
Insert the grinding attachment shank in collet
clamp
11
(when removing remove the grinding attach-
ment shank from collet clamp
11
)�
• After fixing spindle
2
with pin
10
tighten fixing nut
1
with open spanner
9
(when removing do not tighten
fixing nut
1
)�
[GS06-27 LV]
•
While holding spindle
2
with open spanner
9
,
slacken fixing nut
1
with another open spanner
9
�
•
Insert the grinding attachment shank in collet
clamp
11
(when removing remove the grinding attach-
ment shank from collet clamp
11
)�
Summary of Contents for GS06-27 LV
Page 1: ......
Page 5: ...5 ...
Page 120: ...120 ...
Page 121: ...121 ...
Page 122: ...122 ...
Page 123: ...123 ...
Page 124: ...124 ...
Page 125: ...125 ...
Page 126: ...126 ...
Page 127: ...127 ...
Page 128: ......

