16
English
•
Always feed the bit into the material in the
same direction as the cutting edge is exiting
from the material (which is the same direction
as the chips are thrown).
Feeding the tool in the
wrong direction causes the cutting edge of the bit to
climb out of the work and pull the tool in the direction
of this feed�
•
When using rotary files, cut-off wheels, high-
speed cutters or tungsten carbide cutters,
always have the work securely clamped.
These
wheels will grab if they become slightly canted in
the groove, and can kickback� When a cut-off wheel
grabs, the wheel itself usually breaks� When a rotary
file, high-speed cutter or tungsten carbide cutter
grabs, it may jump from the groove and you could
lose control of the tool�
Safety guidelines during
power tool operation
Safety warnings specific for grinding operations
•
Use only wheel types that are recommended
for your power tool and only for recommended
applications. For example: do not grind with the
side of a cut-off wheel.
Abrasive cut-off wheels are
intended for peripheral grinding, side forces applied to
these wheels may cause them to shatter�
•
For threaded abrasive cones and plugs use only
undamaged wheel mandrels with an unrelieved
shoulder flange that are of correct size and length.
Proper mandrels will reduce the possibility of breakage�
•
Do not "jam" a cut-off wheel or apply excessive
pressure. Do not attempt to make an excessive
depth of cut.
Overstressing the wheel increases the
loading and susceptibility to twisting or snagging of the
wheel in the cut and the possibility of kickback or wheel
breakage�
•
Do not position your hand in line with and
behind the rotating wheel.
When the wheel, at the
point of operation, is moving away from your hand, the
possible kickback may propel the spinning wheel and
the power tool directly at you�
•
When wheel is pinched, snagged or when
interrupting a cut for any reason, switch off the
power tool and hold the power tool motionless
until the wheel comes to a complete stop.
Never attempt to remove the cut-off wheel from
the cut while the wheel is in motion otherwise
kickback may occur.
Investigate and take corrective
action to eliminate the cause of wheel pinching or
snagging�
•
Do not restart the cutting operation in the
workpiece. Let the wheel reach full speed and
carefully re-enter the cut.
The wheel may bind, walk
up or kickback if the power tool is restarted in the
workpiece�
•
Support panels or any oversized workpiece to
minimize the risk of wheel pinching and kickback.
Large workpieces tend to sag under their own weight�
Supports must be placed under the workpiece near the
line of cut and near the edge of the workpiece on both
sides of the wheel�
•
Use extra caution when making a "pocket
cut" into existing walls or other blind areas.
The
protruding wheel may cut gas or water pipes, electrical
wiring or objects that can cause kickback�
Safety warnings specific for grinders
•
Check that speed marked on the wheel is equal
to or about of the rated speed of the grinder.
•
Ensure that the wheel dimensions are compat-
ible with the grinder.
•
Abrasive wheels shall be stored and handed
with care in accordance with manufacturer's in-
structions.
•
Inspect the grinding wheel before use, do not
use chipped, cracked or otherwise defective prod-
ucts.
•
Ensure that mounted wheels and points are fit-
ted in accordance with the manufacturer’s instruc-
tions.
•
Ensure that the abrasive product is correctly
mounted and tightened before use and run the tool
at no-load for 30's in a safe position, stop immedi-
ately if there are considerable vibrations or other
defects are detected.
If this condition occures, check
the power tool to determine the causation�
•
Do not use it cutting off steel for side grinding.
•
Ensure that ventilation opening clear when
working in dusty condition.
If it is necessary to clear
the dust make sure that the Switch off the grinder and
disconnect it away the power point�
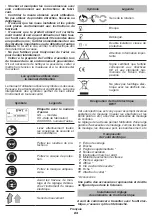
Symbols used in
the manual
Following symbols are used in the operation manual,
please remember their meanings� Correct interpretation
of the symbols will allow correct and safe use of the
power tool�
Symbol
Meaning
Serial number sticker:
GS ��� - model;
XX - date of manufacture;
XXXXXXX - serial number�
Read all safety regulations
and instructions�
Wear safety goggles�
Wear ear protectors�
Wear a dust mask�
Disconnect the power tool
from the mains before instal-
lation or adjustment�
Summary of Contents for GS06-27 LV
Page 1: ......
Page 5: ...5 ...
Page 120: ...120 ...
Page 121: ...121 ...
Page 122: ...122 ...
Page 123: ...123 ...
Page 124: ...124 ...
Page 125: ...125 ...
Page 126: ...126 ...
Page 127: ...127 ...
Page 128: ......

