www.SitePro.us.com
7
OPERATIONS
Set-up
Place the laser instrument on a flat, level survace such as a tripod Setup the instrument
in an area where it can not be obstructed and is set at a convenient height.
IMPORTANT. Be sure the surface is level with +/- 5° of the laser self-leveling range.
Power
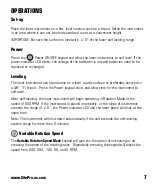
Press the
RPM
Scanning
Mode
Beam
Positioning
Manual
Mode
Variable
Speed
Smart
H.I.
Single
Slope
Dual
Slope
Power
WINDY
Power ON/OFF keypad and allow the laser instrument to self-level. If the
power indicator LED blinks, the voltage of the batteries is low and batteries need to be
replaced or recharged.
Leveling
The laser instrument can stand alone on a level, sturdy surface or preferably secured to
a 5⁄8” -11 tripod. Press the Power keypad once, and allow time for the instrument to
self-level.
After self-leveling, the laser instrument will begin operating in Rotation Mode at the
speed of 600 RPM. If the instrument is placed improperly, or the slope of instrument
exceeds the range of +/-5°, the Power indicator LED and the laser beam will blink at the
same time.
Note: The instrument will shut down automatically if the unit exceeds the self-leveling
system range for more then 5 minutes.
RPM
Scanning
Mode
Beam
Positioning
Manual
Mode
Variable
Speed
Smart
H.I.
Single
Slope
Dual
Slope
Power
WINDY
Variable Rotation Speed
The
Variable Rotation Speed Mode
keypad will give you the option of increasing or de-
creasing the speed of the rotating laser. Repeatedly pressing the keypad will adjust the
speed from 600, 300, 120, 60, and 0 RPM.


