background image

Setup - Event Setup


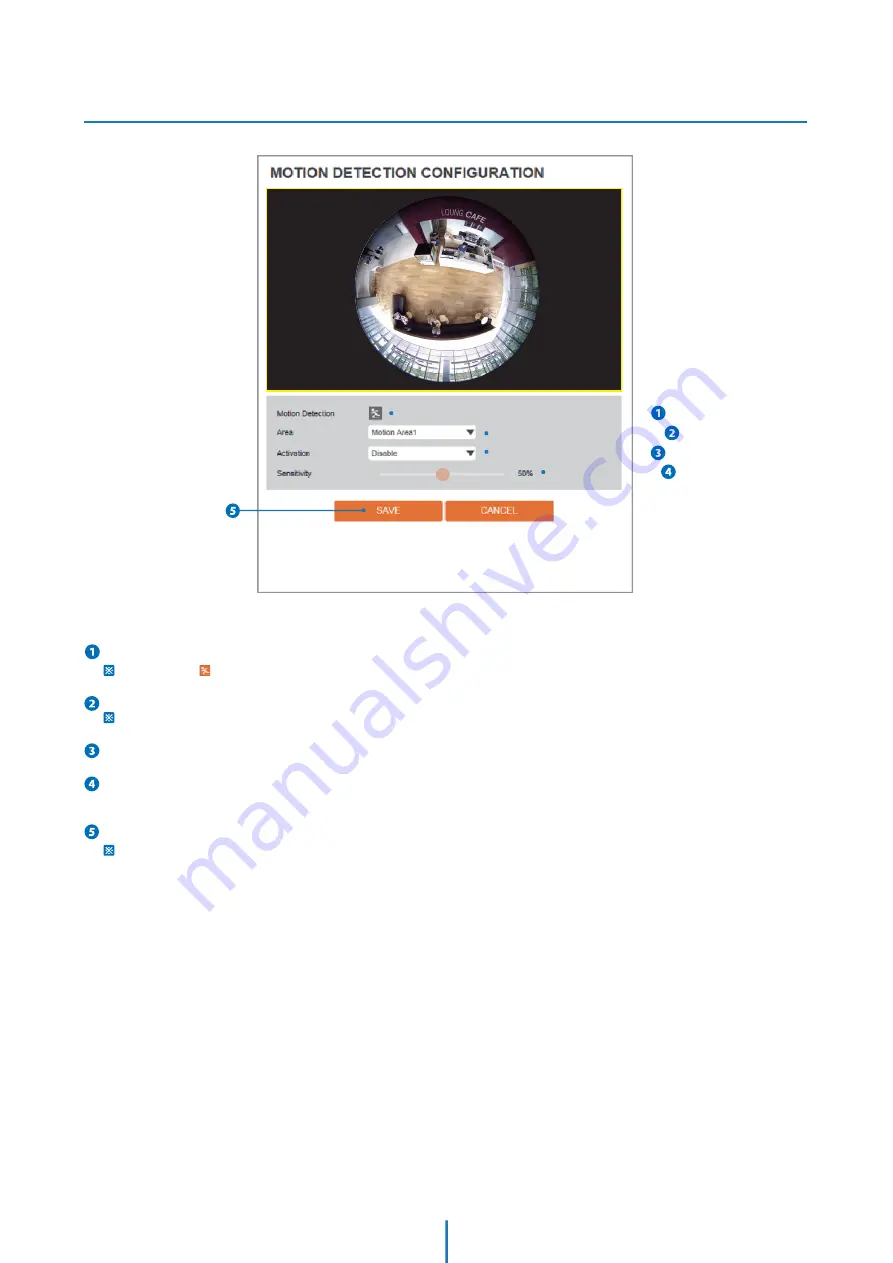
Motion Detection Configuration 

Motion Detection - 

It shows the Motion event status.


 Event Alert Icon(  ) appears if ‘Motion Detection’ is activated.


Area - 

Set the motion detected area.


You can set up to four areas.


Activation - 

Enable or Disable motion detection function.


Sensitivity - 

Define the sensitivity of motion detection. If High value is selected, it will detect very small motion while it becomes 

relatively insensitive when Low value is selected.


Click ‘Save’ to save the current settings.


Click 'Cancel' to return to the previous setting.


52

Summary of Contents for DWC-PVF5M1TIRC1

Page 1: ...g and using the camera please read this manual carefully Be sure to keep it handy for future reference MEGApix CaaSTM 5MP 180 360 fisheye view camera DWC PVF5M1TIRC6 64GB storage DWC PVF5M1TIRC1 128GB...

Page 2: ...era Doing so may cause personal injury due to fire electric shock or falling objects Do not install the unit in humid dusty or sooty locations Doing so may cause fire or electric shock If any unusual...

Page 3: ...undry tub in a wet basement near a swimming pool etc 6 Clean only with dry cloth Unplug this product from the wall outlet before cleaning Do not use liquid cleaners 7 Do not block any ventilation open...

Page 4: ...up Video Audio Region of Interest Configuration 28 Setup Video Audio Privacy Mask Configuration 29 Setup Camera Camera Image adjustment and Enhancement 30 35 Setup Network Settings 37 46 Setup Trigger...

Page 5: ...ries Introduction Screw Plastic Anchor 3pcs Camera Cables Quick Manual Template Sheet for Installing by Bolt Nut Mount Plate Template Sheet for Installing by Plate Mount Bolt Nut Torx Wrench Waterproo...

Page 6: ...Part Name Introduc on Mount Plate Plate Hook Waterproof cap RJ 45 Connector DC Power Jack Fisheye lens Dome Cover Window cover Reset bu on SD Card Illumina on Sensor Hall Illumina on Sensor 6...

Page 7: ...check whether the loca on can bear ve mes of the weight of your camera 3 When installing your camera don t allow any person to approach the installa on site If you have any valuable things under the...

Page 8: ...n the wall or ceiling Pull wires through and make connec ons 4 Using two 2 included screws mount and secure the camera to the moun ng surface Secure the camera s cover dome onto the camera base to com...

Page 9: ...holes in the wall or ceiling Pull wires through and make connec ons Using the three 3 included screws mount and secure the camera to the wall or ceiling 3 4 A ach the camera base to the metal mount b...

Page 10: ...ount Bolt Nut 1 Using the template sheet make and drill the cabling holes on the wall ceiling Secure the two long mounting screws to the camera s base Pass the wires through the mount bracket and make...

Page 11: ...oun ng surface by using the 2 moun ng nuts Rotate the locking discs over the screws un l the camera is held ghtly from the mount ing surface Secure the camera s cover dome onto the camera base to comp...

Page 12: ...Switch If a PoE enabled switch is not used use a power adaptor for power transmission and non PoE switch for data transmission Follow the illustrations below to connect the camera without a PoE enabl...

Page 13: ...deo audio and text data using digital devices Warning Do not remove the built in micro SD card which has been quali ed CAAS TM purpose Make sure check the built in micro SD card at the system before i...

Page 14: ...for all supported cameras and display the results in the tabel Allow up to 5 seconds for the IP Installer to find the camera on the network 4 You can press the Refresh List to search the network agai...

Page 15: ...install VLC to display live video 8 The IP setting can be set to STATIC at IP Installer or web viewer followed by Setup Network Network Settings 9 If the IP Camera is connected to a network which util...

Page 16: ...ur IP Video Server on our DDNS website before you con gure setup or install the IP Camera Even though your IP is not dynamic you will get bene t if you register to DDNS In this case just remember host...

Page 17: ...s received from your Internet Service Provider ISP You may need to refer to these IP addresses at a later time during the con guration Current TCP IP Settings IP Address Subnet Mask Default Gateway Pr...

Page 18: ...how to choose a unique IP and match your network read the FAQ The IP address you assign must be a private IP For information on how to choose a private IP please read the FAQ If you did not receive a...

Page 19: ...to acquire the IP address of their DNS server Case C Static Fixed IP Dedicated line directly to the IP Camera Camera Phone Line or CATV Cable xDSL Modem ISP Provided Internet This is the same site yo...

Page 20: ...r 50 seconds close the con guration screen The view will display Trying to Reconnect If the ACTIVE light on the IP Camera has gone o and is now back on again ashing the IP Camera has rebooted After th...

Page 21: ...Internet Explorer and specifying the IP address and Web Port assigned to the IP Camera 6 Access your IP Camera via the Internet If you use Case B C 1 Open Internet Explorer 2 Type the IP of the IP Cam...

Page 22: ...See the section Setup When the image goes unsmoothly because of bad network connection it stored image during setup time and shows the image on the live view screen User will see the delayed images as...

Page 23: ...XPOSURE DAY NIGHT BACKLIGHT WHITE BALANCE IMAGE VIDEO Network STATUS NETWORK SETTING AUTO IP ONVIF UPNP DDNS FTP SMTP SNMP RTSP INFORMATION Trigger Action ACTION RULES IMAGE TRANSFER Events EVENT RULE...

Page 24: ...alphabets are allowed Including space For the description English Alphabets numbers and special characters _ can beused Resolution Select the video resolution Available resolution can be depends on t...

Page 25: ...production and additional video compression Baseline A simple pro le with a low compression ratio The Baseline pro le supports I frames and P frames Main An intermediate pro le with a medium compressi...

Page 26: ...f video stream is changed in this mode Therefore the frame rate of video is likely to be varying when network tra c is changing This category won t be appear if you select the codec Target Bitrate If...

Page 27: ...tup Video Audio Setup OSD Configuration Date Time Display the current time User Text Output the TEXT entered by the user Support a maximum of 30 characters Click Apply to make above setting effective...

Page 28: ...ndicated area to improve picture qualities of movement scene at the same bandwidth Stream Select the Stream Currently it supports only Channel1 Activation The Region of interest can be enable or disab...

Page 29: ...to hide on screen to protect privacy Activation The Privacy mask function can be enable or disable Area Select the Area1 Area16 and Set the privacy area Click Save to save the current settings Click C...

Page 30: ...our preference Contrast Using this control contrast of image can be adjusted to meet your preference Saturation Using this control Saturation of image can be adjusted to meet your preference Hue Using...

Page 31: ...Shutter Speed If this speed is faster the moving object can be photographed without the ghost effect However picture can be dark if there is no sufficient lighting Slow Shutter Level Slow shutter Leve...

Page 32: ...itivity will be enhanced in the dark light condition but the image is black andwhite Schedule In this mode Day Night mode is converted accordance with the scheduled time Color Level It is a level to c...

Page 33: ...light conditions where the contrast from light to dark areas is very high BLC Back Light Compensation The BLC function can be enable or disable Click Save to save the current settings Click Cancel to...

Page 34: ...Balance Mode Select White Balance depending on the lighting conditions RGB Gain The R G B gain can be set only when the White Balance Mode is set to Manual Click Save to save the current settings Clic...

Page 35: ...uppress noise and retain good video quality in low light conditions Mirror Reverse the video from side to side Flip Reverse the video from up to down Click Save to save the current settings Click Canc...

Page 36: ...Video Enhancement Flicker This function Enable to enhance the icker situation Click Save to save the current settings Click Cancel to return to the previous setting Click Default to settings to the f...

Page 37: ...Setup Network Setup Network Status This menu will show you all the information of Network setting in the camera However you cannot change those here 37...

Page 38: ...he Subnet Mask Format is same as the IP address Default Gateway Default the Gateway IP Address Format is same as the IP address Preferred DNS Server De ne the DNS server IP address Format is same as t...

Page 39: ...k Setup Auto IP Settings General Setting Auto IP Settings function can be enable or disable Auto IP Settings Information It displays the unique id or Auto IP address Click Apply to make above setting...

Page 40: ...uthentication WS Usertoken Allows to access with WS User Token of ONVIF authentication WS Usertoken Digest Allows to access with WS User Token and Digest of ONVIF authentication Discovery Mode The dis...

Page 41: ...Setup Network Setup UPNP Settings General Setting UPNP function can be enable or disable Friendly Name Define the friendly name Click Apply to make above setting effective 41...

Page 42: ...setup is completed by entering User Name and Password registered in that DDNS site DDNS Provider Site Address DynDNS www dyndns com No IP www no ip com If you setup DDNS properly the IP address of you...

Page 43: ...path in FTP serverto store video Forthepath name English Alphabets numbers and special characters _ can be used FTP Port De ne the FTP Server Port If Port is not appropriate it is impossible to access...

Page 44: ...Fill out the correct User ID registered in the SMTP Server Password De ne the Password to access to SMTP Server Fill out the correct Password registered in the SMTP Server E Mail Sender De ne the e m...

Page 45: ...ead or Read Write mode Activation It can be enable or disable selected mode Read Write name De ne Read name and Write name Security Level Select one of no auth no priv auth no priv auth priv Authentic...

Page 46: ...RTP Multicast Check RTP Multicast On O To activate RTP Multicast 1 Click On button 2 Enter accessible RTP Multicast IP port for video stream control RTP packet TTL 3 Click Apply button It is possible...

Page 47: ...ion rules List It indicates the custom action rule information added to Action rules list Click Add to add custom action rules Click Modify to modify selected item from the action rules list Click Del...

Page 48: ...tion Setup Action Rules Add Modify Name Define name of action rules Action1 Action5 Select the action to take If the event occurs Click Save to save the current settings Click Cancel to return to the...

Page 49: ...by setting Image transfer rate and Pre Post alarm duration Descriptions Number of Image De ne Number of image transferred per second Pre alarm Duration Define duration of image transfer before an eve...

Page 50: ...Rules List It indicates the custom Event Rule information added to Event Rules list Click Add to add custom event rules Click Modify to modify selected item from the event rules list Click Delete to...

Page 51: ...ng motion detection network disconnection temperature critical Click Cancel to return to the previous setting You need a event one more Rules Select the action rule defined in the Trigger Action Actio...

Page 52: ...tion detected area You can set up to four areas Activation Enable or Disable motion detection function Sensitivity De ne the sensitivity of motion detection If High value is selected it will detect ve...

Page 53: ...Mode Select the either Fahrenheit and Celsius Threshold De ne the temperature at which the event trigger is occurred Temperature It indicates the current temperature of the IP camera Click Apply to m...

Page 54: ...ver file to update and upload Update with selected le If you select le it will be activated DW Spectrum edge media server start stop Start Start the DW Spectrum edge media server installed in the came...

Page 55: ...Setup Edge Setup Storage Configuration Display the SD card information mounted from device When you select the item in Storage list You can set the functions related to the SD card 55...

Page 56: ...ty of SD card and the remainder of it are displayed Unmount Remove the SD card from the device UNMOUNT cannot be done when EDGE Media server is running Format Delete the all contents that stored in SD...

Page 57: ...he recording IP filter type Click Apply to make above setting e ective Filter IP Address Display the filtered IP address IP Address Define the IP address you want to apply the IP filter Click Add to a...

Page 58: ...Setup Security Setup RTSP Authentication Configuration RTSP Authentication RTSP Authentication can be enable or disable Click Apply to make above setting effective 58...

Page 59: ...D5 It does not require a certificate on the client side TLS It relies on client side and server side certificates to performauthentication EAPOL Version Select the EAPOL Version ID Type the ID to iden...

Page 60: ...Select an installed certificate If you can not select a certi cate please install the certi cate from the Security Certi cates menu HTTPS connection Policy Select one of HTTP HTTPS HTTP and HTTPS dep...

Page 61: ...d certificate Delete Delete the selected certificate Create Certificate signing request This is the encoded data that contains the necessary information for issuing the certificate they must be lled i...

Page 62: ...e PKCS 12 PKCS 12 is cryptography standard if you want to install using PKCS 12 must enter the password Certi cate Name Enter a unique name to identify certi cate Select File Choose certi cation le OK...

Page 63: ...Setup Security Setup Service Con guration Telnet The Telnet function can be enable or disable Click Apply to make above setting e ective 63...

Page 64: ...Setup System Setup System Information System Capability information Device Name You can define the device name Click Apply to make above setting e ective 64...

Page 65: ...uploading will be displayed using Progress Bar If you assign the wrong le name an error massage will be shown Warning 1 Do not turn o the power of camera during the Firmware update Otherwise the syste...

Page 66: ...orrect User ID registered in the FTP Server Password De ne Password to access to the FTP Server Fill out the correct Password registered in the FTP Server FTP Upload Path De ne a path in FTP server to...

Page 67: ...m dd or mm dd yy Current Date Time Shows the current date and time setting in the Camera Synchronize with my computer Set the date time using those of PC currently connected Setup manually Set the dat...

Page 68: ...rator or Viewer Viewer Only monitoring is allowed Operator Most of the functions are allowed except Setup Administrator All functions are allowed The ID and Password are limited to 10 characters Click...

Page 69: ...tem Setup System Log Filter Select a date sort or type of log to lter the log Click the Refresh button to refresh the log list Click Filter to view the ltered log System Log List The ltered log is dis...

Page 70: ...factory defaults Return the setup to the factory default All Reset all Settings to the factory defaults Except Network Settings Except Network related settings reset all others to the factory default...

Page 71: ...Setup System Setup Restart If you click the RESTART menu a message box will be shown to con rm Click the OK button to restart 71...

Page 72: ...k and sharing center Manage network connections Select Internet Protocol Ver 4 TCP IPv4 Click Properties Properties Select Internet Protocol Ver 4 TCP IPv4 Click on Change adapter options in Ethernet...

Page 73: ...IP address Start Start Control Panel Network and sharing center Manage network connections Select Internet Protocol Ver 4 TCP IPv4 Click Properties Properties Select Internet Protocol Ver 4 TCP IPv4...

Page 74: ...f the time the cable s connection to the unit is causing this problem Try using a di erent network cable or crossover cable for PC connection only Try reinserting the cable if this still doesn t solve...

Page 75: ...Unit Inch mm Dimension Specifications 4 9 125mm 1 88 48mm 75...

Page 76: ...M EST A purchase receipt or other proof of the date of the original purchase is required before warranty service is rendered This warranty only covers failures due to defects in materials and workmans...

Page 77: ...not allow the exclusion or limitation of incidental or consequential damages or limitations on how long an implied warranty lasts so the above exclusions or limitations may not apply to you This warra...

Page 78: ...west coast office and warehouse MPPNGJFME WF FSSJUPT BMJGPSOJB 64 1 9 XXX JHJUBM 8BUDIEPH DPN UFDIOJDBMTVQQPSU EXDD UW 5FDIOJDBM 4VQQPSU 1 64 BOBEB 1 904 999 1309 OUFSOBUJPOBM SFODI BOBEJBO 5FDIOJDBM...

Reviews: