Step 1: Uncrate the Duster 3000 Downdraft
x
5HPRYHDOOWKHVFUHZVIURPWKHIURQWWZR´[´ZRRGHQVXSSRUWXSULJKWVDQG
wooden panels with a #2 Philips screwdriver or power tool.
x
5HPRYHWZR´[´ZRRGHQVXSSRUWXSULJKWV
.
x
Remove box with filters and roll the Duster 3000 Downdraft off the skid.
x
Remove the plastic bag.
x
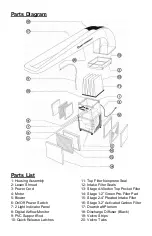
Remove gray PVC support from the rear of the Duster 3000 Downdraft and
insert into the support holder located in the center of the front panel.
Step 2: Install the Intake Filters
x
Remove the three intake filters from the box.
x
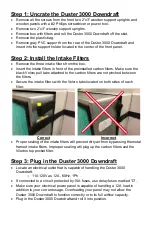
Insert the intake filters in front of the preinstalled carbon filters. Make sure the
black Velcro pull tabs attached to the carbon filters are not pinched between
the filters.
x
Secure the intake filters with the Velcro tabs located on both sides of each
filter.
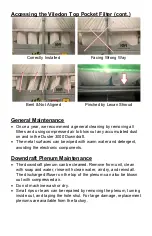
Correct
Incorrect
x
Proper sealing of the intake filters will prevent dirty air from bypassing the metal
framed intake filters. Improper sealing will plug up the carbon filters and the
Viledon top pocket filter.
Step 3: Plug in the Duster 3000 Downdraft
x
Locate an electrical outlet that is capable of handling the Duster 3000
Downdraft:
o
110-120Vac, 12A, 60Hz, 1Ph
x
,IFRQQHFWHGWRDFLUFXLWSURWHFWHGE\$IXVHVXVHGHOD\IXVHVPDUNHG³'´
x
Make sure your electrical power panel is capable of handling a 12A load in
addition to your current usage. Overloading your panel may not allow the
Duster 3000 Downdraft to function correctly or to its full airflow capacity.
x
Plug in the Duster 3000 Downdraft and roll it into position.


