Durr Dental VistaCam CL.iX Installation And Configuration Instructions Download Page 6

6  /  6

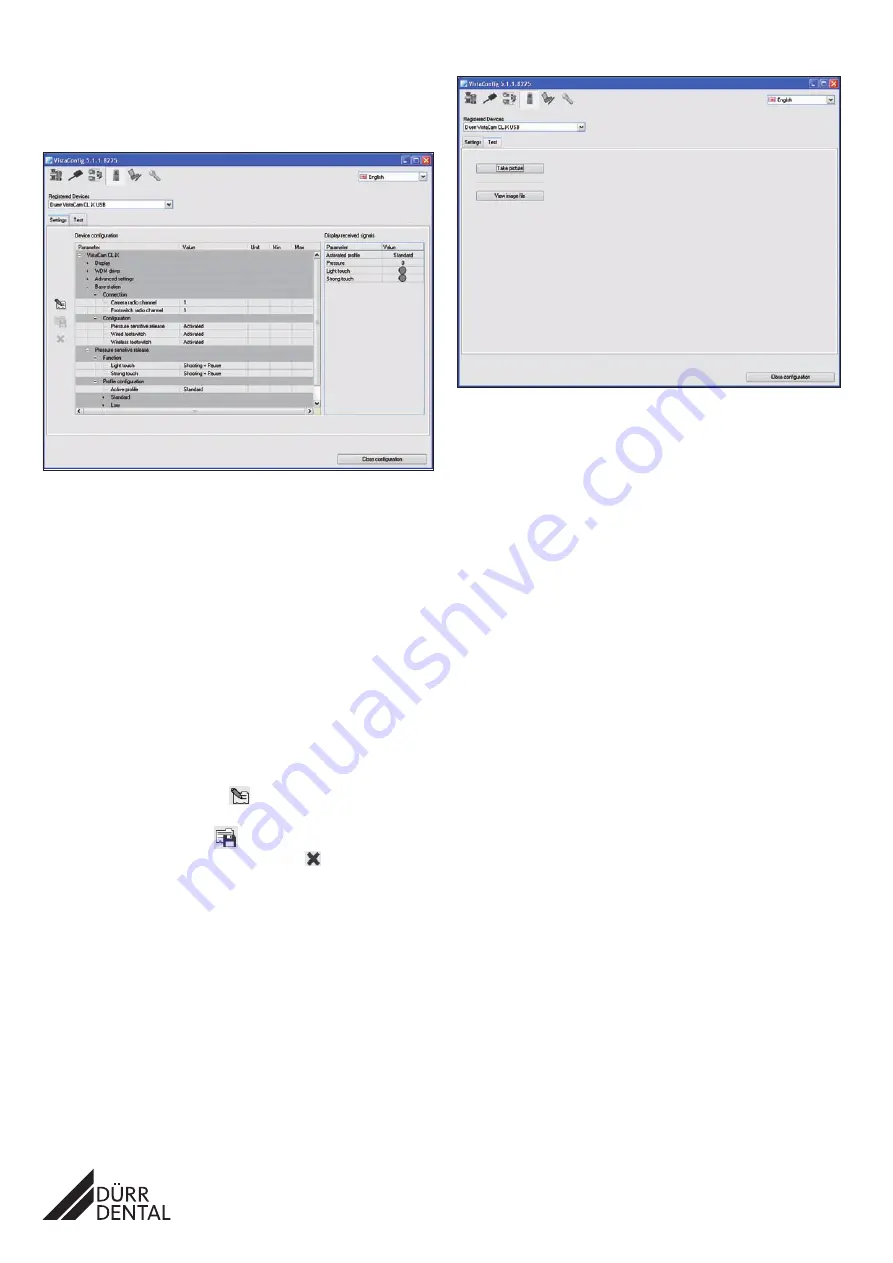
2.2  Setting up the configuration in VistaCamConfig

• Open VistaCamConfig by choosing 

Start > All Programs > Duerr Dental 

>  VistaCamConfig

The camera is automatically detected and activated. 

Changing settings

• Go to the "Settings" tab. 

Display

The best possible values are automatically entered 
here during the installation.

WDM driver

The best possible values are automatically entered 
here during the installation. 

Advanced settings

LED intensity 
configuration

Light intensity of LEDs, can not be altered for Vista-
Cam CL.iX

Basis station

Connection

Where more than one treatment unit (i.e. chair) is 
served or where radio transmission interference is 
experienced (e.g. from radio-operated foot pedal) 
then the channels for the camera and the see can 
be adjusted (see also VistaCam CL.iX Operating 
Instructions, 9000-618-115).

Configuration

Source os camera function activation

Manual  
operation

The manual release is factory set to standard values 
and can not be changed.

• To change the configuration, click 

.

• Change the settings. 

• To save the configuration, click 

• To cancel the changes to the configuration, click 

Testing the camera and configuration

• Go to the "Test" tab.

• Click "Take picture".  

VistaEasyView starts up. 

• Capture an image with the camera. 
• Close VistaEasyView. 
• To check the image file, click "View image file". 

Saving the configuration

• Click "Close configuration".  

The configuration is saved. The window closes. 

3  Electrical safety test

• Carry out an electrical safety test in accordance with national and local 

regulations (e.g. measure the leakage current for the patient). 

• Record the results. 

DÜRR DENTAL AG

Höpfigheimer Strasse 17 
74321 Bietigheim-Bissingen, Germany

2011/09/26

9000-618-123/01



Summary of Contents for VistaCam CL.iX

Page 1: ... mit OK bestätigen Der Installationsassistent Dürr Dental Treiber Setup startet Anweisungen des Installationsassistenten folgen Dabei die Kamera auf Anweisung mit dem Computer verbinden bzw Verbindung trennen 2 Konfiguration Die Konfiguration ist abhängig vom verwendeten Imaging Programm DBSWIN Siehe 2 1 Konfiguration in DBSWIN einstellen weitere Einstel lungen sind in VistaCamConfig möglich Vista...

Page 2: ...gisterkarte Videoquelle 2 vornehmen Registerkarte Videoquelle 1 oder Videoquelle 2 wählen Die Ansteuerungsart WDM wird automatisch ausgewählt Verwendete Halbbilder Beide Vollbild wählen WDM Treiber einstellen Registerkarte WDM wählen Der WDM Treiber Duerr VistaCam CL Imaging wird automatisch ausge wählt Rauschminderung aktivieren deaktiveren Wenn die Rauschminderung aktiviert ist werden bei jeder ...

Page 3: ...15 Konfiguration Quellen für Funktionsauslösung der Kamera Hand auslösung Die Handauslösung ist vom Werk aus auf Standard werte eingestellt und kann nicht verändert werden Um die Konfiguration zu ändern auf klicken Einstellungen ändern Um Konfiguration zu speichern auf klicken Um die Änderung der Konfiguration abzubrechen auf klicken Kamera und Konfiguration testen Registerkarte Testen wählen Auf ...

Page 4: ...al Driver Installation Confirm the message with OK The Dürr Dental Driver Setup installation wizard opens Follow the instructions of the installation wizard When the wizard asks you to connect or disconnect the camera to from the computer do so 2 Configuration The configuration differs depending on the imaging program used DBSWIN See 2 1 Setting up the configuration in DBSWIN additional settings c...

Page 5: ...ab If you are connecting up two cameras make the settings for the second camera on the Video source 2 tab Open the Video source 1 or Video source 2 tab The WDM driver is selected automatically In Use half frames select Both full frame Setting the WDM driver Go to the WDM tab The WDM driver Duerr VistaCam CL Imaging will automatically be selected Activate deactivate noise reduction If noise reducti...

Page 6: ...e can be adjusted see also VistaCam CL iX Operating Instructions 9000 618 115 Configuration Source os camera function activation Manual operation The manual release is factory set to standard values and can not be changed To change the configuration click Change the settings To save the configuration click To cancel the changes to the configuration click Testing the camera and configuration Go to ...

Reviews: