background image

Technical data

Operating Instructions 969 PURE - 00.0 - 04/2020

77

10 Technical data

10.1 Data and characteristic values

10.2 Requirements for fault-free operation

Compressed air quality must conform to ISO 8573-1: 2010 [7:4:4].

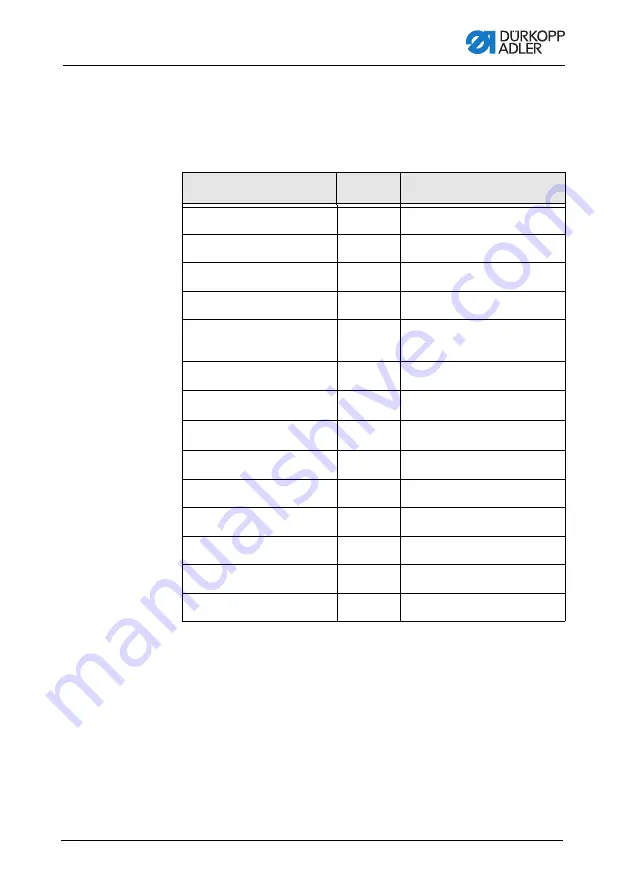
Technical data

Unit

969 PURE

Machine type

Lockstitch 301

Hook type

Barrel shuttle, XL large

Number of needles

1

Needle strength

[Nm]

140-280

Thread strength

[Nm]

43/3-5/3 (needle thread)

60/3-8/3 (hook thread)

Stitch length

[mm]

12/12

Speed maximum

[min

-1

]

800

Speed on delivery

[min

-1

]

800

Mains voltage

[V]

230

Mains frequency

[Hz]

50/60

Length

[mm]

700

Width

[mm]

250

Height

[mm]

420

Weight

[kg]

92

Summary of Contents for 969 PURE

Page 1: ...969 PURE Operating Instructions...

Page 2: ...er AG and protected by copyright Any reuse of these contents including extracts is prohibited without the prior written approval of D rkopp Adler AG Copyright D rkopp Adler AG 2020 IMPORTANT READ CARE...

Page 3: ...he machine 18 4 3 Inserting changing the needle 19 4 4 Threading the needle thread 21 4 5 Winding the hook thread 24 4 6 Changing the bobbin 26 4 7 Thread tension 28 4 7 1 Adjusting the needle thread...

Page 4: ...l 60 6 7 Inserting the machine head 61 6 8 Reel stand 64 6 8 1 Assembling the reel stand to the machine head 64 6 8 2 Assembling the reel stand at the tabletop 65 6 9 Electrical connection 66 6 10 Che...

Page 5: ...oftheproductandkeepiteasily accessible 1 1 For whom are these instructions intended These instructions are intended for Operators This group is familiar with the machine and has access to the instruct...

Page 6: ...ent Cover Specifies which covers must be disassembled in order to access the components to be set Steps to be performed when operating the machine sewing and equipping Steps to be performed for servic...

Page 7: ...rd symbols levels of danger and their signal words are described separately in the chapter Safety p 7 Location information If no other clear location information is used in a figure indications of rig...

Page 8: ...Unauthorized modifications to the machine Use of untrained personnel Use of unapproved parts Transport D rkopp Adler cannot be held liable for breakage and transport damages Inspect the delivery immed...

Page 9: ...tools Leaving the workstation Performing maintenance work and repairs Threading Missingorfaultypartscouldimpairsafetyanddamagethemachine Only use original parts from the manufacturer Transport Use a l...

Page 10: ...sor Do not use a damaged machine any further Safety equipment Safety equipment should not be disassembled or deactivated If it is essential to disassemble or deactivate safety equipment for a repair o...

Page 11: ...r to personnel CAUTION with hazard symbol If ignored moderate or minor injury can result CAUTION with hazard symbol If ignored environmental damage can result NOTICE without hazard symbol If ignored p...

Page 12: ...could result in serious or even fatal injury if ignored This is what a warning looks like for a hazard that could result in moderate or minor injury if the warning is ignored DANGER Type and source o...

Page 13: ...property damage if ignored This is what a warning looks like for a hazard that could result in environmental damage if ignored NOTICE Type and source of danger Consequences of non compliance Measures...

Page 14: ...Safety 12 Operating Instructions 969 PURE 00 0 04 2020...

Page 15: ...scription 3 1 Components of the machine Fig 1 Components of the machine 1 Hand lever 2 Adjusting wheel for sewing foot stroke 3 Adjusting wheel for sewing foot pressure 4 Winder 5 Sewing foot with nee...

Page 16: ...intended for industrial use The machine may only be set up and operated in dry conditions on well maintained premises If the machine is operated on premises that are not dry and well maintained then...

Page 17: ...ions 969 PURE 00 0 04 2020 15 3 3 Declaration of Conformity ThemachinecomplieswithEuropeanregulationsensuringhealth safety and environmental protection as specified in the declara tion of conformity o...

Page 18: ...Machine description 16 Operating Instructions 969 PURE 00 0 04 2020...

Page 19: ...eparing the machine for operation Complete the following steps in preparation of sewing before starting to work Inserting changing the needle Threading the needle thread Inserting and winding on the h...

Page 20: ...and off the machine Switching on the machine To switch on the machine 1 Turn the main switch 3 to the I position LEDs 1 and 2 illuminate Switching off the machine To switch off the machine 1 Turn the...

Page 21: ...and moving parts Puncture possible Switch off the machine before you insert or change the needle Do not reach into the needle tip NOTICE Property damage may occur There is a risk of machine damage ne...

Page 22: ...le Skip stitches After inserting a longer needle Damage to the hook tip Damage to the needle Skip stitches Fig 3 Inserting changing the needle To insert or change the needle 1 Turn the handwheel until...

Page 23: ...off the machine before threading the needle thread Do not reach into the needle tip NOTICE Property damage may occur An incorrect tube height setting may lead to tension deviations as a result of the...

Page 24: ...he slot in the holder of the pretension 2 5 Guide the thread clockwise around the pretension 2 6 Insert the thread from the front to the rear through the slot in the holder of the pretension 2 7 Inser...

Page 25: ...tom through guide 9 and guide 10 14 Feed the thread through the upper slot at the holder of the tension 11 15 Feed the thread counterclockwise around the tension 11 16 Insert the thread through the lo...

Page 26: ...rushing possible Switch off the machine before winding the hook thread Do not reach into the needle tip NOTICE Property damage may occur An incorrect tube height setting may lead to tension deviations...

Page 27: ...the tension 2 4 Insert the thread from the front to the rear through the slot in the holder of the tension 2 5 Insert the thread through the guide 3 6 Clamp the thread under the thread pulling knife 4...

Page 28: ...ng the bobbin 1 To change the bobbin 1 Switch off the machine 2 Slightly depress the hook cover 2 at the slot and push it to the right CAUTION Risk of injury from sharp and moving parts Puncture or cr...

Page 29: ...t Fig 10 Changing the bobbin 3 4 Remove the empty bobbin 8 5 Insert the full bobbin into the bobbin case 4 Make sure that the driver hole 9 is pointing to the bobbin case 6 Depress the bobbin case 4 u...

Page 30: ...ant Hold both threads in place when starting to sew for the first time 4 7 Thread tension Together with the hook thread tension the needle thread tension influences the final seam pattern With thin se...

Page 31: ...wheel clockwise To reduce the tension Turn the adjusting wheel counterclockwise Checking the needle thread tension To check the needle thread tension 1 Sew a seam and check the following Deviations re...

Page 32: ...needle thread pops out of the tensioning plate Additional tension The additional tension 1 increases the needle thread tension during sewing e g for thickened seams Proper setting The additional tensi...

Page 33: ...nsion NOTICE Property damage may occur If adjusted incorrectly the thread pulling direction can result in faulty tensioning results Be sure to pull the hook thread in the proper direction NOTICE Prope...

Page 34: ...2 has reached the position shown above 3 Pull the hook thread 3 off the bobbin Ensure that the hook thread is as shown above pulled off as close to the bobbin case 2 as possible 4 Turn the adjusting w...

Page 35: ...ension over the thickest point of the hook To adjust the needle thread regulator 1 Press the needle thread regulator 2 toward the opening 5 in opening direction 3 2 Adjust the needle thread regulator...

Page 36: ...al needle positioning Fig 15 Positioning the needle To position the needle manually 1 Use the hand lever 1 to lift the sewing feet and remove the existing sewing material 2 Turn the handwheel 3 until...

Page 37: ...cated by the scale on the handwheel and an arrow marking on the belt cover 2 4 9 Sewing feet CAUTION Risk of injury from moving parts Crushing possible Do not reach under the sewing feet NOTICE Proper...

Page 38: ...l Fig 16 Lifting the sewing feet with the pedal Lifting the sewing feet To lift the sewing feet 1 Press the pedal 1 The machine stops and lifts the sewing feet The sewing feet remain up as long as the...

Page 39: ...Lifting the sewing feet manually Lifting the sewing feet To lift the sewing feet 1 Turn the lever to position 1 2 The sewing feet are raised by 14 mm 2 Turn the lever to position 2 3 The sewing feet...

Page 40: ...y transported Disturbance Excessively high sewing foot pressure Tearing of the sewing material Sewing feet impressions on the sewing material Excessively low sewing foot pressure Slipping of the sewin...

Page 41: ...sufficient an auxiliary spring 3 can be used to increase the sewing foot pressure 1 Unscrew the adjusting wheel 1 2 Insert the auxiliary spring 3 3 Screwintheadjustingwheel 1 andadjustthedesiredsewing...

Page 42: ...transported with a consistent stitch length Disturbance Excessively high sewing foot stroke abrupt impact of the sewing feet increased noise level the machine is damaged by the excess stress Excessive...

Page 43: ...Adjusting the stitch length The stitch length can be adjusted continuously between 0 and 12 mm Fig 20 Adjusting the stitch length To adjust the stitch length 1 Turn the adjusting wheel Reduce stitch l...

Page 44: ...ons 969 PURE 00 0 04 2020 4 10 2 Sewing backwards Fig 21 Sewing backwards To sew backwards 1 Push the stitch regulator 1 down Reverse sewing will remain active for as long as the stitch regulator 1 is...

Page 45: ...with a swivel stand can be swiveled down making it possible to increase the space below the free arm Fig 22 Swiveling the tabletop down CAUTION Risk of injury from moving parts Crushing possible Switc...

Page 46: ...top is centered by pins and must be pulled off the pins before it can be swiveled 3 Loosen the split pin 2 and pull the swivel portion off the tabletop 1 Important Position the clamp 3 in such a way t...

Page 47: ...by qualified specialists Service Instructions Maintenance intervals WARNING Risk of injury from sharp parts Punctures and cutting possible Prior to any maintenance work switch off the machine or set...

Page 48: ...he compressed air gun so that the particles do not fly close to people Make sure no particles fly into the oil pan NOTICE Property damage from soiling Sewing dust and thread residues can impair the op...

Page 49: ...ad trimmer 2 Hook 4 Thread pulling knife 5 Area between throat plate and feed dog 3 To clean the machine 1 Switch off the machine 2 Disassemble the throat plate 3 3 Remove the plugs 6 and 7 4 Remove a...

Page 50: ...ury from contact with oil Oil can cause a rash if it comes into contact with skin Avoid skin contact with oil If oil has come into contact with your skin wash the affected areas thoroughly NOTICE Prop...

Page 51: ...oil level must not rise above the maximum level marking 2 or drop below the minimum level marking 3 To top off the oil 1 Switch off the machine 2 Fill oil through the oil filler opening 1 no higher th...

Page 52: ...Maintenance 50 Operating Instructions 969 PURE 00 0 04 2020 5 3 Parts list A parts list can be ordered from D rkopp Adler Or visit our website for further information at www duerkopp adler com...

Page 53: ...the machine head Lashing straps and wooden blocks from the table Lashing straps and wooden blocks from the stand Supporting wedges between machine arm and throat plate WARNING Risk of injury from cut...

Page 54: ...mbling the standard stand Fig 25 Assembling the standard stand To assemble the standard stand 1 Screw the cross member 2 to the stand bars 7 2 Screw the oil can holder 6 to the stand bar 7 3 Screw the...

Page 55: ...tand 1 Screw the side panels 13 to the rear panel 1 and the cross member 8 2 Screw the bolted parts to the left side panel 7 and the cross member 5 3 Tighten the head section 15 1 Rear panel 2 Swiveli...

Page 56: ...older 2 6 Tighten the hinge 6 7 Tighten the setpoint device holder 9 8 Rotate the stand and tighten the cross member 10 to the outer side panels Important Turn the feet 12 so that the stand has even c...

Page 57: ...p To complete the standard tabletop 1 Turn the tabletop over so that the underside is facing up 2 Assemble all components to the underside of the tabletop as shown above 3 Secure all components using...

Page 58: ...the tabletop over so that the underside is facing up 2 Assemble all components to the underside of the tabletop as shown above 3 Tighten the stop 3 4 Attach the oil can holder 4 5 Secure the connecti...

Page 59: ...he stand 2 on the tabletop as shown above 2 Screw the stand 2 into the previously drilled holes 3 Screw the foot button 1 in as close to the left bar of the stand s cross member as possible 4 Press th...

Page 60: ...les 2 are aligned with the tabletop 2 Tighten the foot button 8 as close to the left side panel 4 as possible 3 Press the lugs at the end of the pull rod 6 onto the round pin of the setpoint device 5...

Page 61: ...rom moving parts The tabletop can sink under its own weight when the screws on the stand bars are loosened Crushing possible Ensure that your hands are not jammed when loosening the screws CAUTION Ris...

Page 62: ...l 3 Tighten the screws 2 6 6 Adjusting the pedal Fig 32 Adjusting the pedal To adjust the pedal 1 Adjust the pedal 3 so that it is centered relative to the axis of the needle 2 Adjust the connecting p...

Page 63: ...m moving parts Crushing possible Ensure that your hands are not jammed when inserting the machine head NOTICE Property damage may occur Possible damage to the machine head from impact with the tableto...

Page 64: ...Setup 62 Operating Instructions 969 PURE 00 0 04 2020 Fig 33 Inserting the machine head 1 standard tabletop 1 Eye bolt 2 Machine head 3 Tabletop 4 Screws 5 Oil hose with attachment 6 Fiber washer...

Page 65: ...the eye bolt 1 into the machine head 2 2 Use a crane to lift the machine head 3 Insert the oil hose with attachment 5 and the fiber washer 6 4 Place the machine head 2 onto the tabletop and attach it...

Page 66: ...he reel stand to the machine head To assemble the reel stand to the machine head 1 Tighten the reel stand holder 3 to the machine head 6 using screws 5 2 Fit the reel stand arm 7 to the reel stand hol...

Page 67: ...ng the reel stand at the tabletop Fig 36 Assembling the reel stand at the tabletop To assemble the reel stand at the tabletop 1 Assemble the reel stand 1 2 Insert the reel stand 1 into the hole in the...

Page 68: ...he control as follows Insert the plug of all cables into the sockets on the back of the control Connect the equipotential bonding Use the power cable to connect the control to the mains grid Fig 37 Co...

Page 69: ...10 Checking the lubrication All wicks and felt bits of the machine head are soaked in oil at the factory The oil is conveyed to the reservoir during use This is why you should avoid filling too much o...

Page 70: ...Setup 68 Operating Instructions 969 PURE 00 0 04 2020...

Page 71: ...rom soiling 6 Cover the control to protect it from soiling 7 Cover the entire machine if possible to protect it from contam ination and damage WARNING Risk of injury from a lack of care Serious injuri...

Page 72: ...Decommissioning 70 Operating Instructions 969 PURE 00 0 04 2020...

Page 73: ...able national regulations When disposing of the machine be aware that it consists of a range of different materials steel plastic electronic components etc Follow the national regulations when disposi...

Page 74: ...Disposal 72 Operating Instructions 969 PURE 00 0 04 2020...

Page 75: ...73 9 Troubleshooting 9 1 Customer Service Contact for repairs and issues with the machine D rkopp Adler AG Potsdamer Str 190 33719 Bielefeld Germany Tel 49 0 180 5 383 756 Fax 49 0 521 925 2594 Email...

Page 76: ...and hook thread have not been threaded correctly Check threading path Needle is bent or sharp edged Replace needle Needle is not inserted correctly into the needle bar Insert the needle correctly into...

Page 77: ...assembly of the reel stand Thread tensions are too tight Check thread tensions Throat plate hook or spread have been damaged by the needle Have parts reworked by qualified specialists Loose stitches...

Page 78: ...Troubleshooting 76 Operating Instructions 969 PURE 00 0 04 2020...

Page 79: ...ISO 8573 1 2010 7 4 4 Technical data Unit 969 PURE Machine type Lockstitch 301 Hook type Barrel shuttle XL large Number of needles 1 Needle strength Nm 140 280 Thread strength Nm 43 3 5 3 needle thre...

Page 80: ...Technical data 78 Operating Instructions 969 PURE 00 0 04 2020...

Page 81: ...Appendix Operating Instructions 969 PURE 00 0 04 2020 79 11 Appendix 11 1 Tabletop drawings Fig 38 Fixed tabletop with slot...

Page 82: ...Appendix 80 Operating Instructions 969 PURE 00 0 04 2020 Fig 39 Fixed tabletop without slot...

Page 83: ...Appendix Operating Instructions 969 PURE 00 0 04 2020 81 Fig 40 Swiveling tabletop...

Page 84: ...Appendix 82 Operating Instructions 969 PURE 00 0 04 2020 11 2 Components on the underside of the tabletop Fig 41 Fixed tabletop with or without slot...

Page 85: ...Appendix Operating Instructions 969 PURE 00 0 04 2020 83 Fig 42 Swiveling tabletop...

Page 86: ...according to walking foot stroke 11 4 Stroke limits of the walking foot according to material Walking foot stroke mm Maximum revolutions of the machine 1 min 2 7 1250 7 9 1100 9 11 900 11 12 700 Sewi...

Page 87: ......

Page 88: ...Germany Phone 49 0 521 925 00 Email service duerkopp adler com www duerkopp adler com Subject to design changes Part of the machines shown with additional equipment Printed in Germany D rkopp Adler AG...

Reviews: